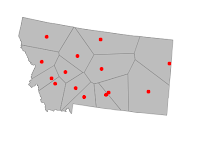
 A GIS software such as gvSIG can help marketers to create polygons representing regional areas of coverage for their companies' branch offices if none are available. All that is required are the points representing the offices and perhaps a polygon representing the overall area of coverage e.g. the State boundary.
The basic steps to create the regional areas are simply the following:
- Generate Voronoi or Thiessen polygons from the points
- Mask away the extra parts of the Voronoi polygons from the area of coverage polygon
For a detailed explanation of Voronoi or Thiessen polygons, visit the Wikipedia site http://en.wikipedia.org/wiki/Voronoi_diagram.
The example below illustrates how to generate the Voronoi polygons of cities in the state of Montana.
- Start gvSIG OADE. Load and display the cities and the state boundary polygon in a map view.

- Select View | Geoprocessing tools.
The Geoprocessing tools dialog box appears.
- Expand the Geoprocessing tools | Analysis | Computational geometry nodes. Double click Voronoi/Delaunay.
The Analysis tools dialog box appears.
- In the Input layer field, choose the points layer e.g. cities_in_montana.shp.
- Toggle on Voronoi(Thiessen) polygons.
- In the Output layer field, click Choose. In the Save dialog, type in the output layer name e.g. c:\temp\voronoi.shp. Click Save. Click OK.
The polygons are generated.
- If the Geoprocessing tools dialog box is closed, select View | Geoprocessing tools.

- Expand the Geoprocessing tools | Analysis | Overlay nodes. Double click on Intersection.
The Analysis tools dialog box appears.
- In the Input layer field, choose the newly created Voronoi polygons layer e.g. voronoi.shp.
- In the Overlay layer field, choose the overall area of coverage polygon layer e.g. montana.shp.
- In the Output layer field, click Choose. In the Save dialog box, type in the output layer name e.g. c:\temp\cities_coverage_pol.shp. Click Save.
- Click Ok.
The final regional area polygons are created and nicely masked.

No comments:
Post a Comment