I wanted to run Ubuntu on an Arm64/Aarch64 virtual machine on a host Intel Linux computer for the longest time for compiling binaries for Raspberry Pis and other SBC boards. I finally figured out how to do it with virt-manager, and it is quite simple as clicking and selecting options on the virt-manager graphical user interface. The instructions below show how it is done.
Download and install prerequisites
- In Ubuntu, open up a Terminal and enter the following commands to install the prerequisite software.
$ sudo apt install qemu-kvm \
libvirt-daemon-system \
libvirt-clients \
bridge-utils \
virt-manager \
qemu-system-arm \
qemu-efi-aarch64 \
qemu-utils
- Open up an Internet browser. Download an Ubuntu Arm64 image to install. For example: https://cdimage.ubuntu.com/releases/22.04/release/ubuntu-22.04.2-live-server-arm64.iso
Create the virtual machine
- In Ubuntu, click the Virtual Machine Manager icon.
The Virtual Machine Manager application appears.
- Select File | Create New Virtual Machine.
The New VM dialog box pops up.
- Choose Local install media (ISO image or CDROM).
- In the Architecture options, choose aarch64 architecture. Click Forward.
Step 2 of 5 pages appears. - In the Choose ISO or CDROM install media field, choose the iso image downloaded previously.

- Click Forward. If necessary, change the memory size and the number of CPUs.
Step 3 of 5 pages appear.
- Click Forward. If necessary, change the disk image size to a suitable size.
Step 4 of 5 appears.
- Click Forward.
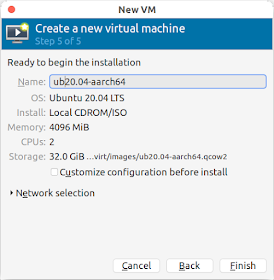
Step 5 of 5 appears.
- Optional. In the Name field, type in a desired name.
- Toggle On the Customize configuration before install field.

- Click Finish.
The 'vm name' on QEMU/KVM dialog box appears.
- In the Hypervisor Details group, change the Firmware to UEFI aarch64.
- Click Apply. Then click the Begin Installation button and follow the prompts to complete the installation.
The installation begins...

No comments:
Post a Comment