Wednesday, November 26, 2008

Calculating Polygon Centroids in GeoMedia

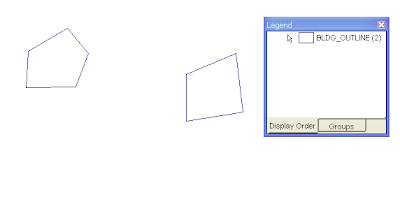
GeoMedia's Functional Attributes or Update Attributes commands can be used to calculate the centroid of polygon geometries. For instance, in the screen shot below, I have two polygon geometries that I want to calculate the centroid coordinates and I want to store the values as database attributes associated with the geometries.


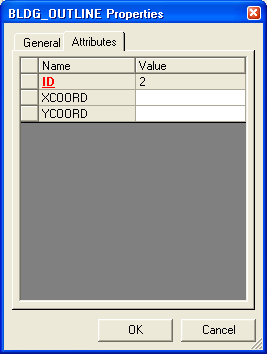
At the moment, the polygon geometries' database attributes are blank as shown below.

The steps are as follows:
  1. In GeoMedia, select Edit > Attribute > Update Attributes.

    The Update Attributes dialog box appears.

  2. In the Update features in box, expand your read/write connection node and select the polygon feature you want to update e.g. BLDG_OUTLINE.

    The Update Attributes dialog box may look like this.


  3. Click the cursor on the attribute field you want to update with the polygon geometries' centroid X coordinate e.g. XCOORD.

  4. Click Expression.

    The Expression dialog box appears.

  5. In the Expression field, type in the following string:
    X(CENTERPOINT(Input.Geometry), Constant.ProjectedMeas, Constant.METER))

    Note: Replace Input.Geometry with the name of your geometry field. The RefSpace argument can be either Constant.ProjectedMeas or Constant.TrueMeas. The UnitOfMeasure argument can be angular units (if Constant.TrueMeas is used) or linear units like Constant.METER, Constant.INCH, etc.

    The Expression dialog box may look like this.


  6. Click OK.

  7. Repeat the steps 3 to 7 for the Y coord field. The expression string for the Y coord may look like this:

    Y(CENTERPOINT(Input.Geometry), Constant.ProjectedMeas, Constant.METER))

    At the end, the Update Attributes dialog box may look like this.


  8. Click Apply.

    The centroids of the polygon geometries are calculated and updated into the attribute fields.

  9. Click Close.

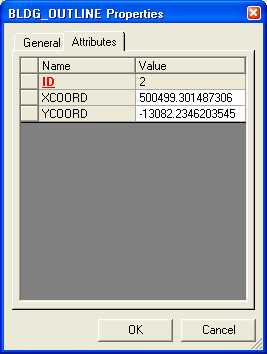
If you review the attributes of the polygon geometries, you may see the following. Note that the XCOORD and YCOORD fields have been updated with the calculated centroid coordinates.

Monday, November 10, 2008

Use Google Maps to create Pin Maps

Prior to Google Maps, either you use a paper map and stick some pins on it to mark locations or you could buy some mapping software like MapInfo, ArcView to do the job; on top of that you had to buy some map data from somebody and that could burn a big hole in your pocket. But Google Maps provide you with some decent pin mapping capabilities for free with reasonable looking maps.
  1. To start, open up your favorite browser and go to http://maps.google.com. You should click on the My Maps link.

    You should see a page like this.


  2. Click Create new map.

  3. If you like, in the Title field type in a meaningful map title, e.g. PinMap, and a description.


    Note: Toggle Unlisted on if you do not want to share the map to everybody.

  4. In the Google Map canvas, navigate to the location you want to place a pin.

    Note: You can use the Search Maps function to locate places by street address if you wish. For example, I can type in '38 Jalan Ikan Merah, Singapore' in the search entry field and click the button as shown below.


    The geocoded location is displayed.


  5. Click the Add a Placemark button at the top of the map canvas (the icon that looks like a reverse tear drop).

    The cursor becomes to a cross hair marker and you are prompted to "click to place me on the map".


  6. Click a point on the map canvas.

    The Info balloon pops up.


  7. In the Title field, type in a meaningful name, e.g. Pin1 and enter a description if necessary. Note that you can change the icon from the default if you wish here.

  8. Click OK.

  9. Repeat steps 4-8 to place more pins.

  10. When all pins have been placed, the page may look like this.


  11. That's it, you're done. You can create and display more than one layers of pins if you wish. If you made a mistake, simply click on the pin and choose Delete to remove the pin.

Friday, November 7, 2008

R.S.O. Borneo (M) Projection Conversion Calculator

This online geographic calculator is useful to convert between Lat/Lon coordinates and Timbalai 1948/Rectified Skewed Orthomorphic Borneo (m) grid coordinates. Note: A new and better version of this calculator is available on this blog at http://dominoc925.blogspot.com/p/rso-borneo-m-projection-coordinates.html

To convert lat/lon coordinates to easting/northing coordinates, simply type in the lat/lon coordinates below and click
Convert to Easting, Northing.

Lat (d:m:s):

Lon (d:m:s):


To convert easting/northing coordinates to lat/lon coordinates, type in the easting/northing values below and click Convert to Latitude, Longitude.
Easting (m) :

Northing (m):


Equations for the coordinate conversions are from this site.

Tuesday, November 4, 2008

Creating your own toolbar in GeoMedia

You can create your own toolbar in GeoMedia. In fact, it is even necessary to create your own toolbar sometimes - for instance, when debugging your custom command there is a useful Unload Command that you can use to unload your custom command from the GeoMedia application process so that you can recompile and overwrite your dll. This command is not exposed out on the GeoMedia menus or toolbars.

Here are the steps to create your own toolbar.
  1. Open up a workspace in GeoMedia.
  2. Select Tools > Customize.

    The Customize dialog box appears.

  3. In the Categories list box, click on a category, e.g. Development Tools.

    The icons for the selected category appear in the Buttons group box.


  4. In the Buttons group box, click and drag out a command icon as shown in the figure below.


  5. Repeat steps 3 to 4 for additional command buttons you want to add to your toolbar. The additional buttons will have to be dropped onto your toolbar as shown in the figure below.


  6. When you are done adding, click Close to exit.
Removing Buttons from your toolbar

Sometimes you want to remove a few buttons or even remove the toolbar entirely. Here are the steps to do that.
  1. On the keyboard, press the ALT key and hold it down.
  2. With the mouse, left click on the button you want to remove and drag out from the toolbar as shown in the figure below.


    The resultant toolbar looks like this.