For some Sony camera models e.g. the Sony Alpha-A7R III, gphoto2 will not be able to connect and/or trigger an image capture after a Linux computer system restart with the camera powered on. This issue is described in more detail at the gphoto2 github repository https://github.com/gphoto/gphoto2/issues/279 but it is currently unresolved.
gphoto2 will be able to work again with the Sony camera if you physically extract out and plug in the USB cable again. But I wanted to do it programmatically. I found this great utility uhubctl at https://github.com/mvp/uhubctl that I can use with a supported smart USB hub to switch a USB port power off and on. You need to connect the Sony camera to the USB hub, and the hub to a Linux PC, Ubuntu in my case.
In this post, I describe the steps I use to setup and programmatically switch the power to the USB port of the hub connecting to the camera (using a Canon for illustration as I don't have a Sony on hand).
Install uhubctl
- On the Linux PC, open up a Terminal and install uhubctl.
$ sudo apt install uhubctl
Identify the USB hub's vendor id and product id
- In a Terminal, type in the following command:
$ lsusb
A list of usb devices is shown. - Note down the vendor id and product id of the smart USB hub.
05e3:0610 is identified as the vendor id and product id of the USB hub.

Identify the port number of the USB hub that is connected to the camera
- In a Terminal, type in the following command:
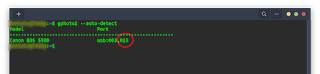
$ sudo uhubctl
A listing of hubs and ports is displayed. - First, look for the smart hub with the previously noted vendor id and product id, e.g. 05e3:0610.
- Then under the selected hub, identify the port with the Sony(Canon) camera connected.
Port number 1 is identified.

Switch off the port to the camera
- In a Terminal, type in the following command to switch off the USB port of the camera:
$ sudo uhubctl -n 05e3:0610 -p 1 -a 0
where -n 05e3:0610 is the vendor id and product id of the USB hub,
-p 1 is the port number of the camera
-a 0 is to power off

Switch on the port to the camera
- In a Terminal, type in the following command to switch on the port to the camera:
$ sudo uhubctl -n 05e3:0610 -p 1 -a 1
where -n 05e3:0610 is the vendor id and product id of the USB hub
-p 1 is the port number of the camera
-a 1 is to power on

Use gphoto2
From this point on, the Sony camera should be functional again from gphoto2.