Monday, January 28, 2013

Connect an Android HP Touchpad to Windows XP via USB

I had some problems getting my Eclipse development environment on Windows XP to recognize an HP Touchpad tablet installed with CyanogenMod 7 (an independent Android OS distribution). I searched the net for a while but could not find a single solution that could fix my problem. In the end, I went on a hunch and resolved the issue. The following steps were what I did.

Reinstall the Mass Storage Device Driver
This section is optional. In my case, I had a previous tablet driver which recognizes the HP Touchpad as a mass storage device only (but not the Eclipse Android SDK). If you don't see the Android Device node in the Device Manager when the tablet is plugged in, then you should do this. Otherwise, skip to the next section.

  1. Select the Start button. Right click on My Computer and choose Manage.

    The Computer Management console appears.
  2. Expand the Universal Serial Bus Controllers node.


  3. Right click on USB Mass Storage Device.
  4. Choose Uninstall.
  5. Select Action | Scan for hardware changes. Reinstall the driver. 


Get the Hardware Ids of the tablet

  1. Physically connect the HP Touchpad to the Windows PC with the USB cable.

    The Found New Hardware Wizard pops up
  2. Select the Start button. Right click on My Computer and choose Manage.

    The Computer Management console appears.

  3. Click Device Manager. Expand the Android Device node. Right click on Android Tablet.

    The Android Tablet Properties appear.
  4. Choose Hardware Ids.


  5. Note down the hardware ids (2 lines that appear in the text) box e.g. USB\Vid_0bb4&Pid_0c02&Rev_0227&MI_01USB\Vid_0bb4&Pid_0c02&MI_01.
  6. Close the dialog box.

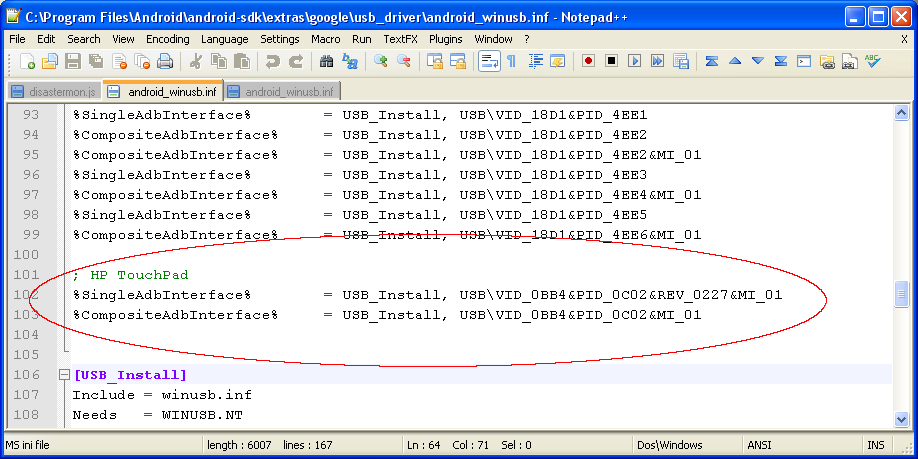
Insert the tablet hardware ids into the Android SDK's usb driver android_winusb.inf file

  1. Use a text editor to open up the android_winusb.inf file.

    Note: This is located underneath where you installed the Android SDK e.g. C:\Program files\android\android-sdk\extras\google\usb_driver\.
  2. Underneath the section [Google.NTx86], add in the hardware ids you noted down previously as shown below.


    Note: lines that begin with ';' are comment lines.
  3. Also add in the same lines underneath the section [Google.NTamd64].
  4.  Save the file. Close the text editor.
Install the Android tablet driver
  1. If the Found New Hardware Wizard is closed, then you can unplug the tablet. Then plug it again to the USB port.

    The Found New Hardware Wizard appears.
  2. Choose Not this time. Click Next.


  3. Choose Install from a list or specified location (Advanced). Click Next.


  4. Toggle on Search for the best driver in these locations.Toggle on Include this location in the search. Click Browse. Specify the folder location of the file winusb.inf e.g. C:\Program files\android\android-sdk\extras\usb_driver\. Click Next.


    The wizard installs the driver.

  5. Click Finish to complete.


  6. If necessary, you may need to reboot.
If the driver installation is successful, the Device Manager will list the Android ADB Interface underneath the Android Device node when the tablet is plugged in, as shown below. You should be able to connect to the HP Touchpad through the Eclipse IDE

Monday, January 21, 2013

How to change between satellite and traffic layers in Google Maps on Android

I wanted to open up a dialog box from the Google Maps View to toggle between the satellite and traffic map layers as shown in the screenshot below.

I used the code snippet below to toggle between the map layers. But it could not toggle between the layers.
 @Override  
 public void onClick(DialogInterface dialog, int which) {  
 // TODO Auto-generated method stub  
 String layer = (String) layers[which];  
 if (layer.compareToIgnoreCase("traffic")==0){  
 _mapView.setTraffic(true);  
 _mapView.invalidate();  
 }  
 else if (layer.compareToIgnoreCase("satellite")==0) {   
 _mapView.setSatellite(true);  
 _mapView.invalidate();  
 }  
 dialog.dismiss();  
 }  

Later, I found out I could resolve the problem by setting the previous layer to false as shown in the snippet below.

 @Override  
 public void onClick(DialogInterface dialog, int which) {  
 // TODO Auto-generated method stub  
 String layer = (String) layers[which];  
 if (layer.compareToIgnoreCase("traffic")==0){  
 _mapView.setSatellite(false);  
 _mapView.setTraffic(true);  
 _mapView.invalidate();  
 }  
 else if (layer.compareToIgnoreCase("satellite")==0) {  
 _mapView.setTraffic(false);  
 _mapView.setSatellite(true);  
 _mapView.invalidate();  
 }  
 dialog.dismiss();  
 }  

Monday, January 14, 2013

Stop the ListView from turning black while scrolling in Android

While developing an Android app, I noticed that my nice white color ListView will turn black whenever I scroll the list. See the screenshot below.


I found out that I set the cacheColorHint property to black in the Android layout xml file.
    <ListView
        android:layout_width="match_parent"
        android:layout_height="match_parent"
        android:id="@+id/listView1"
        android:background="#ffffff"
        android:cacheColorHint="#000000" >
    </ListView>

To rectify the problem, simply set the cacheColorHint property to white to match the background color as shown below.
    <ListView
        android:layout_width="match_parent"
        android:layout_height="match_parent"
        android:id="@+id/listView1"
        android:background="#ffffff"
        android:cacheColorHint="#FFFFFF" >
    </ListView>
Alternatively instead of white, it is okay to set the CacheColorHint property to transparent.

    <ListView
        android:layout_width="match_parent"
        android:layout_height="match_parent"
        android:id="@+id/listView1"
        android:background="#ffffff"
        android:cacheColorHint="@android:color/transparent" >
    </ListView>


And the resultant scrolling of the list will work correctly, as shown below.

Monday, January 7, 2013

Earthquake Monitor Web App

Since Google has announced that it will be closing down the iGoogle site, I decided to migrate some of the Google Gadgets that I had written to Chrome Web Apps for the Chrome Web Store. I consolidated the various earthquake gadgets using the USGS, British Geological Survey, Euro-Mediterranean Seismic Monitoring Center, and the New Zealand GeoNet earthquake feeds into a single Web App.

The screenshot below shows the Earthquake Monitor Web App. It can be installed through the Chrome Web Store (search for Earthquake Monitor) or directly from this url address http://dominoc925-pages.appspot.com/webapp/quakemon/default.html.


Simply choose an earthquake source feed in the side bar's Earthquake feed combo box as shown below.

The earthquake epicenters will be displayed as color coded icons by depth and time on Google Maps. Hovering the cursor on the icons will display a tool tip showing summary details about the earthquake event. Clicking on the icon will open up a page showing more detailed information.


Clicking on the List link in the side bar will display a list view of the earthquake events. The list can be sorted according to the time, depth or magnitude of the earthquake event. Clicking on the Map link will center and zoom to the earthquake epicenter in Google Maps.