Thursday, January 21, 2010

Easier way to find free end points in GeoMedia

In my previous post, I went about a long winded way to determine the free end points using GeoMedia. At the least, it was a good workout of using GeoMedia's query and analysis tools. There is an easier way to do the same thing in GeoMedia by breaking down the line geometries into their base geometries.

Here is the simpler method:

  1. Start up GeoMedia and open up a workspace e.g. C:\GeoWorkspaces\USSampleData.gws.

  2. Select Legend > Add Legend Entries to display the line geometry feature to analyse e.g. Rivers if it is not displayed in the Map Window.

    The feature is displayed.


  3. Select Tools > Generate Base Geometry.

    The Generate Base Geometry dialog box appears.


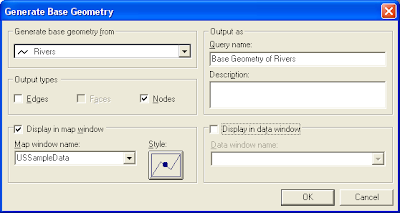
  4. In the Generate base geometry from drop down box, choose the line feature e.g. Rivers.

  5. Toggle Output types Nodes on and Edges off. Toggle on Display in map window.

  6. Click OK.

    The base nodes query Base Geometry of Rivers are generated and displayed.


  7. Select Analysis > Attribute Query.

    The Attribute Query dialog box appears.

  8. In the Select features in combo box, choose the query Base Geometry of Rivers. Click Filter.

    The Base Geometry of Rivers Filter dialog box appears.

  9. In the Filter text box, type in the string: FeatureCount = 1.

    The Base Geometry of Rivers Filter dialog box should look like this.


  10. Click OK.

    The Attribute Filter dialog box is updated with the new filter string.

  11. In the Query Name text box, change the value to Free End Points of Rivers.

    The Attribute Filter dialog may look like this.


  12. Click OK.

    The free end points are generated and displayed in red.


Thursday, January 14, 2010

Edit Global Mapper's workspace file with a text editor

Global Mapper can use workspace files (with .gmw extension) to store map displays, projection, raster data layers, elevation data layers, as well as vector layers. If you create any new point, line or polygon vector features with the digitizing tools, the digitized data layers e.g. lakes (as shown in the screenshot below) are also stored in the workspace file.


If you open up the workspace file in a text editor e.g. Notepad, you would find that it is actually a text file containing a series of Global Mapper scripting commands, as shown below.


The workspace file is really a text script file that you can edit to add in your own scripting commands. What you can do is up to your imagination.

For example, you can put in the EXPORT_VECTOR script command to export out the digitized vector data layers as ESRI shape files. You can even write some sophisticated script automate the process to run for many workspace files at one go.

In the screenshot below, the line:
EXPORT_VECTOR TYPE="SHAPEFILE" FILENAME="c:\temp\lakes.shp" SHAPE_TYPE="AREAS"
 is appended to the workspace file to export out the digitized lakes layer into the shape file C:\temp\lakes.shp.


Note: The edited workspace file should be renamed as a Global Mapper script file with a .gms extension e.g. workspace.gms.

You can either double click the renamed file in the Windows Explorer window or you can open up a Command Prompt window and run the global_mapper11.exe executable with the Global Mapper script file name as the argument, as shown below.

C:\> "\Program Files\GlobalMapper11\global_mapper11" workspace.gms


After running the script file, the shape files are created from the digitized data layers in the workspace.

Tuesday, January 5, 2010

Global Mapper 11 Export to GeoPDF for Acrobat Reader

The Adobe Acrobat Reader 9.x has a Geospatial Location Tool function which can be used to display geographical positions in latitude, longitude and easting, northing values in GeoPDF (PDF with geo-location information) files.

The new Global Mapper 11 has an Export to GeoPDF function which can create PDF files that can be viewed in the Acrobat Reader. It is quite straightforward to use this function - simply stylize and layout the map display then export to GeoPDF.

Creating the GeoPDF file
  1. Before creating the GeoPDF, the layers you want to export need to be displayed and stylized in Global Mapper as shown below.

    Note: the example screenshot shows three layers - a GeoTiff image, State polygons and city point features.


  2. Select File | Export PDF/GeoPDF File.

    The PDF Export Options dialog box appears.


  3. Change any settings as required. For example, change the Orientation setting to Landscape from Portrait. Click OK.

    The Save As dialog box appears.


  4. Browse to the output folder and type in the output File name. Click Save.

    The GeoPDF file is created.

Viewing the GeoPDF Coordinates in Acrobat Reader
  1. In Windows Explorer, double click on the GeoPDF file created previously.

    The file is displayed in Acrobat Reader.
  2. Click the Layers icon on the left to display the list of layers (as shown above).

  3. Using the Layer list, layers can toggle on or off as shown below by clicking the eye icon.


  4. Select Tools | Analysis | Geospatial Location Tool or click the right icon on the Analysis toolbar.

    The coordinate readout display is shown on the bottom right.


    Note: the readout can be a combination of latitude/longitude and/or easting/northing coordinates depending on the Acrobat Reader Preferences settings.

  5. Move the cursor around the map display.

    The cursor coordinates are displayed dynamically.

Marking Locations on the GeoPDF
  1. Right click anywhere on the map display.

    A pop up menu appears.


  2. Choose Find a Location.

    The location entry fields are displayed at the bottom right.


  3. Type in a coordinate. Press RETURN.

    The typed in coordinate is marked on the map display.


Now with GeoPDF files, geospatial information can be easily generated and distributed for viewing using a simple Adobe Acrobat Reader desktop application.

Related material

  1. GeoPDF map files: all regional digital maps on one DVD.: An article from: Engineer: The Professional Bulletin for Army Engineers
  2. PDF Hacks: 100 Industrial-Strength Tips & Tools