Showing posts with label GDAL. Show all posts

Monday, July 17, 2017

Use PDAL to generate a DEM from a LiDAR LAS file

PDAL can be used to generate a GeoTIFF digital elevation model (DEM) from a LiDAR point cloud LAS file via the GDAL writer driver. The resultant elevation GeoTIFF file may not be displayed as what is expected in some software such as Global Mapper because the PDAL generated file can have one or more bands of data including an alpha channel, depending on the PDAL options used; refer to https://www.pdal.io/stages/writers.gdal.html for the types of output bands that can be written to the DEM GeoTIFF file. For normal display, it might be necessary to separate the bands into individual files - in this post, the OTB (Orfeo Tool Box) otbcli_splitImage executable is used.

The following steps show how to generate a GeoTIFF DEM and split the resultant file into separate bands.

Generate the DEM

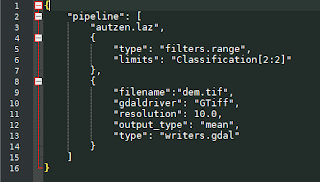
  1. Open up a text editor. Type in the following JSON text. Save the text into a file e.g. pdal_dtm.json


    Note: the JSON pipeline text will do the following:
    (a) Load in a LAS file e.g. autzen.laz
    (b) Filter away non-ground classified point
    (c) Write only the mean Z values to a GeoTIFF file dem.tif with a resolution of 10 meters

  2. Open up the OSGeo4W Command Prompt.

    The Command Prompt appears.
  3. Type in the PDAL command to process the pipeline. Run the command.

    C:\> pdal pipeline pdal_dtm.json

    The GeoTIFF file dem.tif is generated.
Splitting the bands

Displaying the resultant dem.tif containing only the mean Z band in QGIS will show something resembling a grayscale terrain with masked areas, as shown in the screenshot below.

However, displaying the resultant GeoTIFF in Global Mapper will show a black rectangle, as shown below, due to the presence of an alpha channel. This need to be removed for proper interpretation of the elevation data.

To split the bands, do the following:

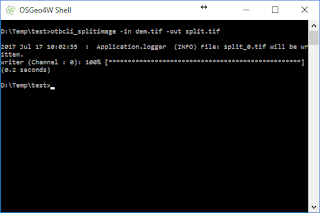
  1. In the OSGeo4W Command Window, type in the command:

    C:\> otbcli_splitimage -in dem.tif -out split.tif


    The input file dem.tif is split into separate files with a numbered suffix starting from 0 e.g. split_0.tif.
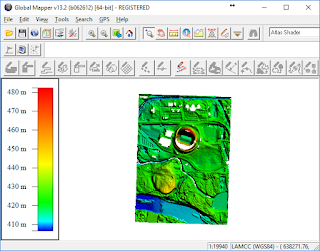
  2. Now, the file can be displayed properly in Global Mapper.

Wednesday, July 12, 2017

Applying a simple X,Y shift or translation to a raster GeoTIFF file using GDAL

Sometimes when comparing a raster ortho-mosaic GeoTIFF file to ground control points (GCPs), the raster file may appear to be slightly shifted relative to the ground control points. To resolve this problem correctly, it may be necessary to regenerate the ortho-mosaic after adjusting the tie points. But sometimes, if the shift is linear or you want to do a fast correction, then the open source software GDAL may be able to solve the problem for you.

To shift a raster GeoTIFF file e.g. input.tif with GDAL, do the following:

  1. Open up a Windows Command Prompt.
  2. Type in the gdal_translate command with the a_ullr option:

    C:\> gdal_translate -a_ullr 760726.437 4557390.415 772996.466 4540826.364 input.tif translate.tif

    Note: 
    translate.tif is the output filename
    -a_ullr specifies the new upper left X, upper left Y, lower right X, lower right Y coordinates  

  3. Run the command.

    Processing messages appear. The file is shifted to the new coordinates.


    The file is shifted to the new coordinates.

Monday, November 16, 2015

Mosaic a large number of GeoTiff images using GDAL

GDAL's gdalwarp function can be used to combine geo-referenced images into a large mosaic file. For a few files, it is relatively straightforward to type the input images in the command line, e.g.
C:> gdalwarp input1.tif input2.tif output.tif
A large number of images for merging

If there are a large number of input files, as shown in the screenshot above, then a wildcard can be used, e.g.
C:> gdalwarp input*.tif output.tif

Alternatively, you can generate a list of input files and pass it to the gdalwarp as an argument as shown below. Then run the command.

  1. In a command prompt, type in the following.

    C:> cd \path\to\input_images
    C:> dir /o/b *.tif > list.txt


    The list is created.

  2. To use the list, use the --optfile argument in the gdalwarp command.

    C:> gdalwarp -multi -wm 1000 --optfile list.txt output.tif

    Note: the -multi argument tells gdalwarp to use multiple processing threads.
    The -wm 1000 tells gdalwarp to grab 1000 mb or memory for processing


    The images in the list are merged into the output.tif file.


Wednesday, June 17, 2015

Using GDAL to cut a large GeoTIFF raster image to smaller files

Sometimes it may be necessary to cut up a large raster image into smaller tiles so that the dataset can be more manageable. GDAL's command line executable gdal_translate has a projwin option where a bounding window in geographical coordinates can be specified to extract a smaller subset from the input raster image into one or more smaller raster files.


The following steps show how this can be done.

  1. Create a DOS batch file with commands of the following syntax.

    gdal_translate -projwin xlow yhigh xhigh ylow input.tif output.tif

    Note:
    replace xlow with the clipping box's low X geographical coordinate
    replace yhigh with the clipping box's high Y geographical coordinate
    replace xhigh with the clipping box's high X geographical coordinate
    replace ylow with the clipping box's low Y geographical coordinate


  2. Run the clipping batch file.


    The larger image is separated into smaller tiles.

Monday, April 13, 2015

Resampling a single GeoTiff image in QGIS

QGIS comes bundled with GDAL tools which you can use to resample one or more raster images, though the QGIS menu labels may be a little unclear.

To resample an geo image in QGIS, do the following:

  1. Start QGIS. Optional. Load in a geo image file to resample.


  2. Select Raster | Projections | Warp (Reproject).

    The Warp (Reproject) dialog box appears.

  3. In the Input file field, click Select. Browse and select the source file, e.g. UTM2GTIF.tif.
  4. In the Output file field, click Select. Type in the destination file e.g. ResampleUTM2GTIF.tif.
  5. Toggle on Resize.
  6. In the Width field, type in the destination width in pixels e.g. 100.
  7. In the Height field, type in the destination height in pixels e.g. 133.


  8. Click OK.

    The source file is resampled.

Friday, January 30, 2015

Using gdalwarp to mosaic adjacent geo-referenced images

I had to merge adjacent 1 km by 1 km GeoTiff ortho-rectified mosaic images into 2 km by 2 km tiles and I really did not want to run the ortho-rectification and mosaicking processes again just to resize the tiles. After some digging around I found that GDAL has a few tools to perform the merging. I chose to use the gdalwarp executable, as it allows me to define a list of images to merge and the destination image bounds.


The following example shows how to use gdalwarp to merge 2 adjacent GeoTiff images into one.
Two adjacent image tiles to merge
  1. Open up a Command Prompt. Type in the gdalwarp command to merge two files e.g. left.tif and right.tif and output to a new file mosaic.tif:

    C:> gdalwarp left.tif right.tif mosaic.tif
  2. Press Return.

    Processing messages appear and the files are merged.


    The resultant merged GeoTiff image

Monday, March 31, 2014

Identifying digital elevation model files with erroneous elevations in batch

A DEM file
Recently I had to identify ESRI ArcGrid ASCII files of digital elevation models with very low elevation values (below zero). If I had one or two files, then I could easily open up the file in Global Mapper or Saga GIS. But there were several hundred DEMs, which made that impractical. Luckily the free open source software GDAL has a utility gdalinfo that can generate statistics about a DEM in batch. The following example shows how to use gdalinfo to look for extreme low (or high) spikes in elevation.


  1. Open up a Windows Command Prompt.
  2. Type in the following:

    C:> gdalinfo -stats inputDEM.asc > output.txt

    Note: to append to an output file, use double ">" as below.

    C:> gdalinfo -stats inputDEM.asc >> output.txt


    Note II: For hundreds of files, simply put these commands into a batch script.
  3. Open up the output file e.g. output.txt in a text editor. Find the statistical values - minimum, maximum that are above or below the valid elevation ranges to identify the DEM files with erroneous values.

Monday, November 4, 2013

Burn or rasterize vectors onto GeoTiff images

Once a while I get an unusual request like burning contour vector lines onto GeoTiff images. It's a good thing the open source software GDAL has a gdal_rasterize utility to do the job. Here is an illustrated example of burning vector lines onto a raster image.
Input vector contour lines
Input raster GeoTiff file


  1. Open up a Windows Command Prompt.
  2. Type in the following command, (assuming the GDAL installation bin folder is in the system path).

    C:\> gdal_rasterize -b 1 -b 2 -b 3 -burn 255 -burn 0 -burn 0 -l contour contour.shp lub_tile1.tif

    Note 1: -burn 255 -burn 0 -burn 0 means burn the RGB color values (255, 0, 0).
    Note 2: -b 1 -b 2 -b 3 means to use the three bands of R, G, and B.
    Note 3: this utility will overwrite the input raster file, so make sure there is a backup copy of the file.


    The contour.shp vector lines are burned onto the GeoTiff file lub_tile1.tif.

Monday, August 19, 2013

Simple C# example using SharpMap and OGR to read a DGN file

SharpMap is an easy to use library for working with GIS data. It comes with wrappers for OGR and GDAL. I recently had to work with DGN files. I thought I would share that experience by posting a simple C# wrapper for reading a Microstation DGN file (version 7) as SharpMap geometries.

The example code below simply opens up a DGN file as an OGR data source. The wrapper exposes a public method to return all the DGN elements as SharpMap geometries for further manipulation.


//...etc...
using SharpMap;
using SharpMap.Geometries;
using SharpMap.Converters.WellKnownBinary;
using SharpMap.Converters.WellKnownText;
using OSGeo.OGR;
 
//A simple example DGN file wrapper using SharpMap and OGR
public class DGNFile
{
#region private member variables
//Variable for the OGR DGN data source
private DataSource _dataSource = null;
private ArrayList _layers = new ArrayList();
#endregion
public DGNFile(string filename)
{
//Register OGR drivers
Ogr.RegisterAll();
string format = string.Empty;

//Attempt to open the DGN file with OGR. 
//If successful, the format string "DGN" will be returned. 
//Otherwise, throw an exception
_dataSource = Ogr.Open(filename, 0);
if (_dataSource != null)
{
format = _dataSource.GetDriver().GetName();
}
if (format.CompareTo("DGN") != 0 || _dataSource == null)
{
throw new Exception("Unable to open DGN file");
}
 
//Get a list of the DGN layers. 
//Note: so far, I have not encountered more than 1 layer
for (int i = 0; i < _dataSource.GetLayerCount(); i++)
{
Layer layer = _dataSource.GetLayerByIndex(i);
if (layer != null)
{
FeatureDefn def = layer.GetLayerDefn();
_layers.Add(def.GetName());
}
}
}
//Just a destructor to free up the OGR resources
~DGNFile()
{
if (_dataSource != null)
{
_dataSource.Dispose();
}
}
//A public method to get all the DGN elements as SharpMap geometries
public ArrayList GetElements()
{
ArrayList geometries = new ArrayList();
 
for (int i = 0; i < _layers.Count; i++)
{
string layerName = (string) _layers[i];
Layer layer = _dataSource.GetLayerByName(layerName);
FeatureDefn def = layer.GetLayerDefn();

//A reset is necessary if you want to read the DGN from the top of the file again
layer.ResetReading();
Feature fea;

//Loop through all the elements
while ((fea = layer.GetNextFeature()) != null)
{
OSGeo.OGR.Geometry geom = fea.GetGeometryRef();
if (geom != null)
{
wkbGeometryType geomType = geom.GetGeometryType();
geom.FlattenTo2D();

//Allocate a buffer to store the WKB geometry
Byte[] buff = new Byte[geom.WkbSize()];
geom.ExportToWkb(buff);

//Convert the WKB geometry to SharpMap geometry
SharpMap.Geometries.Geometry sharpMapGeom = GeometryFromWKB.Parse(buff);
geometries.Add(rec);

//Free up resources
geom.Dispose();
}
fea.Dispose();
}
layer.Dispose();
}
//Return the DGN elements formatted as SharpMap geometries
return geometries;
}        

Monday, March 11, 2013

Build 64 bit GDAL for Windows

In building libLAS from source, there is the option of linking it with GDAL. Since I was interested in making 64 bit Windows version of libLAS, I had to find or make my own 64 bit versions of GDAL. Eventually, I decided to build my own. The following are the steps I did to compile 64 bit GDAL on Microsoft Visual Studio 2010. Note that the 64 bit executables may not run successfully depending on the source code even if the compilation is successful.
  1. Download the latest GDAL source code from http://download.osgeo.org/gdal/. Extract the files into a folder e.g. C:\Work\src\gdal-1.9.2\.
  2. On the Windows Desktop, select Start | All Programs | Microsoft Visual Studio 2010 | Visual Studio Tools | Visual Studio x64 Win64 Command Prompt.

    The Visual Studio x64 Win64 Command Prompt appears.
  3. In the Command Prompt, change directory to the extracted GDAL source code root folder.

    C:\> cd \Work\src\gdal-1.9.2
  4. Build the GDAL 64 bit Windows binaries with the nmake command.

    C:\> nmake /f makefile.vc MSVC_VER=1600 WIN64=YES

    The binaries are generated.