Monday, January 29, 2018

Display CSV (with WKT geometry field) files on Google Maps with this Mapplet

If you want to display a Comma Separated Values (CSV) file with an embedded geometry field in Well Known Text (WKT) format with just an Internet browser, then this Mapplet may be useful to you. Just go to this url https://dominoc925-pages.appspot.com/mapplets/vcsvfile.html with any modern browser such as Chrome, or FireFox. All the processing is done within your browser, that is the CSV file is never uploaded to a server for processing.


  1. To load a CSV file, click on the Import CSV button (in blue color) as shown in the screenshot below. 


    The Import Comma Separated Values (CSV) file dialog box appears.

  2. To load in a CSV file from a local drive, click the Choose File button. Then browse and select a CSV file as shown below.


    Note: You can also copy and paste WKT text into the CSV file field's text area. Or click the Use Sample Data drop up button to load demo WKT data into the text area.

  3. Click Open.

    The file is read and displayed in the text area below the Choose File button. The WKT Geometry column button is populated with the header fields from the CSV file.


    Note: If necessary, choose an appropriate Coordinate System and projection.
  4. Click Start Import.

    The CSV file is loaded and rendered as overlays on the Google Maps backdrop. The name of the file is added to a CSV files combo box.

  5. Optional. Click on the CSV Command drop up button and choose a command to apply to the current CSV layer.


    Fit - Display the current CSV layer within the map
    Fit All - Display all loaded CSV layers within the map
    Toggle display - Toggle the CSV layer display on or off
    Display off - Don't display the current CSV layer
    Display on - Display the current CSV layer
    Remove layer - Unload the current CSV layer

Monday, January 22, 2018

Using QGIS to export CSV files with Well Known Text geometry

QGIS can export feature layers as comma separated values (*.CSV) files with a geometry column in  Well Known Text (WKT) format. This can be very convenient if you want to exchange a small amount of data from one GIS system to another GIS system.

To save a vector feature layer to a WKT CSV file, do the following:

  1. In the legend pane of QGIS, select a layer to export, e.g. forest. Then press the right click of the mouse.

    A pop up menu appears.

  2. In the pop up menu, choose Save As.
  3. The Save vector layer as dialog box appears.


  4. In the Format combo box, choose Comma Separated Values (CSV). In the File name field, click the  Browse button and type in the output file name, e.g. forest.csv.


  5. In the Layer Options group box's GEOMETRY combo box, choose AS_WKT. Click OK.

    The selected vector layer is exported out as a CSV file with a geometry field as WKT format as shown below in a spread sheet.

Monday, January 15, 2018

displaz - A small but fast LiDAR las file viewer

I'm happy with this LiDAR las file viewer displaz I stumbled upon while doing some searching on Google. It's free, open-source, no-frills, fast, and relatively easy to use - just perfect to drag and drop some las files for a quick look. It can be downloaded from this web site http://c42f.github.io/displaz/.

The following are some sample screenshots of the viewer.
  1. Upon start up, the viewer shows a blank view with a shader parameters and Log or Datasets panes on the right.


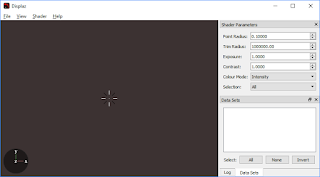
    Note: The points are colored according to intensity values. This can be changed by choosing an alternative coloring method in the Shader parameters pane
    .
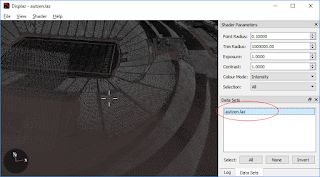
  2. Las files and be opened by simply dragging it(them) and dropping onto the application window from the operating system's file managers.


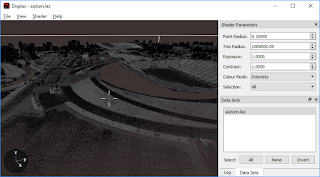
    Note: once opened, the file(s) are listed in the Datasets pane. To view the point cloud from a different orientation, drag and move the mouse left button. To zoom, roll the mouse wheel.
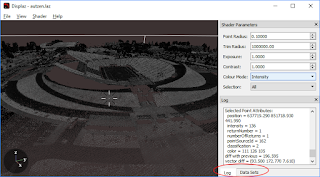
  3. This is a little confusing at first, but to pan or move the view, you have to press the middle button of the mouse to center the view around the chosen point. At the same time, it will show the attributes of the chosen point in the Log pane, as shown below.


  4. Finally, to unload a las file, select one or more files in the Datasets pane and press the DELETE button on the keyboard.


Monday, January 8, 2018

Getting FugroViewer to run in Ubuntu 16.04

I wanted to try running the free but not open source Lidar viewer from Fugro on Ubuntu. FugroViewer can be downloaded from https://www.fugro.com/about-fugro/our-expertise/technology/fugroviewer.

Since FugroViewer is a Windows only application, I had to use Wine to install and run it. I was successful in getting it to run and the following steps illustrate how to set up, install and run FugroViewer on Ubuntu.

Install Wine

  1. In Ubuntu, open up a terminal.
  2. At the command prompt, type in the following command to download a key. Press RETURN.

    $ wget https://dl.winehq.org/wine-builds/Release.key

    The file Release.key is downloaded.

  3. Next, add the key to Ubuntu. Type in the admin password when prompted.

    $ sudo apt-key add Release.key


  4. Now add in the Wine repository to Ubuntu by entering the following command:

    $ sudo apt-add-repository 'https://dl.winehq.org/wine-builds/ubuntu/'


  5. At the command prompt, type in the command:

    $ sudo apt-get update

  6. Finally, install Wine with the following command.

    $ sudo apt-get install wine


Install FugroViewer

Once Wine is installed, it can be used to run the FugroViewer installer (which must be downloaded from the Fugro web site https://www.fugro.com/about-fugro/our-expertise/technology/fugroviewer previously).

  1.  Using a File Manager in Ubuntu, browse to the location of the downloaded FugroViewer installer. Double click on the file or press mouse right click and choose Open with Wine Windows Program.


    The Fugro Viewer Setup wizard appears.
  2. Complete the installation by following the Fugro Viewer Setup wizard.


Running FugroViewer
  1. On the desktop, click the Dash button on the top right. Then type in fugro.

    The FugroViewer application icon is shown.

  2. Click on the FugroViewer icon.

    The FugroViewer application starts up.
  3. Now load in one or more LAS files.

    The LAS file is displayed.