Monday, November 18, 2019

Fix USB serial adapters to static device names on Ubuntu

When a USB to serial device adapter are plugged into a computer's USB port, the Ubuntu Linux OS automatically assigns a default system device name to it. Typically, it is /dev/ttyUSB0, /dev/ttyUSB1, and so on. This is convenient but sometimes it may be necessary to fix a specific device name to a specific USB serial adapter. This can be done by defining a rule file as shown in the steps below.

Identify the USB serial adapter's product and vendor codes
  1. Open up a Terminal. Physically plug in the USB serial adapter to the computer's USB port. Type in the following command:

    $ dmesg | grep ttyUSB
    The device messages with the string ttyUSB are displayed.

  2. Note which default device name has been assigned. In this case it is /dev/ttyUSB0.

  3. Type in the following command to print out the attributes of the device.

    $ udevadm info --name=/dev/ttyUSB0 --attribute-walk

    The attributes are printed out.

  4. Scroll and look for the idProduct and idVendor attributes.


  5. Note down the codes for the idProduct and idVendor attributes. In this case, the codes are ea60 and 10c4 respectively.
Define a rule to rename the USB serial adapter device
  1. In a text editor, create a rule file e.g. 50-usb-serial.rules. Type in the following line:

    SUBSYSTEM=="tty", ATTRS{idVendor}=="10c4", ATTRS{idProduct}=="ea60", SYMLINK+="my_device_name"

    Note: replace the idVendor and idProduct and the my_device_name with the appropriate values.

    An example file listing:

  2. Place the rule file in /etc/udev/rules.d/. Note: you need to place it as the super user.
Activate the rule
  1. This can be done by restarting the computer.
  2. Alternatively, run the following command in a Terminal:

    $ sudo udevadm trigger
  3. To see whether it has been renamed, type in the following command:

    $ ls -l /dev/my_device_name

    Note: replace my_device_name with the name you defined in the rule file.

    The USB serial device has been renamed accordingly as a symbolic link.

Monday, November 11, 2019

Android Studio: Automatically replace the Google Maps V2 API Key for debug and release mode

The Android Google Maps API requires a separate debug and release keys in the Android Studio project's AndroidManifest.xml file, as shown in the listing below.

<meta-data
android:name="com.google.android.maps.v2.API_KEY"
android:value="your_google_maps_v2_api_debug_or_release_key_here" />
It can get tedious having to replace the key every time you want to debug or to generate a release build APK.

It is possible to use Gradle to automate the replacement of the Google Maps V2 API key value by using constants defined in the Gradle build types. To automate the replacement, you can do the following:
  1. In the Android app's build.gradle file, add in the following line under the debug component of buildTypes:

    resValue "string", "google_maps_v2_api_key", "your_google_maps_v2_debug_api_key_here"

    Note: replace the api key accordingly; and the constant name is google_maps_v2_api_key.
  2. Similarly, add in the following line under the release component of buildTypes:

    resValue "string", "google_maps_v2_api_key", "your_google_maps_v2_release_api_key_here"
  3. The Android app's build.gradle should look like this screenshot below:


  4. Now, in the app's AndroidManifest.xml file, replace the Google Maps V2 API key metadata value to the string constant name google_maps_v2_api_key.

    <meta-data
    android:name="com.google.android.maps.v2.API_KEY"
    android:value="@string/google_maps_v2_api_key" />
    

Now you can debug or build the Android app as per normal without manually replacing the Google Maps V2 API key.

Monday, November 4, 2019

Fixing the git-credential-osxkeychain password prompts on every git transaction

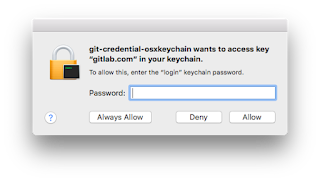
After a password change in my gitlab account, sometimes the git-credential-osxkeychain password prompt (shown below) will always pop up whenever I try to perform a git commit transaction on my Macbook.

And it seemingly will not allow you to proceed even though the correct password has been entered; only by pressing the ESC key will MacOSX allow the transaction to go through.

To resolve this issue, the following steps can be done:
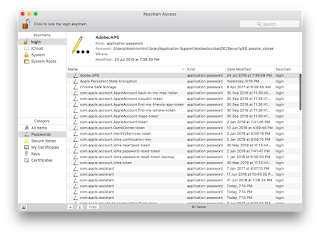
  1. Press Command + spacebar on the keyboard to bring up the Finder. Type in keychain. Press Enter.

    The Keychain access dialog box appears.
  2. In the Search field, type in gitlab.

    The list is filtered by the search string.
  3. Now, mouse right click on the gitlab entry on the list. Choose Delete "gitlab.com".

    The keychain entry is deleted.
The gitlab keychain entry will be regenerated the next time and the git-credential-osxkeychain prompt will no longer pop up.