I wanted to use
SQLite as an object relational model (
ORM) database for a Spring Hibernate Java application. It turned out to be relatively simple to achieve. This post shows a simple example illustrating the project configuration, SQLite table creation, Java object definition, saving and retrieving a Java object into/from the database. The example project structure is shown in the screenshot below.
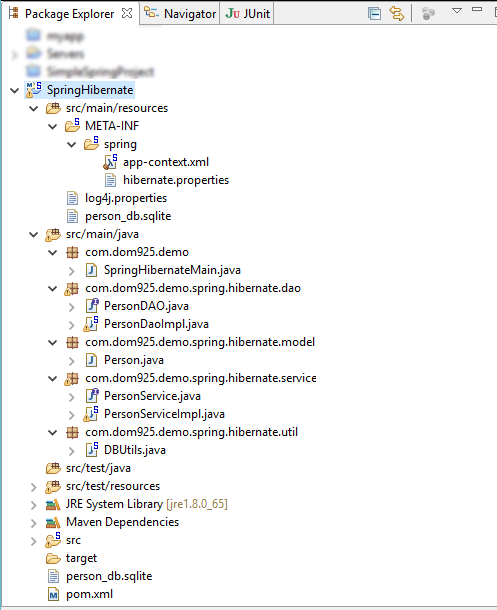
In order to prepare a Java application to work with SQLite as an ORM database, the following steps can be done:
- Add in the software dependencies to the project's Maven pom.xml
- Define Hibernate beans in the application context configuration file
Add in software dependencies to pom.xml
The following listing is an example
pom.xml file.
Note that Hibernate, SQLite and Spring ORM dependencies have been appended to the dependencies element.
<?xml version="1.0" encoding="UTF-8"?>
<project xmlns="http://maven.apache.org/POM/4.0.0"
 xsi:schemaLocation="http://maven.apache.org/POM/4.0.0 http://maven.apache.org/maven-v4_0_0.xsd"
 xmlns:xsi="http://www.w3.org/2001/XMLSchema-instance">
 <modelVersion>4.0.0</modelVersion>
 <groupId>org.springframework.samples.spring</groupId>
 <artifactId>spring-hibernate-utility</artifactId>
 <version>1.0.0.CI-SNAPSHOT</version>
 <packaging>jar</packaging>
 <name>Spring Hibernate Utility</name>
 <url>http://www.springframework.org</url>
 <description>
  <![CDATA[This project is a minimal jar utility with Spring configuration for Hibernate.]]>
 </description>
 <properties>
  <maven.test.failure.ignore>true</maven.test.failure.ignore>
  <spring.framework.version>3.0.6.RELEASE</spring.framework.version>
 </properties>

 <dependencies>

  <dependency>
   <groupId>junit</groupId>
   <artifactId>junit</artifactId>
   <version>4.7</version>
   <scope>test</scope>
  </dependency>
  <dependency>
   <groupId>org.springframework</groupId>
   <artifactId>spring-test</artifactId>
   <version>${spring.framework.version}</version>
   <scope>test</scope>
  </dependency>
  <dependency>
   <groupId>org.springframework</groupId>
   <artifactId>spring-context-support</artifactId>
   <version>${spring.framework.version}</version>
  </dependency>
  <dependency>
   <groupId>org.springframework</groupId>
   <artifactId>spring-aop</artifactId>
   <version>${spring.framework.version}</version>
  </dependency>

  <!-- Dependencies for Hibernate and ORM  -->
  <dependency>
   <groupId>com.h2database</groupId>
   <artifactId>h2</artifactId>
      <version>1.3.156</version>
  </dependency>
  <dependency>
   <groupId>org.springframework</groupId>
   <artifactId>spring-orm</artifactId>
   <version>${spring.framework.version}</version>
  </dependency>
  <dependency>
   <groupId>org.hibernate</groupId>
   <artifactId>hibernate-entitymanager</artifactId>
   <version>3.6.0.Final</version>
  </dependency>

  <!-- Dependencies for SQLite -->
  <dependency>
   <groupId>org.xerial</groupId>
   <artifactId>sqlite-jdbc</artifactId>
   <version>3.8.11.2</version>
  </dependency>
  <dependency>
   <groupId>net.kemitix</groupId>
   <artifactId>sqlite-dialect</artifactId>
   <version>0.1.0</version>
  </dependency>

  <!--
  <dependency>
   <groupId>hsqldb</groupId>
   <artifactId>hsqldb</artifactId>
   <version>1.8.0.10</version>
  </dependency>
   -->
  <dependency>
   <groupId>log4j</groupId>
   <artifactId>log4j</artifactId>
   <version>1.2.16</version>
  </dependency>
 </dependencies>

 <build>
  <plugins>
   <plugin>
    <groupId>org.apache.maven.plugins</groupId>
    <artifactId>maven-compiler-plugin</artifactId>
    <version>2.3.2</version>
    <configuration>
     <source>1.5</source>
     <target>1.5</target>
    </configuration>
   </plugin>
  </plugins>
 </build>

 <repositories>
  <repository>
   <id>org.jboss.repository.releases</id>
   <name>JBoss Maven Release Repository</name>
   <url>https://repository.jboss.org/nexus/content/repositories/releases</url>
   <snapshots>
    <enabled>false</enabled>
   </snapshots>
  </repository>

 </repositories>

</project>
Define Hibernate beans in the application context configuration file
The Spring Java application's context configuration file is located in the
/path/to/project/src/main/resources/META-INF/spring/app-context.xml file. The beans
SessionFactory,
TransactionManager and the
DataSource should at least be defined in the file as shown in the listing below.
Note: In this example listing, we configure Spring to scan for additional components under the package namespace
com.dom925.demo.spring.
<?xml version="1.0" encoding="UTF-8"?>
<beans xmlns="http://www.springframework.org/schema/beans"
 xmlns:xsi="http://www.w3.org/2001/XMLSchema-instance" xmlns:context="http://www.springframework.org/schema/context"
 xmlns:tx="http://www.springframework.org/schema/tx" xmlns:jdbc="http://www.springframework.org/schema/jdbc"
 xsi:schemaLocation="
  http://www.springframework.org/schema/jdbc http://www.springframework.org/schema/jdbc/spring-jdbc-3.0.xsd
  http://www.springframework.org/schema/beans http://www.springframework.org/schema/beans/spring-beans-3.0.xsd
  http://www.springframework.org/schema/tx http://www.springframework.org/schema/tx/spring-tx-3.0.xsd
  http://www.springframework.org/schema/context http://www.springframework.org/schema/context/spring-context-3.0.xsd">

 <tx:annotation-driven transaction-manager="transactionManager" />

 <context:annotation-config/>

 <!-- Tell Spring where to scan for components -->
 <context:component-scan base-package="com.dom925.demo.spring" />

 <!-- Specify the Hibernate properties setting file -->
 <context:property-placeholder
  location="classpath:META-INF/spring/hibernate.properties"/>

 <bean id="dataSource"
  class="org.springframework.jdbc.datasource.DriverManagerDataSource">
  <property name="driverClassName" value="${jdbc.driverClassName}" />
  <property name="url" value="${jdbc.url}" />
  <property name="username" value="${jdbc.username}" />
  <property name="password" value="${jdbc.password}" />
 </bean>

 <bean id="sessionFactory"
  class="org.springframework.orm.hibernate3.annotation.AnnotationSessionFactoryBean">
  <property name="dataSource" ref="dataSource" />
  <property name="annotatedClasses" value="com.dom925.demo.spring.hibernate.model.Person" />
  <property name="hibernateProperties">
   <props>
    <prop key="hibernate.dialect">${hibernate.dialect}</prop>
    <prop key="hibernate.show_sql">${hibernate.show_sql}</prop>
   </props>
  </property>
 </bean>

 <bean id="transactionManager"
  class="org.springframework.orm.hibernate3.HibernateTransactionManager">
  <property name="sessionFactory" ref="sessionFactory" />
 </bean>

 <tx:annotation-driven transaction-manager="transactionManager"/>
</beans>
In this example, some of the Hibernate data source's JDBC properties are defined in a separate file
/path/to/project/src/main/resources/META-INF/hibernate.properties file, as shown below.
Note: this example configures Spring to use a SQLite database named
person_db.sqlite. Since the path is not defined, it will be created in
/path/to/project/ directory.
jdbc.driverClassName=org.sqlite.JDBC
jdbc.url=jdbc:sqlite:person_db.sqlite
jdbc.username=
jdbc.password=
hibernate.dialect=org.hibernate.dialect.SQLiteDialect
hibernate.show_sql=true
At this point, the project configuration should be done. The next steps would be to write the Java classes and interfaces. In this example, the following classes are created.
- DBUtils.java
- Person.java
- PersonDaoImpl.java which implements the interface PersonDAO.java
- PersonServiceImpl.java which implements the interface PersonServiceImpl.java
DBUtils.java
When Spring initializes the Java application, the @PostConstruct annotation in this file will cause the initialize method to be executed. This method will recreate the SQLite database and table each time you run the application.
package com.dom925.demo.spring.hibernate.util;

import java.sql.Connection;
import java.sql.SQLException;
import java.sql.Statement;

import javax.annotation.PostConstruct;
import javax.sql.DataSource;

import org.springframework.beans.factory.annotation.Autowired;
import org.springframework.stereotype.Component;

@Component
public class DBUtils {

 @Autowired
 private DataSource dataSource;

 @PostConstruct
 public void initialize(){
  try {
   Connection connection = dataSource.getConnection();
   Statement statement = connection.createStatement();
   statement.execute("DROP TABLE IF EXISTS PERSON_INFO");
   statement.executeUpdate(
     "CREATE TABLE PERSON_INFO(" +
     "ID INTEGER Primary key, " +
     "FIRST_NAME varchar(30) not null, " +
     "LAST_NAME varchar(30) not null)"
     );
   statement.executeUpdate(
     "INSERT INTO PERSON_INFO " +
     "(FIRST_NAME, LAST_NAME) " +
     "VALUES " + "('DONALD', 'TRUMP')"
     );
   statement.close();
   connection.close();
  }
  catch (SQLException e) {
   e.printStackTrace();
  }
 }
}
Person.java
Now we define the plain old Java object POJO class that we want to associate to a SQLite database table.
Note I: the Spring annotations @Entity and @Table specify the database table
Note II: the annotations @Column specify the database column name, and @Id define the primary key.
package com.dom925.demo.spring.hibernate.model;

import javax.persistence.Column;
import javax.persistence.Entity;
import javax.persistence.GeneratedValue;
import javax.persistence.GenerationType;
import javax.persistence.Id;
import javax.persistence.Table;

@Entity
@Table(name = "PERSON_INFO")
public class Person {

 @Id
 @Column(name = "ID")
 @GeneratedValue(strategy = GenerationType.IDENTITY)
 private Integer id;

 @Column(name = "FIRST_NAME")
 private String firstName;

 @Column(name = "LAST_NAME")
 private String lastName;

 public Integer getId() {
  return id;
 }
 public void setId(Integer id) {
  this.id = id;
 }
 public String getFirstName() {
  return firstName;
 }
 public void setFirstName(String firstName) {
  this.firstName = firstName;
 }
 public String getLastName() {
  return lastName;
 }
 public void setLastName(String lastName) {
  this.lastName = lastName;
 }
 @Override
 public boolean equals(Object obj){
  if (this == obj){
   return true;
  }
  Person person = (Person) obj;
  if (firstName != null ?
    !firstName.equals(person.firstName)
    :person.firstName != null){
   return false;
  }
  else {
   return true;
  }
 }
 @Override
 public String toString() {
  return "Person [id="
    + id
    + ", name="
    + firstName
    + " "
    + lastName
    + "]";
 }
}
PersonDAO.java
This interface defines the interface for accessing the Person data.
package com.dom925.demo.spring.hibernate.dao;

import java.util.List;

import com.dom925.demo.spring.hibernate.model.Person;

public interface PersonDAO {

 public List<Person> getAllPersons();

 public void insertPerson (Person person);
}
PersonDaoImpl.java
This implements the interface defined by the
PersonDAO.java file. Note the use of the Spring
@Repository and
@Transactional annotations for database related activities.
package com.dom925.demo.spring.hibernate.dao;

import java.util.List;

import org.hibernate.Query;
import org.hibernate.Session;
import org.hibernate.SessionFactory;
import org.springframework.beans.factory.annotation.Autowired;
import org.springframework.stereotype.Repository;
import org.springframework.transaction.annotation.Transactional;

import com.dom925.demo.spring.hibernate.model.Person;

@Repository
@Transactional(readOnly = true)
public class PersonDaoImpl implements PersonDAO {

 @Autowired
 private SessionFactory sessionFactory;


 public List<Person> getAllPersons() {
  Session session = sessionFactory.openSession();
  String hql = "FROM Person";
  Query query = session.createQuery(hql);
  List<Person> persons = query.list();
  return persons;
 }

 @Transactional(readOnly = false)
 public void insertPerson(Person employee) {
  Session session = sessionFactory.openSession();
  session.save(employee);
 }

}
PersonService.java
This file defines the interface for a service to access the
Person data.
package com.dom925.demo.spring.hibernate.service;

import java.util.List;

import com.dom925.demo.spring.hibernate.model.Person;

public interface PersonService {

 public List<Person> getAllPersons();

 public void insertPerson(Person person);
}
PersonServiceImpl.java
This is an implementation of the interface defined in the
PersonService.java file. Note the Spring
@Service annotation.
package com.dom925.demo.spring.hibernate.service;

import java.util.List;

import org.springframework.beans.factory.annotation.Autowired;
import org.springframework.stereotype.Component;
import org.springframework.stereotype.Service;

import com.dom925.demo.spring.hibernate.dao.PersonDAO;
import com.dom925.demo.spring.hibernate.model.Person;


@Service
public class PersonServiceImpl implements PersonService {

 @Autowired
 private PersonDAO personDao;

 public List<Person> getAllPersons() {
  List<Person> persons = personDao.getAllPersons();
  return persons;
 }

 public void insertPerson(Person person) {
  personDao.insertPerson(person);
 }

}
SpringHibernateMain.java
Finally, the Java application's main method, which loads the application context, get a
PersonService bean to add a new
Person object to the database. Then print out the database contents to the screen.
package com.dom925.demo;

import org.springframework.context.ApplicationContext;
import org.springframework.context.support.ClassPathXmlApplicationContext;

import com.dom925.demo.spring.hibernate.model.Person;
import com.dom925.demo.spring.hibernate.service.PersonService;

public class SpringHibernateMain {

 public static void main(String[] args) {
  ApplicationContext context =
    new ClassPathXmlApplicationContext(
      "/META-INF/spring/app-context.xml");
  PersonService personService =
    context.getBean("personServiceImpl", PersonService.class);

  Person person = new Person();
  person.setFirstName("HILLARY");
  person.setLastName("CLINTON");
  personService.insertPerson(person);

  for (Person p : personService.getAllPersons()){
   System.out.println(p);
  }
 }
}
 |
| Example print out from the Spring application |
A zip file containing the example project can be downloaded
here.


