Showing posts with label Kotlin. Show all posts

Monday, June 17, 2019

Android Studio: Resolving PreferenceFragment is deprecated warning

I encountered the following warning message in Android Studio while converting some Android Java code to Kotlin:
'PreferenceFragment' is deprecated. Deprecated in Java

Some digging through the Android documentation resulted in a solution; the android.preference.PreferenceFragment class is being deprecated and can be replaced with the new Jetpack androidx preference classes. So I needed to do the following:
  1. Add a new dependency to the new Androidx preference library in the app's build.gradle file

    implementation "androidx.preference:preference:1.0.0"
  2. In the Kotlin source code, remove the following namespace import statement:

    import android.preference.PreferenceFragment
  3. Insert the following namespace import statement:

    import androidx.preference.PreferenceFragmentCompat
  4. Then override the abstract onCreatePreferences method.

override fun onCreatePreferences(savedInstanceState: Bundle?, rootKey: String?) {
//        TODO("not implemented") //To change body of created functions use File | Settings | File Templates.
    }

Monday, June 10, 2019

Android Studio shortcut to insert a Kotlin logging code using Live Template


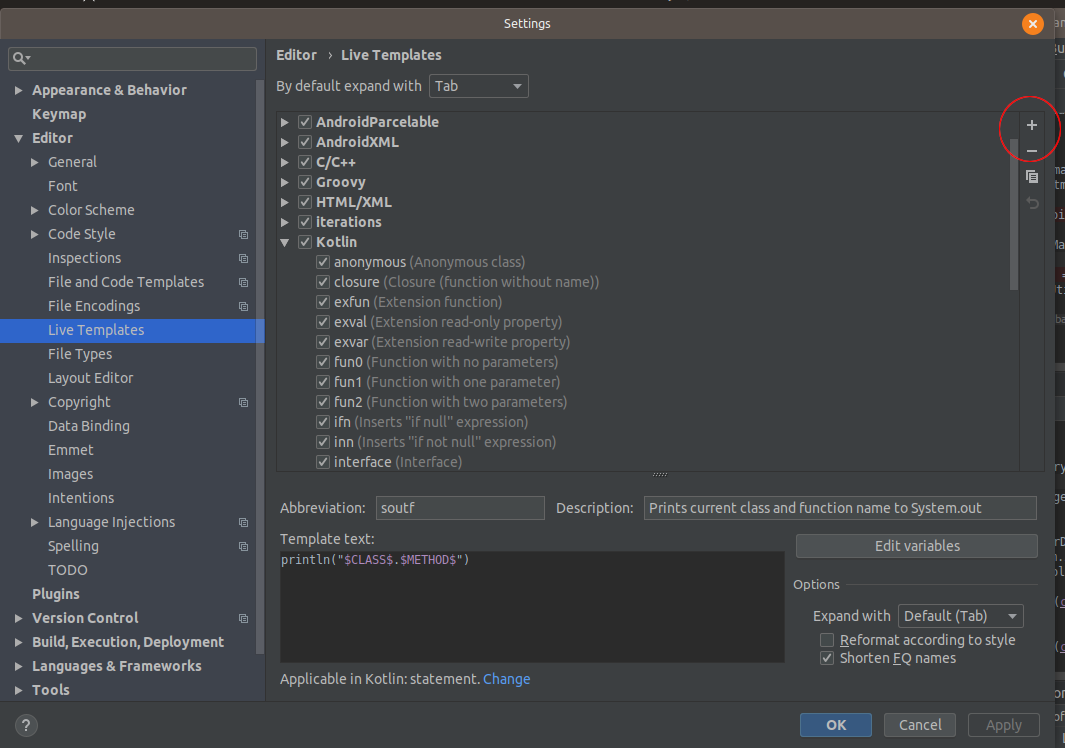
Android Studio has a Live Template system for storing predefined code templates which can be recalled via an abbreviation keyword and automatically inserted at the cursor location in the source code editor. This can ease the task of typing in frequently used code syntax.

In this example, a template with the abbreviation logd shall be created which will insert the following code at the cursor location when activated only within a Kotlin language file. Once the code is inserted, the cursor will be placed inside the quotation marks.

Log.d(TAG, "")

Do the following:
  1. In Android Studio, select File | Settings.

    The Settings dialog box appears.
     
  2.  Select Editor | Live Templates.

  3. Then click the + button on the right. Choose Live Template. In the Abbreviation field, type in the keyword, e.g. logd that will activate this template. In the Description field, type in a accurate value e.g. Log debug message.

  4. In the Template text field, type in the code syntax and/or any macro, e.g. Log.d(TAG, "$END$")

    Note: $END$ is a macro which will position the cursor after the template has been inserted.
  5. Next, click Define to choose the environment in which this template can be activated.

  6. In the popup, choose a language or group construct e.g. Kotlin. Click OK

    The template is created.
Now, to use the newly created template, open a Kotlin file in the code editor. Place the cursor on the location in the code and press CTRL-j on the keyboard. A pop up menu with a list of template keywords will appear.


Type in the keyword logd or choose the logd keyword with the mouse and press Enter. The template is inserted and the cursor placed between the quote marks as shown below.

Monday, October 29, 2018

Setup CMakeLists.txt for Android Studio and OpenCV C++ coding

If you want to develop C++ code making use of Android and OpenCV classes, then you have to configure Android Studio's CMakeLists.txt build file accordingly.

Please follow the previous post https://dominoc925.blogspot.com/2018/10/how-i-setup-opencv4android-java-sdk.html to download and setup the OpenCV4Android Java SDK with and Android project before doing the following steps.
  1. In Android Studio, open up the app's build.gradle file.

    Note: the OpenCV native libraries are under the jniLibs directory relative to the app's build.gradle file according to the source set jniLibs srcDirs parameter.
     

  2. Enter the cmake cpp flags and platform abi filters  in the android defaultConfig externalNativeBuild section, as shown below.

    externalNativeBuild {
        cmake {
          cppFlags "-frtti -fexceptions"        
    
    abiFilters 'x86', 'x86_64', 'armeabi-v7a', 'arm64-v8a'
    }
    }

  3. Next, open up the CMakeLists.txt file in the editor.

     
  4. Add in the cmake macros to add in the path to the OpenCV C++ include files e.g. /path/to/OpenCV-android-sdk/sdk/native/jni/include/

     
  5.  Then, use the macro add_library to add the OpenCV library.

  6. Next, use the macro set_target_properties to tell CMake the location of the OpenCV library.

    set_target_properties(
         lib_opencv        
    
    PROPERTIES
    IMPORTED_LOCATION
    ${CMAKE_CURRENT_SOURCE_DIR}/jniLibs/${ANDROID_ABI}/libopencv_java3.so
    )


  7. Finally, link the OpenCV library with your code with the target_link_libraries macro.

The full sample of the CMakeLists.txt file is shown below.

# For more information about using CMake with Android Studio, read the
# documentation: https://d.android.com/studio/projects/add-native-code.html

# Sets the minimum version of CMake required to build the native library.

cmake_minimum_required(VERSION 3.4.1)

set (OPENCV4ANDSDK_INCLUDE
        /path/to/OpenCV-android-sdk/sdk/native/jni/include)
include_directories(
    ${OPENCV4ANDSDK_INCLUDE}
)
# Creates and names a library, sets it as either STATIC
# or SHARED, and provides the relative paths to its source code.
# You can define multiple libraries, and CMake builds them for you.
# Gradle automatically packages shared libraries with your APK.

add_library( # Sets the name of the library.
        native-lib

        # Sets the library as a shared library.
        SHARED

        # Provides a relative path to your source file(s).
        src/main/cpp/native-lib.cpp)
add_library(
        lib_opencv
        SHARED
        IMPORTED
)
set_target_properties(
        lib_opencv
        PROPERTIES
        IMPORTED_LOCATION
        ${CMAKE_CURRENT_SOURCE_DIR}/jniLibs/${ANDROID_ABI}/libopencv_java3.so
)

# Searches for a specified prebuilt library and stores the path as a
# variable. Because CMake includes system libraries in the search path by
# default, you only need to specify the name of the public NDK library
# you want to add. CMake verifies that the library exists before
# completing its build.

find_library( # Sets the name of the path variable.
        log-lib

        # Specifies the name of the NDK library that
        # you want CMake to locate.
        log)


# Specifies libraries CMake should link to your target library. You
# can link multiple libraries, such as libraries you define in this
# build script, prebuilt third-party libraries, or system libraries.

target_link_libraries( # Specifies the target library.
        native-lib

        # Links the target library to the log library
        # included in the NDK.
        ${log-lib}
        lib_opencv
        )


Monday, October 22, 2018

How I setup OpenCV4Android Java SDK with a blank Android project

Setting up an Android Studio project with OpenCV3 can be a little tricky. The official documentation is still using Eclipse and has not been updated with Android Studio. So setting up OpenCV with Android Studio required some trial and error experimentation. I managed to get a template Android Studio project to load the native OpenCV library with the following steps.

Download OpenCV4AndroidSdk
  1. If you have not done so, download OpenCV4Android from this website https://sourceforge.net/projects/opencvlibrary/files/opencv-android/
  2. Extract the files into a folder e.g. /path/to/Open-CV-android-sdk/
Create an Android Project with C++ Support
  1.  Run Android Studio. Choose Create a New Project.

  2. In the Create New Project dialog box, toggle on Include C++ support.
  3. Choose appropriate options and click Next in the following screens.
  4. Click Finish.

    The new project is created.
Import the OpenCV module into Gradle
  1. In the Android Studio File menu, select File | New | Import Module.

    The Import Module from Source dialog box appears.
  2. In the Source directory field, click the ... button and browse to the downloaded OpenCV4Android files and select the java folder e.g. /path/to/OpenCV-android-sdk/sdk/java/.
  3. Optional. In the Module name field, type in a name e.g. :opencv.
  4. Click Next and Finish.

    The module is imported (with most likely error messages)
  5. Options. You can download the missing dependencies by clicking the Install missing platforms and sync project link. Or you can edit the OpenCV4Android's build.gradle file to enter the installed dependencies.
Fix OpenCV4Android configuration files
  1. In Android Studio, open up the file build.gradle from the imported module opencv module e.g. /path/to/opencv/build.gradle. It may be necessary to change the Project pane to display as project view.

  2. In the editor, changed the compiledSdkVersion to 27 (or any installed version), the targetSdkVersion to 27 (or any installed version).
  3. Then sync the gradle project.

    The project is synced but now there is an error about the manifest file.
  4. Open up the manifest file /path/to/opencv/src/main/AndroidManifest.xml in the editor.

  5. Now, comment out the uses-sdk line as shown in the screenshot above.
  6. Sync the project again.

    The OpenCV module is successfully configured.
Add the OpenCV module as a dependency to the Android App project
  1. In Android Studio, select App in the Project pane.
  2. Select File | Project Structure.

    The Project Structure dialog box appears.
  3. Select app. Then click the Dependencies tab. Click +. Choose module dependency.
  4. Choose the imported Opencv module.

    OpenCV is appended to the list.
  5. Click OK.

    The module is added the Android App project.
Copy over the OpenCV native platform binaries to the Android App project
  1.  Open up a File Explorer. Select all the native platform folders under the /path/to/OpenCV-android-sdk/sdk/native/libs/*.

  2. Right click and select Copy.
  3. In Android Studio, right click on the app folder (in project view). Choose Paste.

    The Copy dialog box appears.
  4. In the To directory field, change the text to /path/to/myandroid/app/jniLibs/.
  5. Click OK.

    The native binaries are copied to the project.
  6. To enable the Android project to know where the native binaries are, open up the app's build.gradle file in the editor.

  7. Add in the android class, add in the following sourceSets lines:

    Note: 'jniLibs' means the jniLibs directory relative to this build.gradle file location.
    sourceSets {
        main {
            jniLibs.srcDirs = ['jniLibs']
        }
    }
  8. Sync the project.
Load the native library
  1.  In the MainActivity Kotlin class, type in the following to load in the OpenCV library.

    System.loadLibrary("opencv_java3")
  2. If everything is configured properly, then the Android app can be launched successfully.

    Now you can make any java/Kotlin calls to the built in OpenCV interfaces.

Monday, August 20, 2018

Android Studio: Resolving a "Didn't find class "some.class.name" on path: DexPathList" error

I encountered this error message when trying to run an Android project in Android Studio.
08-15 21:05:44.338 7789-7789/? E/AndroidRuntime: FATAL EXCEPTION: main
Process: com.dom925.cadmon.tampa, PID: 7789
java.lang.RuntimeException: Unable to instantiate application com.dom925.cadmon.tampa.App: java.lang.ClassNotFoundException: Didn't find class "com.dom925.cadmon.tampa.App" on path: DexPathList[[zip file "/data/app/com.dom925.cadmon.tampa-1/base.apk"],nativeLibraryDirectories=[/data/app/com.dom925.cadmon.tampa-1/lib/x86, /system/lib, /vendor/lib]]
at android.app.LoadedApk.makeApplication(LoadedApk.java:802)
at android.app.ActivityThread.handleBindApplication(ActivityThread.java:5377)
at android.app.ActivityThread.-wrap2(ActivityThread.java)
at android.app.ActivityThread$H.handleMessage(ActivityThread.java:1545)
at android.os.Handler.dispatchMessage(Handler.java:102)
at android.os.Looper.loop(Looper.java:154)
at android.app.ActivityThread.main(ActivityThread.java:6119)
at java.lang.reflect.Method.invoke(Native Method)
at com.android.internal.os.ZygoteInit$MethodAndArgsCaller.run(ZygoteInit.java:886)
at com.android.internal.os.ZygoteInit.main(ZygoteInit.java:776)


The cause to this particular problem was some missing plugins in the Android app's build.gradle file. As I was adding some Kotlin code to the project, the Gradle build system needs to recognize the Kotlin classes. If the plugins are not included, the Gradle build system will not be able to run the Kotlin code. 

The app's build.gradle file with missing Kotlin plugins
So adding in the Kotlin plugins kotlin-android and/or kotlin-android-extension as shown below solved the problem.