Monday, June 24, 2019

How to setup a VirtualBox Ubuntu virtual machine on a Windows 10 computer for remote desktop access

An Oracle VirtualBox virtual machine (VM) can be accessed from a remote Windows 10 computer through the remote desktop protocol (RDP) as if it were running locally on the local desktop. But this is not enabled by default; to allow remote desktop connections, the VM's remote display parameters must be set and enabled. The following steps show how this can be done.

Setting up a VM on the remote PC for remote access
  1. On the remote Windows 10 PC, start Oracle VirtualBox.

  2. In the list of virtual machines, select a VM, e.g. Ubuntu19. Click Settings.

    The Settings dialog box appears.
  3. Click Display and then the Remote Display tab.
  4. Toggle on the Enable Server field. In the Server Port field, type in an unused port e.g. 5000. Click OK.
  5. Click the black drop down arrow on the Start icon and choose Start Headless Start.


    The Virtual machine is started without displaying any windows.

Connecting to the remote VM from a local PC
  1. Now on a local PC e.g. an Ubuntu 18.04, start up a RDP client e.g. Remmina Remote Desktop Client.
  2. Create a new Remote Desktop Profile.

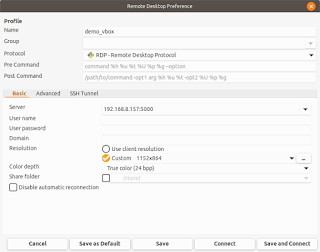
  3. In the Name field, type in a suitable name, e.g. demo_vbox.
  4. In the Protocol field, choose RDP - Remote Desktop Protocol.
  5. In the Server field, type in the IP address and port number of the remote Windows 10 computer, e.g. 192.168.123.123:5000.
  6. Choose an appropriate Resolution and Color depth.
  7. Save and connect to the VM.

    The remote desktop is displayed.

If the remote VM cannot be connected successfully, then it is possible the remote Windows 10 PC's firewall is blocking the network port. To open the port, the following steps can be done.

  1. On Windows 10, click the Start button and then the Settings icon.

    The Settings dialog box appears.
  2.  Click Windows Security. Click Firewall and network protection.

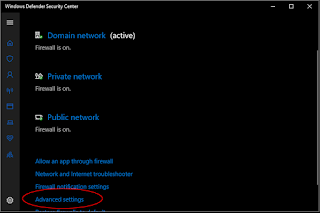
  3. Scroll down and click Advanced settings.

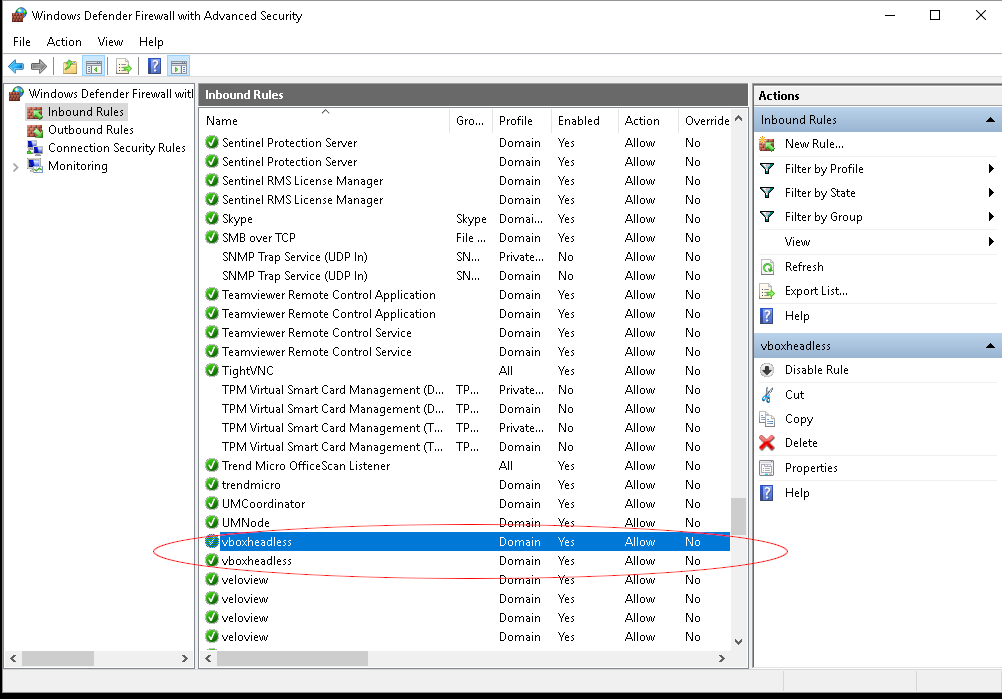
    The Windows Defender Firewall with Advanced Security on Local Computer dialog box appears.
  4. Click Inbound Rules.

  5. Scroll down and ensure the vboxheadless rule exists and enabled. If not create a new rule and enable the selected port e.g. 5000.

Monday, June 17, 2019

Android Studio: Resolving PreferenceFragment is deprecated warning

I encountered the following warning message in Android Studio while converting some Android Java code to Kotlin:
'PreferenceFragment' is deprecated. Deprecated in Java

Some digging through the Android documentation resulted in a solution; the android.preference.PreferenceFragment class is being deprecated and can be replaced with the new Jetpack androidx preference classes. So I needed to do the following:
  1. Add a new dependency to the new Androidx preference library in the app's build.gradle file

    implementation "androidx.preference:preference:1.0.0"
  2. In the Kotlin source code, remove the following namespace import statement:

    import android.preference.PreferenceFragment
  3. Insert the following namespace import statement:

    import androidx.preference.PreferenceFragmentCompat
  4. Then override the abstract onCreatePreferences method.

override fun onCreatePreferences(savedInstanceState: Bundle?, rootKey: String?) {
//        TODO("not implemented") //To change body of created functions use File | Settings | File Templates.
    }

Monday, June 10, 2019

Android Studio shortcut to insert a Kotlin logging code using Live Template


Android Studio has a Live Template system for storing predefined code templates which can be recalled via an abbreviation keyword and automatically inserted at the cursor location in the source code editor. This can ease the task of typing in frequently used code syntax.

In this example, a template with the abbreviation logd shall be created which will insert the following code at the cursor location when activated only within a Kotlin language file. Once the code is inserted, the cursor will be placed inside the quotation marks.

Log.d(TAG, "")

Do the following:
  1. In Android Studio, select File | Settings.

    The Settings dialog box appears.
     
  2.  Select Editor | Live Templates.

  3. Then click the + button on the right. Choose Live Template. In the Abbreviation field, type in the keyword, e.g. logd that will activate this template. In the Description field, type in a accurate value e.g. Log debug message.

  4. In the Template text field, type in the code syntax and/or any macro, e.g. Log.d(TAG, "$END$")

    Note: $END$ is a macro which will position the cursor after the template has been inserted.
  5. Next, click Define to choose the environment in which this template can be activated.

  6. In the popup, choose a language or group construct e.g. Kotlin. Click OK

    The template is created.
Now, to use the newly created template, open a Kotlin file in the code editor. Place the cursor on the location in the code and press CTRL-j on the keyboard. A pop up menu with a list of template keywords will appear.


Type in the keyword logd or choose the logd keyword with the mouse and press Enter. The template is inserted and the cursor placed between the quote marks as shown below.

Monday, June 3, 2019

Installing and running the Velodyne Height Map package on ROS Melodic distribution

The ROS Velodyne Height Map package (https://wiki.ros.org/velodyne_height_map) is a useful tool for identifying obstacles in a point cloud. An example of potential obstacles is shown below (the red squares).

However the last supported ROS distribution seems to be Indigo, a few releases from the latest Melodic distribution. But it is still possible to install and run the package on the latest ROS distribution. To do that, the source code from https://github.com/jack-oquin/velodyne_height_map must be downloaded and compiled on the ROS installation. The following steps illustrate the procedure.

Create a ROS Catkin workspace
  1. Follow the tutorial here at https://wiki.ros.org/catkin/Tutorials/create_a_workspace to create an empty workspace, e.g /path/to/catkin_ws/.
Download the Velodyne Height Map source code
  1. Open up a Terminal. Change the directory to the location of the Catkin workspace's src directory created earlier.

    $ cd /path/to/catkin_ws/src
  2.  Assuming git is installed, clone the velodyne height map source code.

    $ git clone https://github.com/jack-oquin/velodyne_height_map.git
Build the package
  1. In the Terminal, change the directory to the root of the Catkin workspace.

    $ cd /path/to/catkin_ws
  2. Type in the following command to build the packages.

    $ catkin_make
Once the package is built, the Velodyne Height Map package can be executed according to the instructions here at https://wiki.ros.org/velodyne_height_map. For example,

$ rosrun velodyne_height_map heightmap_node