Showing posts with label Git. Show all posts

Monday, March 2, 2020

git authentication failed after changing password or installing a new version of git for Windows

After installing a new version of git for Windows or changing the git repository password, the following git error messages may appear when trying to access the git repository: "...access denied...fatal authentication failed for ..."
 
This problem can be resolved by resetting the git password in the Windows Credential Manager.

  1. Click the Windows Start button.
  2. Start typing in "Credential Manager". When the Credential Manager icon is displayed, click the icon.

    The Credential Manager dialog box appears.

  3. Click the Windows Credentials icon.
  4. Scroll down the credential list and look for a git generic credential, e.g. git:https://gitlab.com. Click on the credential.

    The git credential properties appear.

  5. Click Remove.


    The git credential is removed.
  6. Close the Credential Manager.

Now, running any git command to access the repository will cause Windows to pop up a dialog box to enter the login and pasword, as shown below.
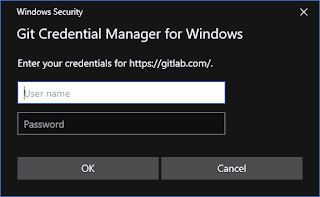
Entering the correct login and password will allow the git command to be executed successfully.


Monday, November 4, 2019

Fixing the git-credential-osxkeychain password prompts on every git transaction

After a password change in my gitlab account, sometimes the git-credential-osxkeychain password prompt (shown below) will always pop up whenever I try to perform a git commit transaction on my Macbook.

And it seemingly will not allow you to proceed even though the correct password has been entered; only by pressing the ESC key will MacOSX allow the transaction to go through.

To resolve this issue, the following steps can be done:
  1. Press Command + spacebar on the keyboard to bring up the Finder. Type in keychain. Press Enter.

    The Keychain access dialog box appears.
  2. In the Search field, type in gitlab.

    The list is filtered by the search string.
  3. Now, mouse right click on the gitlab entry on the list. Choose Delete "gitlab.com".

    The keychain entry is deleted.
The gitlab keychain entry will be regenerated the next time and the git-credential-osxkeychain prompt will no longer pop up.

Monday, June 3, 2019

Installing and running the Velodyne Height Map package on ROS Melodic distribution

The ROS Velodyne Height Map package (https://wiki.ros.org/velodyne_height_map) is a useful tool for identifying obstacles in a point cloud. An example of potential obstacles is shown below (the red squares).

However the last supported ROS distribution seems to be Indigo, a few releases from the latest Melodic distribution. But it is still possible to install and run the package on the latest ROS distribution. To do that, the source code from https://github.com/jack-oquin/velodyne_height_map must be downloaded and compiled on the ROS installation. The following steps illustrate the procedure.

Create a ROS Catkin workspace
  1. Follow the tutorial here at https://wiki.ros.org/catkin/Tutorials/create_a_workspace to create an empty workspace, e.g /path/to/catkin_ws/.
Download the Velodyne Height Map source code
  1. Open up a Terminal. Change the directory to the location of the Catkin workspace's src directory created earlier.

    $ cd /path/to/catkin_ws/src
  2.  Assuming git is installed, clone the velodyne height map source code.

    $ git clone https://github.com/jack-oquin/velodyne_height_map.git
Build the package
  1. In the Terminal, change the directory to the root of the Catkin workspace.

    $ cd /path/to/catkin_ws
  2. Type in the following command to build the packages.

    $ catkin_make
Once the package is built, the Velodyne Height Map package can be executed according to the instructions here at https://wiki.ros.org/velodyne_height_map. For example,

$ rosrun velodyne_height_map heightmap_node

Tuesday, June 2, 2015

Using Git with Visual Studio: cloning a repository

I like using the source code repository tool Git with Microsoft Visual Studio 2013. It makes life easier for a developer in managing software code. To start using Git, perhaps one of the first thing to do is to set up Git with Visual Studio and clone an existing repository. The following steps illustrate the basic steps.

  1. Start Visual Studio.


  2. Select View | Team Explorer.

    The Team Explorer pane appears on the right.

  3. Click Settings. Then click Git Settings.

    The Git Global Settings appear.

  4. Type in your User Name and Email Address that you want to associate with Git. If you like, define the Default Repository Location. Click Update.

    The settings are saved.

  5.  Click the Connect to Team Projects button.


  6. Click Clone.


  7. Type in the URL to the Git repository.


  8. Define the directory to clone to, e.g. D:\GitRepos\gps-localtime-windows\.
  9. Click Clone.

    Processing messages appear.


    Finally, the repository is cloned.