Showing posts with label Eclipse. Show all posts

Monday, March 10, 2014

Handling the Android compilation error "Unable to execute dex: Multiple dex files define" in Eclipse

I have spent a lot of time trying to get an Android project using the Google Play Services and the Google Maps Android Utility libraries to compile successfully. A typical error message is shown in the screenshot below.

Eclipse was complaining about multiple dex files; eventually I found out that I was exporting out multiple jar files with the same classes and I had to toggle off the duplicate jar files in Eclipse. The following steps ensure that my project could compile successfully with the two libraries.

Add the Google Play Services and Google Maps Android Utility libraries

  1. In Eclipse, select the Android project in the Package Explorer. Right click and choose Properties.

    The Properties for xxx project appears.
  2. Choose Android. Click Add.

    The Project Selection dialog appears.

  3. Choose Google Play Services library. Click OK.

    The library is added.
  4. Repeat steps 2 and 3 to add the Google Maps Android Utility library.

    The library is added.
Check for Duplicate JARs
  1. Click Java Build Path.

    The Java Build Path page appears.
  2. Click the Libraries tab.


  3. In the JARS and class folders tree, expand the top level nodes.
  4. Make a note of any duplicate JAR files.

    Note: In this example, the android-support-v4.jar is duplicated. There is a copy in my Android project and there is another copy in the Google Maps Android Utility library.

  5. Click the Order and Export tab.


  6. Toggle off one the items that contain the duplicate JAR files e.g. the android-support-v4.jar file in my Android project.
  7. Click OK.

    The Properties for XXXX project is closed.

  8. If necessary, select Project | Clean to clean up the previous compilation temporary files and compile/run the project again.

    The project should now compile successfully.

Monday, April 22, 2013

Create a rounded border around a layout of an Android Activity

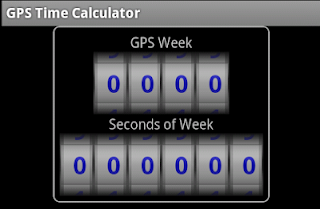
A rounded border can be easily created around a layout in an Android Activity. An example of how it looks like is shown in the screenshot below.

To define a rounded border drawable using the Android Development Toolkit, in Eclipse, the following steps can be done:

Create a new Android drawable XML file
  1. In the Package Explorer pane of Eclipse, right click on the drawable folder.

    A pop up menu appears.

  2. Choose New | Android XML File.

    The New Android XML File dialog box appears.


  3. In the File field, type in the name of the drawable XML file e.g. myborder.xml.
  4. In the Root Element list, choose shape. Click Finish.

    The file is created and the following code is displayed in Eclipse. 

<?xml version="1.0" encoding="utf-8"?>
<shape xmlns:android="http://schemas.android.com/apk/res/android" >

 
</shape>

Edit the drawable Android XML file
  1. In the Eclipse code editor, type in the following to define the rounded border shape.


    <?xml version="1.0" encoding="utf-8"?>
    <shape xmlns:android="http://schemas.android.com/apk/res/android"> 
    <stroke 
    android:width="1dip" 
    android:color="@android:color/darker_gray" /> 
    <solid 
    android:color="@android:color/background_dark" /> 
    <padding 
    android:left="7dip" 
    android:top="7dip" 
    android:right="7dip" 
    android:bottom="7dip" /> 
    <corners 
    android:radius="6dip" /> 
    </shape>


  2. Save the code.

Using the drawable Android XML file in a layout

When editing the layout XML of an Activity, the newly created rounded border drawable can be referenced and used. For example, in the LinearLayout element, the android:background attribute can be set to the myborder drawable created previously, as shown in the code snippet below.


<LinearLayout 
android:orientation="vertical"
android:background="@drawable/border_rounded_corner"
android:layout_width="wrap_content"
android:layout_gravity="center_horizontal"
android:layout_height="wrap_content">
<TextView
android:layout_width="wrap_content"
android:layout_height="wrap_content"
android:layout_gravity="center_horizontal"
android:text="GPS Week"
/>
<RelativeLayout 
android:orientation="horizontal"
android:layout_gravity="center_horizontal"
android:layout_height="wrap_content"
android:layout_width="wrap_content">

<kankan.wheel.widget.WheelView
android:id="@+id/digit4GpsWeek"
android:padding="0dip"
android:layout_width="wrap_content"
android:layout_height="wrap_content"            
/>
<kankan.wheel.widget.WheelView
android:id="@+id/digit3GpsWeek"
android:padding="0dip"
android:layout_width="wrap_content"
android:layout_height="wrap_content"
android:layout_toRightOf="@id/digit4GpsWeek"
/>
<kankan.wheel.widget.WheelView
android:id="@+id/digit2GpsWeek"
android:padding="0dip"
android:layout_width="wrap_content"
android:layout_height="wrap_content"
android:layout_toRightOf="@id/digit3GpsWeek"
/>
<kankan.wheel.widget.WheelView 
android:id="@+id/digit1GpsWeek"
android:padding="0dip"
android:layout_width="wrap_content"
android:layout_height="wrap_content"
android:layout_toRightOf="@id/digit2GpsWeek"
/>
</RelativeLayout>
<!-- etc -->
</LinearLayout>

The corresponding resultant Activity may look like the screenshot below.

Monday, January 28, 2013

Connect an Android HP Touchpad to Windows XP via USB

I had some problems getting my Eclipse development environment on Windows XP to recognize an HP Touchpad tablet installed with CyanogenMod 7 (an independent Android OS distribution). I searched the net for a while but could not find a single solution that could fix my problem. In the end, I went on a hunch and resolved the issue. The following steps were what I did.

Reinstall the Mass Storage Device Driver
This section is optional. In my case, I had a previous tablet driver which recognizes the HP Touchpad as a mass storage device only (but not the Eclipse Android SDK). If you don't see the Android Device node in the Device Manager when the tablet is plugged in, then you should do this. Otherwise, skip to the next section.

  1. Select the Start button. Right click on My Computer and choose Manage.

    The Computer Management console appears.
  2. Expand the Universal Serial Bus Controllers node.


  3. Right click on USB Mass Storage Device.
  4. Choose Uninstall.
  5. Select Action | Scan for hardware changes. Reinstall the driver. 


Get the Hardware Ids of the tablet

  1. Physically connect the HP Touchpad to the Windows PC with the USB cable.

    The Found New Hardware Wizard pops up
  2. Select the Start button. Right click on My Computer and choose Manage.

    The Computer Management console appears.

  3. Click Device Manager. Expand the Android Device node. Right click on Android Tablet.

    The Android Tablet Properties appear.
  4. Choose Hardware Ids.


  5. Note down the hardware ids (2 lines that appear in the text) box e.g. USB\Vid_0bb4&Pid_0c02&Rev_0227&MI_01USB\Vid_0bb4&Pid_0c02&MI_01.
  6. Close the dialog box.

Insert the tablet hardware ids into the Android SDK's usb driver android_winusb.inf file

  1. Use a text editor to open up the android_winusb.inf file.

    Note: This is located underneath where you installed the Android SDK e.g. C:\Program files\android\android-sdk\extras\google\usb_driver\.
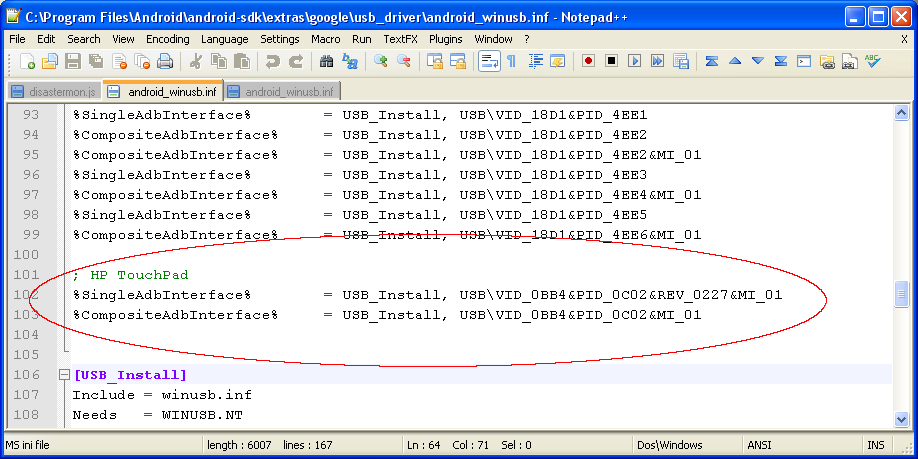
  2. Underneath the section [Google.NTx86], add in the hardware ids you noted down previously as shown below.


    Note: lines that begin with ';' are comment lines.
  3. Also add in the same lines underneath the section [Google.NTamd64].
  4.  Save the file. Close the text editor.
Install the Android tablet driver
  1. If the Found New Hardware Wizard is closed, then you can unplug the tablet. Then plug it again to the USB port.

    The Found New Hardware Wizard appears.
  2. Choose Not this time. Click Next.


  3. Choose Install from a list or specified location (Advanced). Click Next.


  4. Toggle on Search for the best driver in these locations.Toggle on Include this location in the search. Click Browse. Specify the folder location of the file winusb.inf e.g. C:\Program files\android\android-sdk\extras\usb_driver\. Click Next.


    The wizard installs the driver.

  5. Click Finish to complete.


  6. If necessary, you may need to reboot.
If the driver installation is successful, the Device Manager will list the Android ADB Interface underneath the Android Device node when the tablet is plugged in, as shown below. You should be able to connect to the HP Touchpad through the Eclipse IDE