Showing posts with label Ubuntu. Show all posts

Monday, May 11, 2026

Resolving the no external monitor signal error after updating Ubuntu 24.04

After installing system updates on my Ubuntu 24.04 Thinkpad P53 with a NVIDIA T1000 GPU, sometimes my external HDMI monitor will no longer get any display signal from my laptop after rebooting. This happened to me many times over the years; and every time I had to search for the solution to the problem. This could take a while and wasted my time. So for posterity's sake, I am writing this post so that I can refer to it in the future.

If the Ubuntu system updates borks up your external monitor display, you can do the following:

 Check if the NVIDIA drivers are installed correctly

  1. Open up a terminal and type in the following command:

    $ sudo nvidia-smi

  2.  If the above command shows a table as shown below, then your drivers are installed.


  3. If not, then try to find and install the correct NVIDIA driver. 

Finding the correct NVIDIA driver for your system

  1.  In a terminal, type in the following command:

    $ sudo ubuntu-drivers devices

  2. In the following list that appears, take note of the recommended driver, e.g. nvidia-driver-595-open.


 Configure Ubuntu to use the recommended NVIDIA driver 

  1.  Click the Ubuntu icon on the desktop and then choose the Additional drivers icon. 

    The Software & Updates dialog box appears.


  2. In the list of drivers, toggle on the recommended driver, e.g. nvidia-driver-595-open. Then click Apply Changes


  3. Reboot the machine.

 After restarting, the external monitor should be displaying the signal from the laptop.

Monday, June 5, 2023

How to sync the time between 2 Ubuntu systems on an isolated network

I wanted to match the times between two systems on an isolated network running Ubuntu 22. This can be done using chrony (https://chrony.tuxfamily.org) on the two systems - one system serves as the local time server to the other client system. 

Setting up the Server

  1. Optional. If chrony is not installed, run the following command in the Terminal to install it.

    $ sudo apt install chrony

  2. Using a text editor, add the following lines to the file /etc/chrony/chrony.conf.


    local stratum 8
    allow xxx.xxx.xxx.xxx


    Note 1: The keyword local tells chrony to server isolated networks.
    Note 2: The allow keyword specifies the IP address of the client to server


  3. Restart the chrony service using the following command. Or you can reboot.

    $ sudo systemctl restart chronyd

Setting up the Client

  1.  Optional. If chrony is not installed, run the following command in the Terminal to install it.

    $ sudo apt install chrony

  2. Using a text editor, add the following to the file /etc/chrony/chrony.conf.

    server yyy.yyy.yyy.yyy minpoll 0 maxpoll 5 maxdelay 0.1

  3. Restart the chrony service using the following command. Or reboot.

    $ sudo systemctl restart chronyd

  4. To verify whether the syncing is working, the following command can be used.

    $ chronyc sources -v


    Note: If the sync is successful, the MS column should be showing the symbols ^* for the IP address of the server entry.


Monday, April 3, 2023

How to create a Arm64 Ubuntu virtual machine using Virt-Manager

I wanted to run Ubuntu on an Arm64/Aarch64 virtual machine on a host Intel Linux computer for the longest time for compiling binaries for Raspberry Pis and other SBC boards. I finally figured out how to do it with virt-manager, and it is quite simple as clicking and selecting options on the virt-manager graphical user interface. The instructions below show how it is done.

Download and install prerequisites

  1. In Ubuntu, open up a Terminal and enter the following commands to install the prerequisite software.

    $ sudo apt install qemu-kvm \
    libvirt-daemon-system \
    libvirt-clients \
    bridge-utils \
    virt-manager \
    qemu-system-arm \
    qemu-efi-aarch64 \
    qemu-utils
    

  2. Open up an Internet browser. Download an Ubuntu Arm64 image to install. For example: https://cdimage.ubuntu.com/releases/22.04/release/ubuntu-22.04.2-live-server-arm64.iso

 Create the virtual machine

  1. In Ubuntu, click the Virtual Machine Manager icon.

    The Virtual Machine Manager application appears.


  2. Select File | Create New Virtual Machine.

    The New VM dialog box pops up.


  3. Choose Local install media (ISO image or CDROM).

  4. In the Architecture options, choose aarch64 architecture. Click Forward.

    Step 2 of 5 pages appears.

  5. In the Choose ISO or CDROM install media field, choose the iso image downloaded previously.


  6. Click Forward. If necessary, change the memory size and the number of CPUs.

    Step 3 of 5 pages appear.


  7. Click Forward. If necessary, change the disk image size to a suitable size.

    Step 4 of 5 appears.


  8. Click Forward.

    Step 5 of 5 appears.


  9. Optional. In the Name field, type in a desired name.

  10. Toggle On the Customize configuration before install field.


  11. Click Finish.

    The 'vm name' on QEMU/KVM dialog box appears.


  12. In the Hypervisor Details group, change the Firmware to UEFI aarch64.


  13. Click Apply. Then click the Begin Installation button and follow the prompts to complete the installation.

    The installation begins...


Monday, January 30, 2023

Fixing a kernel panic error when installing Ubuntu 20.04 in VirtualBox

I was trying to create an Ubuntu 20.04 virtual machine using Oracle VirtualBox but I kept encountering this error with the message "...end kernel panic - not syncing: Attempted to kill the idle task!..." The screenshot below shows the error in VirtualBox.

Eventually, I found out the error was caused by inadequate alllocated CPU resources in VirtualBox. By default, the number of CPU allocated for the VM is 1, as shown in the screen shot below.

Simply increasing the number of CPU to at least 2 helped to solve the kernel panic error in this case.

Monday, November 7, 2022

Shell script to batch bulk convert *.flac files to *.mp3

I have many music files in flac format and I wanted to convert them to a more compressed mp3 format with ffmpeg on Ubuntu so I can upload them to a storage limited portable music player. To ease the conversion task, I decided to write this simple shell script to do the job. In brief, the script will do the following:

  • find all the files with the extension .flac in the current directory
  • replace the file name extension .flac with the .mp3 extension
  • create a temporary script that calls the ffmpeg command to convert
  • run the temporary script

The listing of the shell script is shown below.  

# Define the internal field separator as a newline
IFS=$'\n'

# Find all the *.flac files in the current directory and perform the conversion
for f in `find . -name "*.flac" `;
do
	# Use the input flac file name prefix and replace the .flac extension with a .mp3 extension
	f=$(echo $f | cut -c 3-)
	outfile=$(basename $f .flac)
	outfile=$outfile.mp3
	
	echo "Convert $f->$outfile..."
	
	# Form the ffmpeg command to convert the input flac file to mp3
	cmd="ffmpeg -hide_banner -i \"$f\" -ab 320k -map_metadata 0 -id3v2_version 3 \"$outfile\" "
	
	# Create a temporary shell script for running the conversion
	echo $cmd > /tmp/tmp.sh
	
	# Run the conversion to mp3
	bash /tmp/tmp.sh
	
	# Clean up
	rm /tmp/tmp.sh
done

To use this shell script, you can do the following:

  1. Save the code listing above to a file e.g. run.sh in a directory, e.g. /path/to
    /directory/


  2. Open up a Linux Terminal.

  3. In the Terminal, type in the command to change directory to the location of the flac files, e.g. /path/to/music/

    $ cd /path/to/music


  4. At the prompt, type in the command to run the shell script.

    $ bash /path/to/run.sh

    The flac files are converted to mp3 files.
 

Monday, October 31, 2022

Simple C++ example to send serial AT commands to and receive data from a modem

I tried using many C/C++ libraries trying to coax a 5G modem to respond to my input AT commands for a long time but I was not successful. The command I was trying to send was the Quectel modem command to query for PDN channels:

AT+CGDCONT?

After a while, I figured out I had to simulate a keyboard Enter press in code to actually tell the modem the command is complete. So all I had to do was append the carriage return (\r) and new line (\n) characters to the AT command string, e.g:

string cmd = "AT+CGDCONT?\r\n";

A working C++ code example is shown below:

#include <string>
#include <iostream>
#include <cstdio>
#include <unistd.h>

// Using header only library from 
// https://github.com/karthickai/serial
#include "Serial.h"


using namespace std;


int main ( int argc, char** argv) {

        string commPort = "/dev/ttyUSB2";
        unsigned int baud = 115200;
        serial::Serial serial;

        serial.open ( commPort, baud);

        if ( !serial.isOpen()) {
                cout << "comm port is not open" << endl;
                return 1;
        }

        // A modem AT query command
        string cmd = "AT+CGDCONT?\r\n";
        vector<uint8_t> cmdVec (cmd.begin(), cmd.end());

        // send command to the modem
        size_t bytesSent = serial.transmitAsync(cmdVec);
        cout << "Bytes sent " << bytesSent << endl;

        int received_bytes = -1;

        while (received_bytes != 0 ) {
                // read one byte from the modem and timeout if the
                // there is no response in more than 1 sec.
                future<vector<uint8_t>> future = serial.receiveAsync(1, 1000);
                vector<uint8_t> const received_data = future.get();
                received_bytes = received_data.size();

                string str(received_data.begin(), received_data.end());
                cout << "[" << received_data[0] << "] " << endl;
        }
        // Close the serial port
        serial.close();

        cout << "End of process" << endl;

        return 0;

}

The example prints out the data sent by the modem to the calling program, as shown below:

Note: this example is using the modern serial header only C++ library from this site: https://github.com/karthickai/serial

Monday, October 17, 2022

Auto mount an SD card upon insert on Ubuntu Server

I have a headless Raspberry Pi board running Ubuntu 20.04.x server with a USB SD card reader. I wanted the system to automatically mount an SD card to a fixed mount point, e.g. /media/ubuntu/sdcard/ upon card insertion. By default, Ubuntu Server doesn't mount the SD card so I had to do some setup and configuration, as illustrate in the steps below. I had to install some prerequisite software package (udevil) and create a systemd service.

Install udevil package and create mount directory

  1. Open up a Terminal and type in the following command to install udevil.

    $ sudo apt install udevil

  2. Then, create a SD card directory mount point, e.g. /media/ubuntu/sdcard/ with the following command:

    $ mkdir -p /media/ubuntu/sdcard


Add a mount rule to the fstab file

  1. Using a text editor, e.g. vi, open up the system file /etc/fstab.

    $ sudo vi /etc/fstab

  2. Append the following line:

    /dev/sda1 /media/ubuntu/sdcard auto rw,user,exec,umask=000  0  2

    An example fstab file is shown below:
LABEL=writable  /        ext4   defaults        0 1
LABEL=system-boot       /boot/firmware  vfat    defaults        0       1
/dev/sda1       /media/ubuntu/sdcard auto rw,user,exec,umask=000        0       2

Create the devmon Systemd service

  1. In the Terminal, change directory to /etc/systemd/system/.

    $ cd /etc/systemd/system

  2. Using a text editor, e.g. vi, create a file e.g. devmon.service. Enter the following and save the file.

    [Unit]
    Description=Systemd service for running devmon
    [Service]
    Type=simple
    User=ubuntu
    Group=ubuntu
    ExecStart=/usr/bin/devmon
    [Install]
    WantedBy=multi-user.target


  3. In the Terminal, type in the following to generate the service:

    $ sudo systemctl daemon-reload
    $ sudo systemctl enable devmon

  4. Then either reboot the board or run the following command to start the service:

    $ sudo systemctl start devmon

 Monitor the service

  1. In a Terminal, type in the following to monitor the newly create devmon service when an SD card is inserted or unmounted.

    $ journalctl -u devmon -f

 Note: The SD card should be unmounted properly using the following command(s):

$ udevil umount /media/ubuntu/sdcard

- or -

$ sudo umount /media/ubuntu/sdcard

Monday, September 19, 2022

Run Quectel's Connection Manager as a systemd service on Ubuntu

I found myself in possession of a modem by Quectel (https://www.quectel.com) to hook up to a Raspberry Pi running Ubuntu 20.04. I wanted to auto run Quectel's connection manager executable quectel-CM on system start up but found limited information available online from Quectel. So I had to roll up my sleeves and make my own systemd service for that purpose.

This post outlines the steps I took:

Download and compile the quectel-CM executable

  1. Using an Internet browser, download the latest Quectel LTE, 5G Linux USB driver, e.g. Quectel_LTE5G_Linux_USB_Driver_V1.0.zip from https://www.quectel.com/download-zone.
     
  2.  Extract QConnectManager_Linux_V1.0.zip into a folder e.g. /home/ubuntu/Downloads/quectel-CM/.

  3. In a Terminal, change directory to the extracted folder.

    $ cd ~/Downloads/quectel-CM/

  4. Use the make command to compile the connection manager executable.

    $ make

    The quectel-CM executable is compiled.

Place the quectel-CM exe to the run time directory

  1. In a Terminal, type in the following commands to change directory to the extracted directory.

    $ cd /home/ubuntu/Downloads/quectel-CM/

  2. Copy the executable to /usr/local/bin/.

    $ sudo cp quectel-CM /usr/local/bin

Create a systemd service file

  1.  In the directory /etc/systemd/system, use a text editor to create a service file e.g. quectelcm.service.

    $ sudo vi /etc/systemd/system/quectelcm.service

  2. Type in the following lines, save and exit the file:
    [Unit]
    Description=Systemd service for running Quectel's Connection Manager quectel-CM executable
    
    [Service]
    ExecStart=/usr/local/bin/quectel-CM 
    Restart=always
    RestartSec=5
    
    [Install]
    WantedBy=multi-user.target
    

  3. Give the service file the following executable permission:

    $ sudo chmod 664 /etc/systemd/system/quectelcm.service

 Create the service

  1. In the Terminal, type in the following commands:

    $ sudo systemctl daemon-reload
    $ sudo systemctl enable quectelcm

    The quectelcm service is created.


Running and monitoring the service

  1. You can either reboot the Raspberry Pi or type in the following command to start the service in a Terminal.

    $ sudo systemctl start quectelcm

  2. To monitor the quectelcm service, use the journalctl command:

    $ journalctl -u quectelcm -f


Note: In order for quectel-CM to request and set the machine's network address, the software prerequisites net-tools and udhcpc must be installed on the Raspberry Pi.


Monday, March 28, 2022

Workaround for gphoto2 with certain Sony camera models problem on system restart

For some Sony camera models e.g. the Sony Alpha-A7R III, gphoto2 will not be able to connect and/or trigger an image capture after a Linux computer system restart with the camera powered on. This issue is described in more detail at the gphoto2 github repository https://github.com/gphoto/gphoto2/issues/279 but it is currently unresolved.

gphoto2 will be able to work again with the Sony camera if you physically extract out and plug in the USB cable again. But I wanted to do it programmatically. I found this great utility uhubctl at https://github.com/mvp/uhubctl that I can use with a supported smart USB hub to switch a USB port power off and on. You need to connect the Sony camera to the USB hub, and the hub to a Linux PC, Ubuntu in my case.

In this post, I describe the steps I use to setup and programmatically switch the power to the USB port of the hub connecting to the camera (using a Canon for illustration as I don't have a Sony on hand).

Install uhubctl

  1. On the Linux PC, open up a Terminal and install uhubctl.

    $ sudo apt install uhubctl

Identify the USB hub's vendor id and product id

  1. In a Terminal, type in the following command:

    $ lsusb

    A list of usb devices is shown.


  2. Note down the vendor id and product id of the smart USB hub.

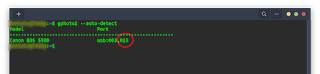
    05e3:0610 is identified as the vendor id and product id of the USB hub.
     

Identify the port number of the USB hub that is connected to the camera

  1. In a Terminal, type in the following command:

    $ sudo uhubctl

    A listing of hubs and ports is displayed.


  2. First, look for the smart hub with the previously noted vendor id and product id, e.g. 05e3:0610.
     
  3. Then under the selected hub, identify the port with the Sony(Canon) camera connected.

    Port number 1 is identified.

Switch off the port to the camera

  1. In a Terminal, type in the following command to switch off the USB port of the camera:

    $ sudo uhubctl -n 05e3:0610 -p 1 -a 0

    where -n 05e3:0610 is the vendor id and product id of the USB hub,
    -p 1 is the port number of the camera
    -a 0 is to power off


Switch on the port to the camera

  1.  In a Terminal, type in the following command to switch on the port to the camera:

    $ sudo uhubctl -n 05e3:0610 -p 1 -a 1

    where -n 05e3:0610 is the vendor id and product id of the USB hub
    -p 1 is the port number of the camera
    -a 1 is to power on


Use gphoto2

From this point on, the Sony camera should be functional again from gphoto2.


Monday, March 21, 2022

Setup a Raspberry Pi 4B to publish a webcam with hardware accelerated video encoding

The Raspberry Pi 4B has an integrated video processing unit, a so called GPU. I wanted to use the GPU to offload the video encoding processing from the CPU when I publish my webcam as a RTSP video stream from the Pi board running Ubuntu 20.04 64 bit and using ffmpeg

Download and install rtsp-simple-server

  1. Using a browser, download and extract the open source rtsp-simple-server from https://github.com/aler9/rtsp-simple-server into a folder, e.g. /path/to/rtsp/

    The files rtsp-simple-server and rtsp-simple-server.yml are extracted out.

  2. Open up a Terminal. At the prompt, change directory to the previously created folder /path/to/rtsp/.

    $ cd /path/to/rtsp/

  3. Move the binary to the folder /usr/local/bin/

    $ sudo mv rtsp-simple-server /usr/local/bin/

  4. Move the yml configuration file to the folder /usr/local/etc/

    $ sudo mv rtsp-simple-server.yml /usr/local/etc/

Configure rtsp-simple-server to publish the webcam from ffmpeg

  1.  Open up a Terminal. At the prompt, change directory to the directory /usr/local/etc/.

    $ cd /usr/local/etc

  2. Using a text editor, edit the configuration file rtsp-simple-server.yml. Create a new path name, e.g. cam under the paths key.

    paths:
      cam:
        runOnDemand: ffmpeg -hide_banner -s 1280x720 -r 25 -i /dev/video0 -b:v 2M -c:v h264_v4l2m2m -f rtsp rtsp://localhost:$RTSP_PORT/$RTSP_PATH
        runOnDemandRestart: yes
    

    Notes:
    -s 1280x720 is the source video resolution size from the webcam
    -r 25 is the source sample rate
    -i /dev/video0 is the source webcam video
    -b:v 2M is the output video bit rate
    -c:v h264_v4l2m2m is the video encoder to use


  3. Save and close the configuration file.

 Create and start the rtsp-simple-server service

  1.  Open up a Terminal. Type in the following to create the systemd service.

    sudo tee /etc/systemd/system/rtsp-simple-server.service >/dev/null << EOF
    [Unit]
    After=network.target
    [Service]
    ExecStart=/usr/local/bin/rtsp-simple-server /usr/local/etc/rtsp-simple-server.yml
    [Install]
    WantedBy=multi-user.target
    EOF
    

  2. Enable and start the service by executing the following commands. Or reboot the system.

    $ sudo systemctl enable rtsp-simple-server
    $ sudo systemctl start rtsp-simple-server

Viewing the webcam stream using VLC

  1. If the configuration parameters are correct, then start up VLC on a PC on the network.

    VLC starts up.


  2. Select Media | Open Network Stream.

    The Open Media dialog box appears.


  3. In the URL field, type in the address of the Raspberry Pi e.g. rtsp://192.168.18.5:8554/cam. Then click Play.

    If all the parameters are correct, then VLC should show a stream from the webcam.

    VLC displaying a webcam stream.


    Note: if the video stream looks wrong i.e. greenish and weird as shown above, then the ffmpeg version installed on the Raspberry Pi is an older buggy version 4.2.4 and you need to replace it by downloading the latest ffmpeg and building from source.

Replacing ffmpeg and build from source

  1. Open up a Terminal and remove the system installed ffmpeg with the following command:

    $ sudo apt remove ffmpeg

  2. Using a browser and follow the instructions on https://trac.ffmpeg.org/wiki/CompilationGuide/Ubuntu to install the latest ffmpeg.

  3. Compilation on the Raspberry Pi 4B may take a while, maybe an hour or two so be aware. After compiling successfully, you can try to use VLC and open up the webcam steam again.

    VLC displaying the webcam stream correctly.

Monday, January 24, 2022

How to setup rtsp-simple-server service for publishing from gstreamer using the vaapi encoder

The rtsp-simple-server README instructions on https://github.com/aler9/rtsp-simple-server is a little sparse on publishing as a systemd service using Gstreamer and the vaapi plugin. I spent some time trying to get the service to run properly. This post documents the steps I used on an Intel system board running Ubuntu 20.


Install GStreamer

  1. Optional. If Gstreamer has not been installed, then follow the instructions on https://gstreamer.freedesktop.org/documentation/installing/on-linux.html?gi-language=c.

  2. If the GStreamer VAAPI plugin has not been installed, run the following command in a Terminal:

    $ sudo apt install gstreamer1.0-vaapi

 Download and install rtsp-simple-server

  1. Using a browser, download and extract the rtsp-simple-server binary from the github repo https://github.com/aler9/rtsp-simple-server into a folder, e.g. /path/to/rtsp/

    The files rtsp-simple-server and the rtsp-simple-server.yml are extracted out into the directory /path/to/rtsp/.


  2. Open up a Terminal. At the prompt, change directory to the extracted location.

    $ cd /path/to/rtsp/

  3. Move the binary to the folder /usr/local/bin/

    $ sudo mv rtsp-simple-server /usr/local/bin/

  4. Move the configuration file to the folder /usr/local/etc/

    $ sudo mv rtsp-simple-server.yml /usr/local/etc/

Configure rtsp-simple-server to publish from gstreamer

  1. Open up a Terminal. At the prompt, change directory to the directory /usr/local/etc/.

    $ cd /usr/local/etc/

  2. Using a text editor, edit the configuration file rtsp-simple-server.yml. Create a new path name e.g. mystream under the paths key.

    paths:
        mystream:
            runOnDemand: gst-launch-1.0 v4l2src device=/dev/video0 ! 'video/x-raw,framerate=30/1,width=320,height=240' ! videoconvert ! vaapih264enc ! h264parse ! rtspclientsink location=rtsp://localhost:$RTSP_PORT/$RTSP_PATH
            runOnDemandRestart: yes
    

  3. In the runOnDemand key, type in the Gstreamer pipeline to read from a video source, perform encoding and finally to publish to the rtsp server.

    gst-launch-1.0 v4l2src device=/dev/video0 ! 'video/x-raw,framerate=30/1,width=320,height=240' ! videoconvert ! vaapih264enc bitrate=200000 ! h264parse ! rtspclientsink location=rtsp://localhost:$RTSP_PORT/$RTSP_PATH
    
    Note 1: device points to the video source.
    Note 2: video/x-raw line specifies the video format, frame rate, and resolutions to use
    Note 3: videoconvert converts the color space
    Note 4: vaapih264 performs the video encoding using the Intel GPU
    Note 5: rtspclientsink publishes the video to the rtsp server


  4. Save and close the configuration file.

Create and start the rtsp-simple-server service

  1.  Open up a Terminal. Type in the following to create the systemd service.

    sudo tee /etc/systemd/system/rtsp-simple-server.service >/dev/null << EOF
    [Unit]
    After=network.target
    [Service]
    ExecStart=/usr/local/bin/rtsp-simple-server /usr/local/etc/rtsp-simple-server.yml
    [Install]
    WantedBy=multi-user.target
    EOF


  2. To enable and start the service, run the following:

    $ sudo systemctl enable rtsp-simple-server
    $ sudo systemctl start rtsp-simple-server

Optional. Define LIBVA environment variables

On some boards, when using the vaapi encoding plugin, gstreamer may not run with the error message:

WARNING: erroneous pipeline: no element "vaapih264enc"

In this case, setting the environment variables LIBVA_DRIVERS_PATH and LIBVA_DRIVER_NAME for the service may solve the problem. An example of the command to create the rtsp-simple-server service with the environment variables is shown below:

sudo tee /etc/systemd/system/rtsp-simple-server.service >/dev/null << EOF
[Unit]
After=network.target
[Service]
EnvironmentName="LIBVA_DRIVERS_PATH=/usr/lib/x86_64-linux-gnu/dri/"
EnvironmentName="LIBVA_DRIVER_NAME=i965"
ExecStart=/usr/local/bin/rtsp-simple-server /usr/local/etc/rtsp-simple-server.yml
[Install]
WantedBy=multi-user.target
EOF

Monday, January 17, 2022

gstreamer command to encode videos using an Intel GPU on Ubuntu

An alternative to ffmpeg is the gstreamer library, which comes with optional plug-ins to perform video encoding using Intel GPUs. 

Gstreamer can be installed on Ubuntu by following instructions on  https://gstreamer.freedesktop.org/documentation/installing/on-linux.html?gi-language=c

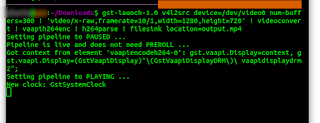
Assuming gstreamer has been installed on Ubuntu, you can run the following command to save the video into an output.mp4 video file.

$ gst-launch-1.0 \
v4l2src device=/dev/video0 num-buffers=300 ! \
'video/x-raw,framerate=10/1,width=1280,height=720' ! \
videoconvert ! \
vaapih264enc ! \
h264parse ! \
filesink location=output.mp4

Note 1: device specifies the video source /dev/video0 and num-buffers specifies the number of frames to read.

Note 2: The line video/x-raw specifies the format, frame rate and resolution to read from the video source.

Note 3: vaapih264enc specifies the Intel Video Accelerated encoder to use.

Note 4: filesink location specifies the output video file.

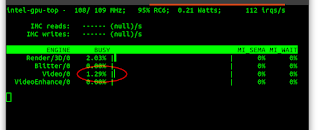
While the gstreamer command is processing the video, in another terminal, run the command to monitor the Intel GPU.

$ sudo intel_gpu_top

As shown above, the printout in red indicates the GPU is being used.

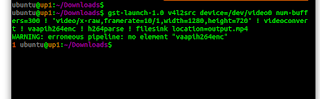
Caution: On some Intel boards I have tested, sometimes running the gstreamer vaapih264enc plugin resulted in the following error message even though the plugin has been installed:

WARNING: erroneous pipeline: no element "vaapih264enc"

In my case, I managed to resolve that error by setting the following environment variables before running the encoding command:

$ export LIBVA_DRIVERS_PATH=/usr/lib/x86_64-linux-gnu/dri/

$ export LIBVA_DRIVER_NAME=i965


Monday, December 27, 2021

ffmpeg command to encode videos using Intel GPU on Ubuntu

Using ffmpeg to encode a video stream, I found the encoding process to use my CPU excessively. I wanted to reduce the CPU usage by transferring the encoding to my built-in Intel GPU. To determine details about the on board Intel GPU driver, you can use the following command on Ubuntu:

$ vainfo


In the example screenshots below, I used the libx264 software encoding option in the ffmpeg command to encode a video stream coming from the device /dev/video0 into an output mpeg file output.mp4:

$ sudo ffmpeg -hide_banner -i /dev/video0 -c:v libx264 output.mp4

While this command is running, the top command shows a high CPU usage.

$ top

After reading through the ffmpeg manual pages and a lot of trials, I found the options to use to enable Intel GPU encoding with the ffmpeg command:

$ sudo ffmpeg -hide_banner -vaapi_device /dev/dri/renderD128 -i /dev/video0 -vf 'format=nv12,hwupload' -c:v h264_vaapi output.mp4


Running the top command shows reduce CPU usage during the encoding process:


Another example with more options is illustrated below: 

$ ffmpeg \
        -vaapi_device /dev/dri/renderD128 \
        -s 1280x720 \
        -i /dev/video0 \
        -vf 'scale=320x240,fps=fps=25,format=nv12,hwupload' \
        -c:v h264_vaapi \
        -b:v 600k \
        output.mp4

ffmpeg will request a video stream of resolution 1280x720 from the source, then scale the frames to 320x240 resolution with a fps of 25. Then it uploads the video data to the Intel GPU for encoding before writing it out with a video bitrate of 600k to the output.mp4 file.


Monday, October 18, 2021

Use Virtual Machine Manager to create a Raspberry Pi virtual machine on Ubuntu

I tried to use the Virtual Machine Manager (virt-manager)'s graphical user interface on Ubuntu to create a Raspberry Pi virtual machine. I found it to be a little tricky having to know the right parameters and configuration. This post describes the steps I went through to successfully create and run the Raspberry Pi virtual machine.

Install software prerequisites

If virt-manager and/or QEMU are not installed on the Ubuntu host, then run the following commands to install them.

$ sudo apt-get install qemu-kvm libvirt-clients libvirt-daemon-system bridge-utils virtinst libvirt-daemon virt-manager

Download a Raspberry Pi OS image

  1. Open up a browser to https://www.raspberrypi.com/software/operating-systems/.

  2. Click on a Raspberry Pi OS image of your choice to download. For example, Raspberry Pi OS Lite.

  3. Unzip the download file and place the extracted image file e.g. 2021-05-raspios-buster-armhf-lite.img to a folder, e.g. /path/to/folder/.

Download a QEMU kernel and the device tree blob (.dtb) for Raspberry Pi

  1. Open up a browser and browse to the repository https://github.com/dhruvvyas90/qemu-rpi-kernel.

  2. Click on kernel-qemu-4.19.50-buster and download the kernel to a folder, e.g. /path/to/folder/.


  3. Next, click on versatile-pb-buster.dtb and download the file to a folder, e.g. /path/to/folder/.

Create a new VM

  1. On the Ubuntu host, run virt-manager.

    The Virtual Machine Manager graphical application appears.
     
  2. Click the Create a new virtual machine button.

    The New VM dialog box wizard appears.


  3. In the Architecture options drop down, choose armv6l in the Architecture combo box. Then select versatilepb in the Machine Type combo box. Press Forward.

    Step 2 page appears.
     
  4. In the Provide the existing storage path field, click Browse.

    The Choose Storage Volume dialog appears.


  5. Click Browse Local and choose to open the previously downloaded Raspberry Pi OS image, e.g. /path/to/folder/2021-05-raspios-buster-armhf-lite.img.


  6. In the Kernel path field, click the Browse button.

    The Choose Storage Volume appears again.


  7. Click Browse Local and choose to open the previously downloaded kernel file, e.g. /path/to/folder/kernel-qemu-4.19.50-buster.

  8. In the DTB path field, click the Browse button.

    The Choose Storage Volume appears.

  9. Click Browse Local and choose to open the previously downloaded dtb file, e.g. /path/to/folder/versatile-pb-buster.dtb.

  10. In the Kernel args field, type in the following:

    root=/dev/vda2 panic=1

  11. Finally, in the Choose the operating system you are installing field, type and choose the following:

    Generic default (generic)

    The Step 2 of the New VM dialog should look like the screen below.


  12. Click Forward.

    Page Step 3 appears.

  13. In the Memory field, change the value to 256.


  14. Click Forward.

    Page 4 appears.


  15. Optional. Change the Name from vm-armv6l if necessary.

     
  16. Toggle on Customize configuration before install. In the Network selection drop down, select Specify shared device name. Then type in virbr0 in the Bridge name.

  17. Click Finish.

    The vm-armv6l on QEMU/KVM dialog box appears.


Customize configuration

  1. Click CPUs. Then in the Model combo box, choose arm1176. Then click Apply to save the change.


  2. Click Boot Options. Toggle on Enable boot menu. Then Toggle on IDE Disk 1. Click Apply.


  3. Click on IDE Disk 1. Then click the Advanced options drop down. In the Disk bus field, change from IDE to VirtIO. Click Apply.


  4. Click the NIC icon. Then change the Device model to virtio. Click Apply.


  5. Optional. Click Add Hardware to add additional peripherals such as Serial mouse, Video card etc. if necessary.

  6. Click Begin Installation.

    The processing messages appear and the Raspberry Pi VM is created.