Wednesday, June 28, 2017

Mask a LAS file using PDAL and QGIS

The Point Data Abstraction Library (PDAL) comes with a useful function to mask or crop out a LiDAR LAS file with one or more polygons. The example screenshot below shows a point cloud overlaid with a red polygon in the upper right corner, which outlines the desired area of the point cloud to be cropped.

The cropping can be done using PDAL's crop filter but it requires the cropping polygon to be specified in the Well Known Text (WKT) string format. This is a bit of pain but can be overcome using a few methods, one of which is shown below using QGIS and the Plain Geometry Editor plugin.

Define the cropping polygon
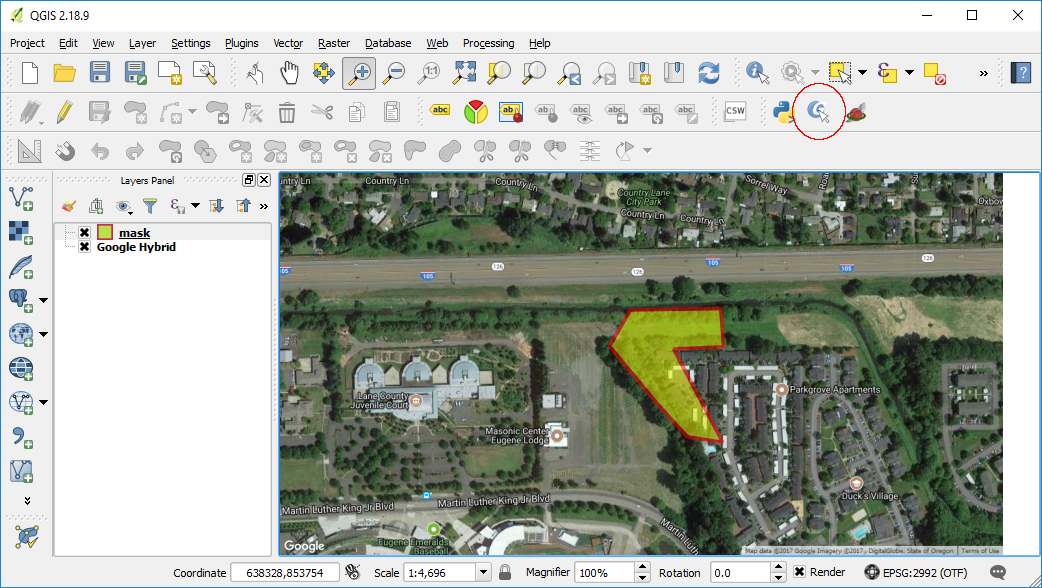
  1. In QGIS, draw a new polygon e.g. mask, as shown below.


    Note: The mask should be created in the same coordinate system as the LAS file
  2. Click the Plain Geometry Editor icon in the toolbar (red circle above). Click on the clipping polygon.

    The Plain Geometry Editor dialog box appears.


    Note: Install the Plain Geometry Editor plugin if the icon is not available.
  3. In the text field, select and copy all the polygon WKT text string into the Windows clipboard.  
Create a PDAL processing pipeline JSON file
  1. In a text editor, type in something similar to the example below.
  2. From the Windows Clipboard, paste the WKT string from the previous section to the "polygon" attribute and surround it with double quote '"' characters.
  3. Save the JSON file e.g. process.json.
{
  "pipeline":[
    "autzen.laz",
    {
      "type":"filters.crop",
      "polygon": "Polygon ((638500.66904077248182148 853359.34703735215589404, 638869.71793351718224585 853365.15883093187585473, 638881.34152069012634456 853208.24040409235749394, 638677.92874516302254051 853199.52271371346432716, 638878.43562390014994889 852818.85023379256017506, 638733.14078423334285617 852842.09740813483949751, 638611.09311891463585198 852975.76866063219495118, 638416.39803376235067844 853211.14630088687408715, 638500.66904077248182148 853359.34703735215589404))"
    },
    {
      "type":"writers.las",
      "filename":"file-cropped.las"
    }
  ]
}

Note: 
  • The pipeline JSON file stores the processes to be done in sequence in an array bracketed by the '[' and ']' characters. 
  • autzen.laz is the input LAS file for this example
  • filters.crop is the process to apply using the "polygon" attribute.
  • file-cropped.las is the output LAS file. 


Run the cropping process
  1. Open up the OSGeo4W Shell.
  2. At the prompt, type in the pdal pipeline command:

    C:\> pdal pipeline process.json -v 4
    Processing messages appear. The file is cropped.

  3. Optional. Using your preferred LAS Viewer, open up the resultant cropped LAS file.

    The cropped file showing only the cropped area is displayed.


Wednesday, June 21, 2017

Combine separate gray scale TIFF images into a single RGB TIFF image

Some multi spectral cameras capture images as individual gray scale TIFF images - each file containing data for a single light wavelength e.g. red, green, blue, or infra-red. Example files are the gray scale TIFF files shown below, each file representing a single color band.

Combining these individual color bands into a single RGB color composite can be done using the free and open source ImageMagick software, as shown in the steps below.

  1. Open up a Command Prompt.
  2. At the prompt, type in the ImageMagick convert command:

    C:\> magick convert -verbose band_red.tif -channel R band_green.tif -channel G band_blue.tif -channel B -combine -channel RGB -alpha off -colorspace sRGB out_rgb.tif

    Note:
    band_*.tif are the input TIFF files. Each input file must be followed with the correct channel option.
    out_rgb.tif is the output RGB TIFF file.
    -verbose is used to print out processing messages.
    -combine -channel RGB are for combining the bands.
    -alpha off is used to disable the creation of the alpha channel in the output RGB file.
    -colorspace sRGB is used to set the output color space.
  3. Run the command.

    Processing messages appear. The output file out_rgb.tif is created.
  4. Open up the resultant file in an image editor, e.g. GIMP.

    The file is displayed in color and the the bands are combined into the image's red, green and blue channels.

Monday, June 12, 2017

Using PDAL to classify isolated LiDAR points as noise

LiDAR data often contains noise and it is necessary to identify and/or remove them. An example of a LAS file containing noise in the form of low isolated points beneath the ground is shown in the screen shot below.

Isolated points can be easily identified by using statistical filtering methods, which the PDAL open source software has.

To filter out these points using PDAL, perform the following steps.

  1. Open up the OSGeo4W Shell.

    The OSGeo4W Shell prompt appears.
  2. In the prompt, type in the command:

    C:\> pdal translate -i in_noisy.las -o out_filtered.las outlier --filters.outlier.method="statistical" --filters.outlier.mean_k=8 --filters.outlier.multiplier=3.0 -v 4

    Note:
    -i in_noisy.las is the input LAS file
    -o out_filtered.las specifies the output LAS file
    outlier tells PDAL to apply the outlier filter
    --filters.outlier.**** options specify the various outlier parameters
    -v 4 indicates the processing messages verbosity level


  3. After running the command, the isolated points are classified as Class 7 - Low Noise points in the output LAS file.

    The point cloud colored by classification.


    The resultant LAS file colored by elevation and with the class 7 - Low noise points turned off.

Monday, June 5, 2017

Extract GPS tags from photographs into a CSV file using Exiftool

There is a nice command line utility Exiftool from http://www.sno.phy.queensu.ca/~phil/exiftool/ that can be used to quickly extract out the GPS positions and other tags from photographs and other images into a comma separated values (CSV) file.

The following example uses the Windows executable version of the utility to illustrated the extraction steps.

  1. Open up a Windows Command Prompt. In the prompt, type in the command.

    C:\> "exiftool(-k).exe" -n -gpslongitude -gpslatitude -gpstimestamp -csv D:\MyDocuments\temp\somephotos

    Note:
    -n means to print out as numbers only
    -csv prints out csv including the file path and name
    -D points to the folder directory of the photographs to extract
  2. Press RETURN

    The extraction values are displayed to the screen.

  3. To output to a file, use the > character to redirect the standard output to a file, e.g. type in the command:

    C:\> "exiftool(-k).exe" -n -gpslongitude -gpslatitude -gpstimestamp -csv D:\MyDocuments\temp\somephotos > outgps.csv

    The output file outgps.csv is created.
  4. Display the resultant file in a spreadsheet. Or plot the locations on a map.