Monday, April 28, 2014

"Cannot find repository" error and installing Tizen SDK for Wearable

The Tizen SDK for Wearable is one of the prerequisite software that must be installed if you want to develop applications for the Samsung  Gear, as detailed in the website http://developer.samsung.com/samsung-gear. So I downloaded and ran the installer, which popped up the following error message "Cannot start Tizen SDK for Wearable Install Manager. Cannot find repository. Please check your repository.", as shown in the screen shot below.


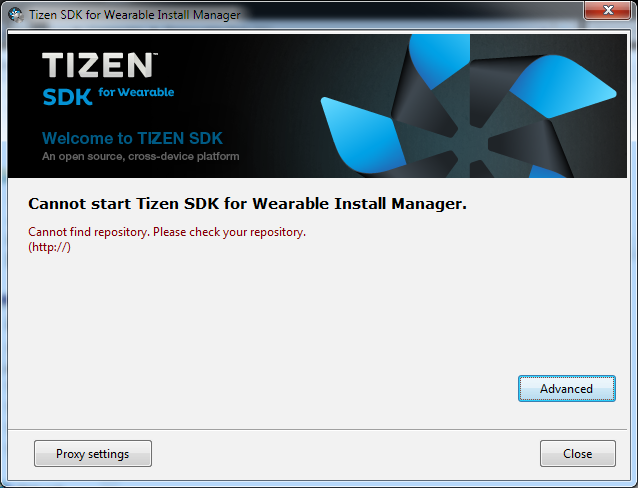
I could not find any instructions on the page on what this repository is about. Eventually, I figured out that I needed to download an appropriate SDK image for my development platform - an Intel Windows 7 64 bit machine. These images can be downloaded from the same page https://developer.tizen.org/downloads/tizen-sdk?langswitch=en#wearable.

Once the image file has been downloaded, do the following:

  1. Click the Advanced button.

  2. Toggle on SDK Image. Click the file icon. Browse and select the downloaded SDK image file, e.g. tizen-wearable-sdk-TizenSDK_1.0.0b2-windows64.zip. Click Open.


    The following appears.


  3. Click OK.

  4. Click Next.

  5. Agree to the Licence Agreement. Click Next.

  6.  Click Next.

  7. Optional. In the Install Tizen SDK for Wearable field, specify another folder.
  8. Click Install.


    The Intel Hardware Accelerated Execution Manager Setup wizard appears.
  9. Click Next.

    The SDK is installed.
  10. Click Close

Monday, April 21, 2014

A simple Chrome Web App for creating animated GIF files

Recently, it seems animated GIFs have been making a come back and used on social networks like Google+. I thought of making a simple Chrome Web App for creating the animated GIF files (using only Javascript, HTML5 and the gif.js library) without having to upload to a server for processing, i.e. the processing takes place within the web browser only. The resultant WebApp is available here on http://dominoc925-pages.appspot.com/webapp/gifanim/default.html.


Using the WebApp is easy. The following steps show how to create an animated GIF with the default settings.

  1. Simply drag and drop the image frames into the box provided. Or click the Add Image button.

    The Open dialog box appears.

  2. Select one or more image files. Click Open.

    The thumbnails of the selected files appear in the box.

  3. Click Generate GIF.

    The animated GIF file is created.

  4. To save the animated GIF file, mouse right click on the animation. Select Save Image As.


    The Save As dialog appears.
  5. Type in a file name. Click Save.

    The animated GIF file is saved.
Delete or change the order of the image frames
  1. If you want to change the order of the images, simply click on the image thumbnail.

    The Move previous, delete, and Move next icons appear below the thumbnail.

  2. Click Move previous to move the selected image before the previous image frame.
  3. Click Move next to move the selected image after the next image frame.
  4. Click Delete to delete the selected image.
Changing the default settings
  1. If you want to change the default settings, click on Settings on the right pane.


  2. In the Quality field, choose another value.
  3. In the Animation speed field, choose another value.
  4. In the Repeat field, choose another value.
  5. In the Canvas size field, choose another value.
  6. Click Generate GIF to see the effects. 

Monday, April 14, 2014

Create features using precision key-ins in QGIS

Given some MH370 satellite imagery debris coordinates, I wanted to enter them in QGIS to see the precise locations on a map; but I could not find a precision key-in function. That is until I found out that there is a plug-in - NumericalDigitize but it must be installed from the Plug-in dialog.


If the plug-in is installed, then the highlighted icon is available in the Digitize tool bar.


Using NumericalDigitize to precisely enter feature coordinates is easy, as shown below.

  1. In QGIS, create a new layer, or load in a new layer, e.g. pointlayer.shp.
  2. Toggle on Editing.


  3. Click on the NumericalDigitize icon.

    The Add numerical feature dialog box appears.

  4. Optional. Toggle on the appropriate coordinate CRS, e.g. in the CRS of the Project.
  5. In the X field, type in a coordinate value, e.g. 90.3.
  6. In the Y field, type in a coordinate value, e.g. -44.5.


  7. Repeat steps 5 and 6 for more coordinates.
  8. Click OK.

    The feature(s) are created at the precise coordinates.


Monday, April 7, 2014

Enable the Nexus 7 to be recognized by the Android Development Toolkit ADT

After connecting a Nexus 7 running stock Android Jelly Bean 4.2.2 to a Windows 7 computer, I assumed that the Android Development Toolkit's ADB utility would be able to detect the connected Nexus 7 device. But it wasn't so. I learned later that the Developer's Options on the Nexus 7 is not enabled by default. It needs to be exposed first.

The following steps show how to expose the Developer's Options.

  1. On the Nexus 7, open up the Settings screen. Expand About Tablet.

    Information about the tablet appears.
  2. Touch the Build Number several times.

    The message "Congratulations, you are a developer" or something similar appear.
  3. Close and reopen the Settings screen.

    The setting {} Developer options should be displayed.
  4. Touch the Developer options.
  5. Toggle on USB debugging.

    The Nexus 7 should be recognized by the ADB.