- In Ubuntu, open up a Terminal. Change directory to the location of the PCAP file e.g. /path/to/download/HDL32-V2_Monterey_Highway.pcap.
$ cd /path/to/download/
$ roslaunch velodyne_pointcloud 32e_points.launch pcap:=$(pwd)/HDL32-V2_Monterey_Highway.pcap
Note 1: 32e_points.launch is the sample launch file for HDL-32E sensors (change this for different sensors),
$(pwd) is a macro that points to the current working directory, and
pcap:= points to the input PCAP file name.
Note 2: By default, the LiDAR points are published in the velodyne coordinate reference frame, i.e. the points are relative to the Velodyne sensor. - Open up another Terminal. Startup RViz by entering the following commands.
$ rosrun rviz rviz -f velodyne
Note: the -f option tells RViz to use the velodyne coordinate transformation frame.
The RViz application starts up.
- Click the Add button as shown above.
The Choose visualization dialog box appears.
- Click By topic and choose the topic /velodyne_points/PointCloud2. click OK.
The PCAP point cloud is displayed.
Note: the HDL-32E sensor is mounted on top of the car so the road is below zero as shown below.
- To transform the PCAP data to the car (so called odom frame), we have to define the transformation parameters from the odom frame to the velodyne frame. For example, say the HDL-32E is 2 meters above the odom frame origin. Open another Terminal and type in the following command:
$ rosrun tf static_transform_publisher 0 0 2 0 0 0 odom velodyne 100
Note: 0 0 2 0 0 0 values are equal to dx, dy, dz, and yaw, pitch, roll (in rads),
odom is the parent or from frame,
velodyne is the child or to frame, and
100 is the time interval for publishing the transformation in msec. - In the Fixed frame field of the RViz application, change the value to odom.
The point cloud is displayed in the odom frame as shown below.

About Geospatial Applications, FME, Visual Studio, gvSIG, Global Mapper, Programming, LiDAR, GIS, Google Maps, SAGA GIS, Android, QGIS
Monday, May 27, 2019
Displaying Velodyne PCAP data in ROS' RViz
Pre-recorded data in PCAP format from Velodyne's LiDAR sensors such as the HDL-32E, VLP-16, etc. can be displayed in the RViz application software from the Robotic Operating System (ROS). The following steps show how:


Monday, May 20, 2019
Setup Ubuntu network settings to Velodyne VLP-16 for ROS
After installing ROS (Robotic Operating System) and the Velodyne drivers and utilities on Ubuntu 18.04 LTS, the computer needs to be able to communicate with the Velodyne VLP-16 sensor unit.
Note: this post is specific to the VLP-16 unit but should be applicable to the other units, with some address changes.
By default, the IP address of the VLP-16 is set to be 192.168.1.201 by the factory. The network interface for the computer should be set to be on the same network, i.e. 192.168.1.77 for example, with the network masks at 255.255.255.255 and the gateway to be 192.168.1.255.
- To set the Ubuntu network settings, click the network icon on the top left bar and choose Wired Settings in the pop down menu.

- In the Settings dialog box, click the gear icon as shown below.

The Wired dialog box appears.
- Click the IPv4 tab. Toggle on the Manual IPv4 Method.

- Type in the following address values, as shown below.

- Scroll down. Type in the Routes (to the VLP-16) values as shown below.

- Click Apply. If all the values are correct, Ubuntu should show you a Network connected status. Otherwise, recheck the values and try again.
- Now to start ROS and run a sample Velodyne launch file, the following commands can be executed in separate terminals.
$ roscore
$ roslaunch velodyne_pointcloud VLP16_points.launch
The VLP-16 /velodyne_points topic is published


Monday, May 13, 2019
Setting up Visual Studio Code for working with ROS C++ on Ubuntu
In order to use Visual Studio Code on Ubuntu to develop ROS (Robotic Operating System) C++ packages, a couple of Visual Studio Code extensions can be helpful.
If they are not already installed, simply run Visual Studio Code and install the following extensions:
Another thing that can be helpful is to configure the Microsoft C/C++ extension to include the ROS header include files. If the extension is unable to locate the ROS header files, the code editor will show wavy green lines under the header files, as shown in the screenshot below.
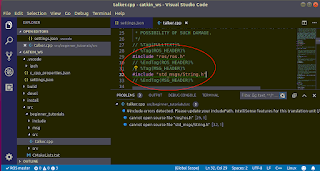
To get rid of these wavy lines, the C/C++ properties (c_cpp_properties.json) file need to be edited to add in the ROS header include directory, e.g. /opt/ros/melodic/include/.
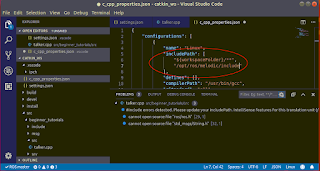
The following screenshots show the c_cpp_properties.json file and the includePath configuration array.
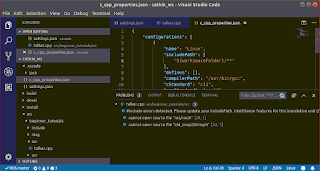
Append the path "/opt/ros/melodic/include" to the includePath array variable as shown below.
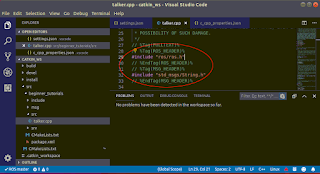
Then save and restart Visual Studio Code. Observe that the green wavy lines are no longer displayed.
If they are not already installed, simply run Visual Studio Code and install the following extensions:
- Microsoft C/C++ extension

- ROS extension


Another thing that can be helpful is to configure the Microsoft C/C++ extension to include the ROS header include files. If the extension is unable to locate the ROS header files, the code editor will show wavy green lines under the header files, as shown in the screenshot below.

To get rid of these wavy lines, the C/C++ properties (c_cpp_properties.json) file need to be edited to add in the ROS header include directory, e.g. /opt/ros/melodic/include/.
The following screenshots show the c_cpp_properties.json file and the includePath configuration array.

Append the path "/opt/ros/melodic/include" to the includePath array variable as shown below.

Then save and restart Visual Studio Code. Observe that the green wavy lines are no longer displayed.

Monday, May 6, 2019
Export Velodyne PCAP to LAS files in VeloView
VeloView is an open source application for working with Velodyne's popular LiDAR sensors (HDL-64E, HDL-32E, VLP-16 etc.). It is available from this website https://www.paraview.org/veloview/.
VeloView has an export to LAS file format command but you would not know it as it is not available from the graphical user interface. To generate LAS files, it is necessary to use the Python command line interface. The steps below show how it can be done.
VeloView has an export to LAS file format command but you would not know it as it is not available from the graphical user interface. To generate LAS files, it is necessary to use the Python command line interface. The steps below show how it can be done.
- Run VeloView and load a Velodyne PCAP file.

- Choose Tools | Python Console.
The Python Console appears.
- To export out the current frame, type in the following command at the Python prompt.
>>> vv.saveLASCurrentFrame('c:/path/to/output.las', 0)
Note 1: the last argument indicates the coordinate transformation mode. 0 = raw, 1 = absolute, 2 = relative.
Note 2: Replace c:/path/to/ with your actual file system path - To export a range of frames by frame numbers, type in the following command at the Python prompt.
>>> vv.saveLASFrames('c:/path/to/output.las', 10, 20, 0)
Note: in this example, 10 is the starting frame, 20 is the ending frame, and 0 is the raw transformation mode. - To export a list of frames by time steps, type in the following command at the Python prompt.
>>> vv.saveLAS('c:/path/to/output/las', timesteps, 0)
Note: timesteps is an array of integers specifying the time steps e.g. [0,1,2,...10] and 0 is the raw transformation mode.
To get the available time steps in the PCAP file, type in the following command at the Python prompt.
>>> timesteps = vv.getCurrentTimesteps() - Optional. Display the resultant LAS file in a viewer.


Subscribe to:
Posts (Atom)
