Showing posts with label Raspberry Pi. Show all posts

Monday, April 3, 2023

How to create a Arm64 Ubuntu virtual machine using Virt-Manager

I wanted to run Ubuntu on an Arm64/Aarch64 virtual machine on a host Intel Linux computer for the longest time for compiling binaries for Raspberry Pis and other SBC boards. I finally figured out how to do it with virt-manager, and it is quite simple as clicking and selecting options on the virt-manager graphical user interface. The instructions below show how it is done.

Download and install prerequisites

  1. In Ubuntu, open up a Terminal and enter the following commands to install the prerequisite software.

    $ sudo apt install qemu-kvm \
    libvirt-daemon-system \
    libvirt-clients \
    bridge-utils \
    virt-manager \
    qemu-system-arm \
    qemu-efi-aarch64 \
    qemu-utils
    

  2. Open up an Internet browser. Download an Ubuntu Arm64 image to install. For example: https://cdimage.ubuntu.com/releases/22.04/release/ubuntu-22.04.2-live-server-arm64.iso

 Create the virtual machine

  1. In Ubuntu, click the Virtual Machine Manager icon.

    The Virtual Machine Manager application appears.


  2. Select File | Create New Virtual Machine.

    The New VM dialog box pops up.


  3. Choose Local install media (ISO image or CDROM).

  4. In the Architecture options, choose aarch64 architecture. Click Forward.

    Step 2 of 5 pages appears.

  5. In the Choose ISO or CDROM install media field, choose the iso image downloaded previously.


  6. Click Forward. If necessary, change the memory size and the number of CPUs.

    Step 3 of 5 pages appear.


  7. Click Forward. If necessary, change the disk image size to a suitable size.

    Step 4 of 5 appears.


  8. Click Forward.

    Step 5 of 5 appears.


  9. Optional. In the Name field, type in a desired name.

  10. Toggle On the Customize configuration before install field.


  11. Click Finish.

    The 'vm name' on QEMU/KVM dialog box appears.


  12. In the Hypervisor Details group, change the Firmware to UEFI aarch64.


  13. Click Apply. Then click the Begin Installation button and follow the prompts to complete the installation.

    The installation begins...


Monday, October 17, 2022

Auto mount an SD card upon insert on Ubuntu Server

I have a headless Raspberry Pi board running Ubuntu 20.04.x server with a USB SD card reader. I wanted the system to automatically mount an SD card to a fixed mount point, e.g. /media/ubuntu/sdcard/ upon card insertion. By default, Ubuntu Server doesn't mount the SD card so I had to do some setup and configuration, as illustrate in the steps below. I had to install some prerequisite software package (udevil) and create a systemd service.

Install udevil package and create mount directory

  1. Open up a Terminal and type in the following command to install udevil.

    $ sudo apt install udevil

  2. Then, create a SD card directory mount point, e.g. /media/ubuntu/sdcard/ with the following command:

    $ mkdir -p /media/ubuntu/sdcard


Add a mount rule to the fstab file

  1. Using a text editor, e.g. vi, open up the system file /etc/fstab.

    $ sudo vi /etc/fstab

  2. Append the following line:

    /dev/sda1 /media/ubuntu/sdcard auto rw,user,exec,umask=000  0  2

    An example fstab file is shown below:
LABEL=writable  /        ext4   defaults        0 1
LABEL=system-boot       /boot/firmware  vfat    defaults        0       1
/dev/sda1       /media/ubuntu/sdcard auto rw,user,exec,umask=000        0       2

Create the devmon Systemd service

  1. In the Terminal, change directory to /etc/systemd/system/.

    $ cd /etc/systemd/system

  2. Using a text editor, e.g. vi, create a file e.g. devmon.service. Enter the following and save the file.

    [Unit]
    Description=Systemd service for running devmon
    [Service]
    Type=simple
    User=ubuntu
    Group=ubuntu
    ExecStart=/usr/bin/devmon
    [Install]
    WantedBy=multi-user.target


  3. In the Terminal, type in the following to generate the service:

    $ sudo systemctl daemon-reload
    $ sudo systemctl enable devmon

  4. Then either reboot the board or run the following command to start the service:

    $ sudo systemctl start devmon

 Monitor the service

  1. In a Terminal, type in the following to monitor the newly create devmon service when an SD card is inserted or unmounted.

    $ journalctl -u devmon -f

 Note: The SD card should be unmounted properly using the following command(s):

$ udevil umount /media/ubuntu/sdcard

- or -

$ sudo umount /media/ubuntu/sdcard

Monday, September 19, 2022

Run Quectel's Connection Manager as a systemd service on Ubuntu

I found myself in possession of a modem by Quectel (https://www.quectel.com) to hook up to a Raspberry Pi running Ubuntu 20.04. I wanted to auto run Quectel's connection manager executable quectel-CM on system start up but found limited information available online from Quectel. So I had to roll up my sleeves and make my own systemd service for that purpose.

This post outlines the steps I took:

Download and compile the quectel-CM executable

  1. Using an Internet browser, download the latest Quectel LTE, 5G Linux USB driver, e.g. Quectel_LTE5G_Linux_USB_Driver_V1.0.zip from https://www.quectel.com/download-zone.
     
  2.  Extract QConnectManager_Linux_V1.0.zip into a folder e.g. /home/ubuntu/Downloads/quectel-CM/.

  3. In a Terminal, change directory to the extracted folder.

    $ cd ~/Downloads/quectel-CM/

  4. Use the make command to compile the connection manager executable.

    $ make

    The quectel-CM executable is compiled.

Place the quectel-CM exe to the run time directory

  1. In a Terminal, type in the following commands to change directory to the extracted directory.

    $ cd /home/ubuntu/Downloads/quectel-CM/

  2. Copy the executable to /usr/local/bin/.

    $ sudo cp quectel-CM /usr/local/bin

Create a systemd service file

  1.  In the directory /etc/systemd/system, use a text editor to create a service file e.g. quectelcm.service.

    $ sudo vi /etc/systemd/system/quectelcm.service

  2. Type in the following lines, save and exit the file:
    [Unit]
    Description=Systemd service for running Quectel's Connection Manager quectel-CM executable
    
    [Service]
    ExecStart=/usr/local/bin/quectel-CM 
    Restart=always
    RestartSec=5
    
    [Install]
    WantedBy=multi-user.target
    

  3. Give the service file the following executable permission:

    $ sudo chmod 664 /etc/systemd/system/quectelcm.service

 Create the service

  1. In the Terminal, type in the following commands:

    $ sudo systemctl daemon-reload
    $ sudo systemctl enable quectelcm

    The quectelcm service is created.


Running and monitoring the service

  1. You can either reboot the Raspberry Pi or type in the following command to start the service in a Terminal.

    $ sudo systemctl start quectelcm

  2. To monitor the quectelcm service, use the journalctl command:

    $ journalctl -u quectelcm -f


Note: In order for quectel-CM to request and set the machine's network address, the software prerequisites net-tools and udhcpc must be installed on the Raspberry Pi.


Monday, March 21, 2022

Setup a Raspberry Pi 4B to publish a webcam with hardware accelerated video encoding

The Raspberry Pi 4B has an integrated video processing unit, a so called GPU. I wanted to use the GPU to offload the video encoding processing from the CPU when I publish my webcam as a RTSP video stream from the Pi board running Ubuntu 20.04 64 bit and using ffmpeg

Download and install rtsp-simple-server

  1. Using a browser, download and extract the open source rtsp-simple-server from https://github.com/aler9/rtsp-simple-server into a folder, e.g. /path/to/rtsp/

    The files rtsp-simple-server and rtsp-simple-server.yml are extracted out.

  2. Open up a Terminal. At the prompt, change directory to the previously created folder /path/to/rtsp/.

    $ cd /path/to/rtsp/

  3. Move the binary to the folder /usr/local/bin/

    $ sudo mv rtsp-simple-server /usr/local/bin/

  4. Move the yml configuration file to the folder /usr/local/etc/

    $ sudo mv rtsp-simple-server.yml /usr/local/etc/

Configure rtsp-simple-server to publish the webcam from ffmpeg

  1.  Open up a Terminal. At the prompt, change directory to the directory /usr/local/etc/.

    $ cd /usr/local/etc

  2. Using a text editor, edit the configuration file rtsp-simple-server.yml. Create a new path name, e.g. cam under the paths key.

    paths:
      cam:
        runOnDemand: ffmpeg -hide_banner -s 1280x720 -r 25 -i /dev/video0 -b:v 2M -c:v h264_v4l2m2m -f rtsp rtsp://localhost:$RTSP_PORT/$RTSP_PATH
        runOnDemandRestart: yes
    

    Notes:
    -s 1280x720 is the source video resolution size from the webcam
    -r 25 is the source sample rate
    -i /dev/video0 is the source webcam video
    -b:v 2M is the output video bit rate
    -c:v h264_v4l2m2m is the video encoder to use


  3. Save and close the configuration file.

 Create and start the rtsp-simple-server service

  1.  Open up a Terminal. Type in the following to create the systemd service.

    sudo tee /etc/systemd/system/rtsp-simple-server.service >/dev/null << EOF
    [Unit]
    After=network.target
    [Service]
    ExecStart=/usr/local/bin/rtsp-simple-server /usr/local/etc/rtsp-simple-server.yml
    [Install]
    WantedBy=multi-user.target
    EOF
    

  2. Enable and start the service by executing the following commands. Or reboot the system.

    $ sudo systemctl enable rtsp-simple-server
    $ sudo systemctl start rtsp-simple-server

Viewing the webcam stream using VLC

  1. If the configuration parameters are correct, then start up VLC on a PC on the network.

    VLC starts up.


  2. Select Media | Open Network Stream.

    The Open Media dialog box appears.


  3. In the URL field, type in the address of the Raspberry Pi e.g. rtsp://192.168.18.5:8554/cam. Then click Play.

    If all the parameters are correct, then VLC should show a stream from the webcam.

    VLC displaying a webcam stream.


    Note: if the video stream looks wrong i.e. greenish and weird as shown above, then the ffmpeg version installed on the Raspberry Pi is an older buggy version 4.2.4 and you need to replace it by downloading the latest ffmpeg and building from source.

Replacing ffmpeg and build from source

  1. Open up a Terminal and remove the system installed ffmpeg with the following command:

    $ sudo apt remove ffmpeg

  2. Using a browser and follow the instructions on https://trac.ffmpeg.org/wiki/CompilationGuide/Ubuntu to install the latest ffmpeg.

  3. Compilation on the Raspberry Pi 4B may take a while, maybe an hour or two so be aware. After compiling successfully, you can try to use VLC and open up the webcam steam again.

    VLC displaying the webcam stream correctly.

Monday, October 18, 2021

Use Virtual Machine Manager to create a Raspberry Pi virtual machine on Ubuntu

I tried to use the Virtual Machine Manager (virt-manager)'s graphical user interface on Ubuntu to create a Raspberry Pi virtual machine. I found it to be a little tricky having to know the right parameters and configuration. This post describes the steps I went through to successfully create and run the Raspberry Pi virtual machine.

Install software prerequisites

If virt-manager and/or QEMU are not installed on the Ubuntu host, then run the following commands to install them.

$ sudo apt-get install qemu-kvm libvirt-clients libvirt-daemon-system bridge-utils virtinst libvirt-daemon virt-manager

Download a Raspberry Pi OS image

  1. Open up a browser to https://www.raspberrypi.com/software/operating-systems/.

  2. Click on a Raspberry Pi OS image of your choice to download. For example, Raspberry Pi OS Lite.

  3. Unzip the download file and place the extracted image file e.g. 2021-05-raspios-buster-armhf-lite.img to a folder, e.g. /path/to/folder/.

Download a QEMU kernel and the device tree blob (.dtb) for Raspberry Pi

  1. Open up a browser and browse to the repository https://github.com/dhruvvyas90/qemu-rpi-kernel.

  2. Click on kernel-qemu-4.19.50-buster and download the kernel to a folder, e.g. /path/to/folder/.


  3. Next, click on versatile-pb-buster.dtb and download the file to a folder, e.g. /path/to/folder/.

Create a new VM

  1. On the Ubuntu host, run virt-manager.

    The Virtual Machine Manager graphical application appears.
     
  2. Click the Create a new virtual machine button.

    The New VM dialog box wizard appears.


  3. In the Architecture options drop down, choose armv6l in the Architecture combo box. Then select versatilepb in the Machine Type combo box. Press Forward.

    Step 2 page appears.
     
  4. In the Provide the existing storage path field, click Browse.

    The Choose Storage Volume dialog appears.


  5. Click Browse Local and choose to open the previously downloaded Raspberry Pi OS image, e.g. /path/to/folder/2021-05-raspios-buster-armhf-lite.img.


  6. In the Kernel path field, click the Browse button.

    The Choose Storage Volume appears again.


  7. Click Browse Local and choose to open the previously downloaded kernel file, e.g. /path/to/folder/kernel-qemu-4.19.50-buster.

  8. In the DTB path field, click the Browse button.

    The Choose Storage Volume appears.

  9. Click Browse Local and choose to open the previously downloaded dtb file, e.g. /path/to/folder/versatile-pb-buster.dtb.

  10. In the Kernel args field, type in the following:

    root=/dev/vda2 panic=1

  11. Finally, in the Choose the operating system you are installing field, type and choose the following:

    Generic default (generic)

    The Step 2 of the New VM dialog should look like the screen below.


  12. Click Forward.

    Page Step 3 appears.

  13. In the Memory field, change the value to 256.


  14. Click Forward.

    Page 4 appears.


  15. Optional. Change the Name from vm-armv6l if necessary.

     
  16. Toggle on Customize configuration before install. In the Network selection drop down, select Specify shared device name. Then type in virbr0 in the Bridge name.

  17. Click Finish.

    The vm-armv6l on QEMU/KVM dialog box appears.


Customize configuration

  1. Click CPUs. Then in the Model combo box, choose arm1176. Then click Apply to save the change.


  2. Click Boot Options. Toggle on Enable boot menu. Then Toggle on IDE Disk 1. Click Apply.


  3. Click on IDE Disk 1. Then click the Advanced options drop down. In the Disk bus field, change from IDE to VirtIO. Click Apply.


  4. Click the NIC icon. Then change the Device model to virtio. Click Apply.


  5. Optional. Click Add Hardware to add additional peripherals such as Serial mouse, Video card etc. if necessary.

  6. Click Begin Installation.

    The processing messages appear and the Raspberry Pi VM is created.


Monday, September 30, 2019

CMake example for cross compiling and using a static library for a Raspberry Pi on an Ubuntu PC

Compiling source code on a Raspberry Pi can be sluggish compared to a PC. So instead I decided that cross compilation on an Ubuntu PC would be faster and therefore more productive of my time. So after a few false starts, I finally managed to get the workflow working. This post shows a simple example of how to compile a C++ static library and using that in an executable for Raspberry Pi using the CMake build system on an Ubuntu PC.

Down the Raspberry Pi build tools
The first thing is to get the Raspberry cross compilation tools from the git repository.

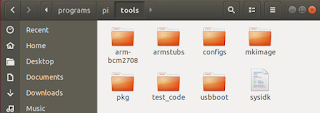
In Ubuntu, open a Terminal. Type in the following to download the tools to a folder e.g. /path/to/programs/pi/.

$ cd ~/programs/pi/
$ git clone https://github.com/raspberrypi/tools.git

Create a CMake toolchain file
Next, create a cmake file e.g. /path/to/workspace/toolchain-rpi.cmake specifying the correct Raspberry cross compilation tools for compiling C/C++ source files with the CMAKE_C_COMPILER and CMAKE_CXX_COMPILER macros. Also the root folder of the Raspberry Pi libraries and include files need to be specified with the CMAKE_FIND_ROOT_PATH macro.

Choose the right ones for your Raspberry Pi chipset.

Listing of toolchain-rpi.cmake
SET(CMAKE_SYSTEM_NAME Linux)
SET(CMAKE_SYSTEM_VERSION 1)

# define the C cross compiler for the Raspberry Pi 
SET(CMAKE_C_COMPILER $ENV{HOME}/programs/pi/tools/arm-bcm2708/arm-rpi-4.9.3-linux-gnueabihf/bin/arm-linux-gnueabihf-gcc)

# define the C++ cross compiler for the Raspberry Pi
SET(CMAKE_CXX_COMPILER $ENV{HOME}/programs/pi/tools/arm-bcm2708/arm-rpi-4.9.3-linux-gnueabihf/bin/arm-linux-gnueabihf-g++)

# define the root location of the Raspberry Pi libraries and includes
SET(CMAKE_FIND_ROOT_PATH $ENV{HOME}/programs/pi/tools/arm-bcm2708/arm-linux-gnueabihf/arm-linux-gnueabihf/sysroot)

SET(CMAKE_FIND_ROOT_PATH_MODE_PROGRAM NEVER)
SET(CMAKE_FIND_ROOT_PATH_MODE_LIBRARY ONLY)
SET(CMAKE_FIND_ROOT_PATH_MODE_INCLUDE ONLY)

add_definitions(-Wall -std=c11)

Create the workspace
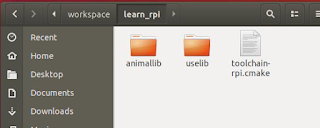
In the same example project workspace folder /path/to/workspace/, create two folders animallib and uselib, the first for the library files, and the later for the executable files.


Create the static library
The next step is to create the header file and define the classes that will be used by the example executable. Place the Animal.h and Animal.cpp files respectively in the include and src folders under the /path/to/workspace/animallb/ folder.

Listing of Animal.h
#include <string>

using namespace std;

class Animal {
        private:
                string name;
        public:
                Animal(string);
                virtual void print_name();
};

Listing of Animal.cpp
#include <iostream>
#include "Animal.h"

using namespace std;

Animal::Animal(string name): name (name) {}

void Animal::print_name(){
        cout << "Name is " << this->name << endl;
}

Create the static library's CMakeLists.txt file in the animallib folder e.g. /path/to/workspace/animallib/. As defined, this will help to generate a static library libanimallib.a and a header file animallib_Export.h.

cmake_minimum_required(VERSION 2.8.6)
project (animallib)

set (BUILD_SHARED_LIBS OFF)
set (CMAKE_BUILD_TYPE Debug)

#include *.h files under the include folder and
#the project's output folder e.g. build
include_directories (include ${PROJECT_BINARY_DIR})

#compile all *.cpp source files under the src folder
file (GLOB SOURCES "src/*.cpp")

#output static library export file *.a and
#output macro definitions include file
include (GenerateExportHeader)
add_library(animallib STATIC ${SOURCES})
GENERATE_EXPORT_HEADER (animallib
        BASE_NAME animallib
        EXPORT_MACRO_NAME animallib_EXPORT
        EXPORT_FILE_NAME animallib_Export.h
        STATIC_DEFINE animallib_BUILT_AS_STATIC
        )

Open up a Terminal and change directory to the static library's folder e.g. /path/to/workspace/animallib/.

If the build folder does not exist, create it.

$ mkdir build
$ cd build

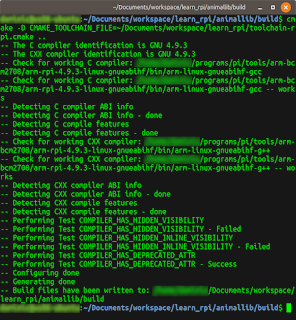
Type in the cmake command with the CMAKE_TOOLCHAIN_FILE variable pointing to the previously created Raspberry Pi toolchain CMake file.

$ cmake -D CMAKE_TOOLCHAIN_FILE=/path/to/workspace/toolchain-rpi.cmake ..
Build files are generated


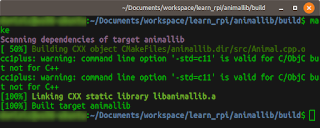
In the Terminal, type in the make command to generate the static library file.
$ make
Static library compilation messages
Using the static library in a separate C++ application
Now that the library has been generated, the next thing is to use the library's classes and functions in an executable e.g. uselib project under /path/to/workspace/uselib/.

Listing of uselib.cpp
#include "Animal.h"

#include "animallib_Export.h"

int main(int argc, char *argv[]){
        Animal animal("Dog");
        animal.print_name();
        return (0);
}

Place the source code file uselib.cpp under the src directory e.g. /path/to/workspace/uselib/src/.

Then create a CMakeLists.txt file under the /path/to/workspace/uselib/ folder.
cmake_minimum_required(VERSION 2.8.6)
project (UseLib)

# link as a static library
set(CMAKE_EXE_LINKER_FLAGS "-static")

set (EXAMPLE_DIR $ENV{HOME}/Documents/workspace/learn_rpi/)

# name and location of the library to link with the executable
set (PROJECT_LINK_LIBS animallib)
link_directories (${EXAMPLE_DIR}/animallib/build/)

include_directories (
        ${EXAMPLE_DIR}/animallib/include
        ${EXAMPLE_DIR}/animallib/build
        )

#compile all *.cpp source files under src folder
file (GLOB SOURCES "src/*.cpp")

#output executable name as uselib
add_executable (uselib ${SOURCES})
target_link_libraries (uselib ${PROJECT_LINK_LIBS})

Open up a Terminal. Change directory to the /path/to/workspace/uselib/ folder.

If the build directory does not exist, type in the following to create it.

$ mkdir build

Type in the cmake command with the CMAKE_TOOLCHAIN_FILE variable pointing to the previously created Raspberry Pi toolchain CMake file.

$ cmake -D CMAKE_TOOLCHAIN_FILE=/path/to/workspace/toolchain-rpi.cmake ..
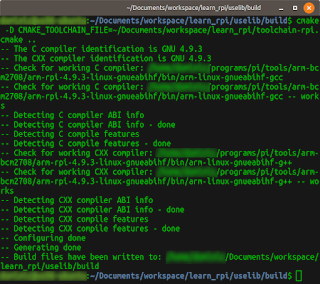
The build files are generated
Compile the executable with the make command.
$ make
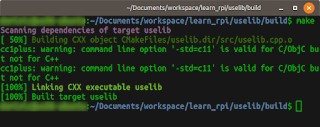
Compilation messages
Once the executable uselib has been generated, it can be copied to the Raspberry Pi and run. If you have an arm emulator e.g. qemu installed on the Ubuntu PC, then it can be executed as shown below.
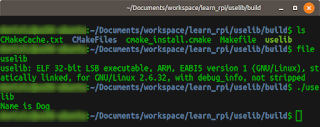
Running the Raspberry Pi executable on the Ubuntu PC with QEMU

Monday, September 16, 2019

Allocating more space to an emulated Raspbian disk image

The Raspberry Pi Raspbian images from http://downloads.raspberrypi.org/raspbian/images/ for QEMU have limited disk space, just enough for booting up and not much else. In the screenshot below, the image has just 3.3GB to it.

In order to work with ROS or other applications, the disk image has to be resized with more free disk space. This can be done by doing the following.
  1. Optional but recommended. Make a copy of the original Raspbian image and rename it, for example as raspbian.img.

    $ cp 2019-06-20-raspbian-buster.img raspbian.img
  2. Extend the copied image's size with the following command in the Terminal.

    $ qemu-img resize raspbian.img +6G


    Note: +6G means to extend the original size by 6 gigabytes
  3. Next, boot up the newly resized image with QEMU.

    $ qemu-system-arm -kernel kernel-qemu-4.4.34-jessie \
      -cpu arm1176 \
      -m 256 \
      -M versatilepb \
      -serial stdio \
      -append "root=/dev/sda2 rootfstype=ext4 rw" \
      -hda raspbian.img \
      -net nic \
      -net user,hostfwd=tcp::5022-:22 \
      -no-reboot


    The QEMU window appears.

  4. In the QEMU window, open up a Terminal.
  5. Enter the following commands to delete and create a new partition.

    $ sudo fdisk /dev/sda
  6. Print out the current partitions by entering p. Make a note of the starting offset of the second partition e.g. 540672.


  7. Delete the second partition by entering d followed by 2. Then recreate the second partition by entering c, n, p, 2, followed by the starting address noted from the previous steps e.g. 540672. Leave the signature alone when prompted.


  8. Now, reboot the emulated Raspbian OS.
  9. When QEMU has restarted the Raspbian OS, open a Terminal and enter the command to resize the file system.

    $ sudo resize2fs /dev/sda2

  10. To see the available disk space, enter the command:

    $ df -h

Monday, September 9, 2019

How to emulate a Raspbian OS in QEMU on Windows 10

I wanted to test out developing for a Raspberry Pi on a Windows 10 PC platform running an emulated Raspbian OS. After trying out a few methods to get  the emulator running, I settled on the following procedure.

Install QEMU for 64-bit Windows 10
  1. Go to the following web site https://www.qemu.org/download/ and download the latest QEMU installer for Windows 64bit.
  2. Run the installer.

    The QEMU executable files are installed, e.g. C:\Program Files\qemu\
Download a Linux kernel
  1. Go to the following web site https://github.com/dhruvvyas90/qemu-rpi-kernel and download a suitable kernel, e.g. kernel-qemu-4.4.34-jessie.
  2. Place the kernel file in a folder e.g. D:/Temp/raspbian/kernel-qemu-4.4.34-jessie
Download an Raspbian OS image
  1. Go to the following web site http://downloads.raspberrypi.org/raspbian/images/ and download the latest image e.g. 2019-06-20-raspbian-buster.zip
  2. Unzip the image file into a folder, e.g. D:/Temp/raspbian/2019-06-20-raspbian-buster.img

Create a Windows bat file
  1. Run a text editor.
  2. Type in the following lines.

    "c:\Program Files\qemu\qemu-system-arm.exe" ^
    -kernel kernel-qemu-4.4.34-jessie ^
    -cpu arm1176 ^
    -m 256 ^
    -M versatilepb ^
    -serial stdio ^
    -append "root=/dev/sda2 rootfstype=ext4 rw" ^
    -hda 2019-06-20-raspbian-buster.img ^
    -net nic ^
    -net user,hostfwd=tcp::5022-:22 ^
    -no-reboot


    Note: rename the kernel and image file names (in bold) to match the downloaded file names accordingly.

  3. Save as a bat file e.g. run_raspbian.bat and close the editor.
Run QEMU
  1. Open up a Command Prompt.
     
  2. Change directory to the folder containing the kernel and image files e.g. D:/Temp/raspbian.
  3. Type in the command:

    D:\> run_raspbian.bat


    The QEMU window appears running Raspbian OS