Monday, May 26, 2014

QGIS Export layers to SVG for cartographic editing in desktop publishing software

If there is a need to manipulate QGIS map layers for cartographic publishing purposes in vector editing software like Adobe Illustrator or the free and open source software Inkscape, there is a plugin - Simple SVG for that. The plugin is not perfect but it gives you probably enough to work on.

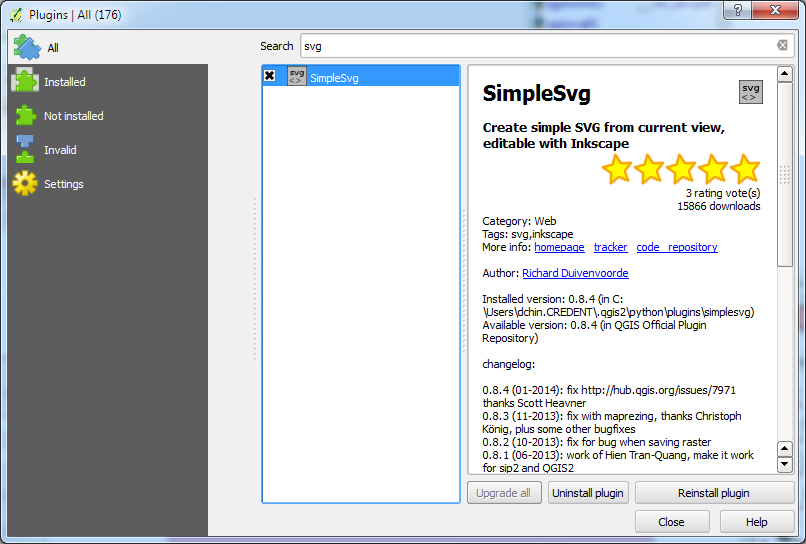
If the plugin is not installed in QGIS, simply run select Plugins | Manage and install Plugins... Then search for SimpleSvg, as shown below. Once located, just install it. There will be a Web pull down menu and an SVG icon in the tool bar.


  1. Using SimpleSvg is simple. Just display the layers you want to export to SVG. Resize the map view until you are happy with the extent.


  2. Then select Web | Save as SVG | Save as SVG.

    The SimpleSvg dialog box appears.

  3. Type in the output SVG file path and name.

    Note: On Windows, clicking the browse button will cause a Python error. So just key in the output file path and name.

  4. Click OK.

    The SVG file is created.

  5. Open the resultant SVG file in a vector editing software such as Inkscape. Further cartographic editing can now be done on the resultant vector graphics.


    Note: There is a bounding box feature in the resultant layer named qgisviewbox.
    Each map feature is placed in its own layer, e.g. waterbody.
    Each map feature is grouped together
    .


Monday, May 19, 2014

Trainsity Recife Metro Android App

Find your way around the FIFA World Cup 2014 city of Recife, Brazil using the high resolution vector maps of the MetroRec's Center 1, Center 2, South and Diesel Train Lines. The maps have small file size footprints but with many levels of zoom and can work offline without an Internet connection. Users can tap the train station labels to open Google Maps or Street View, where they can use all the functions of the Google apps to visualize the surrounding area and/or perform routing for directions.

On a mobile handset, the app will display a list of train lines, which when tapped will open up a detail view of the metro transit map, as shown below.

Tapping the station boxes will bring up an option menu where users can choose to display the station in Google Maps or Street View.

The app is also optimized for tablet devices. The layout on a tablet will display both the list and the vector map at the same time, as shown below.

Users can toggle the map to full screen mode by tapping the action bar icon at the top.

The app is available on the Google Play Store. Just click the button below.
Get it on Google Play

Monday, May 12, 2014

Import OpenStreetMap features into QGIS

QGIS 2.2 has a built in function to import OpenStreetMap features into a SpatiaLite database. Using the function requires us to perform three basic steps:
  • Download data
  • Import topology from XML
  • Export topology to SpatiaLite
The following steps illustrate how to import OpenStreetMap features into QGIS.

Download data
  1. Start QGIS. Optional: Navigate the map view to the area where you want to download OpenStreetMap features.


  2. Select Vector | OpenStreetMap | Download data.

    The Download OpenStreetMap data dialog box appears.

  3. Optional. Choose an extent method e.g. From map canvas.
  4. In the Output file field, click the [...] button.

    The Save As dialog box appears.

  5. Type in a file name, e.g. fortaleza.osm. Click Save. Click OK.

    The OpenStreetMap data has been downloaded.

  6. Click OK. Click Close.
Import topology from XML
  1. Select Vector | OpenStreetMap | Import topology from XML.

    The OpenStreetMap Import dialog box appears.

  2. In the Input XML file (*.osm) field, click the [...] button.

    The Open dialog box appears.

  3. Browse and select the previously downloaded *.osm file, e.g. fortaleza.osm. Click Open.

    The Output SpatiaLite DB file and Connection name fields are populated with default values.

  4. Click OK.

    The OpenStreetMap tables are imported into the SpatiaLite DB.

  5. Click OK. Click Close.
     
Export topology to SpatiaLite.
  1. Select Vector | OpenStreetMap | Export topology to SpatiaLite.

    The Export OpenStreetMap topology to SpatiaLite dialog box appears.

  2. In the Input DB file field, click the [...] button.

    The Open dialog box appears.
  3. Browse and select the previously created SpatiaLite DB file, e.g. fortaleza.osm.db. Click Open.
  4. In the Export type field, toggle on a geometry feature type, e.g. Polylines.


  5. Optional. In the Output layer name field, type in a layer name to use, e.g. fortaleza_polylines.
  6. Click OK.

    The layer is created in QGIS.
  7. Click OK.


  8. Optional. Repeat the previous steps 4-6 for additional geometry types.
  9. Click Close.

Monday, May 5, 2014

How to enable MultiWindow support for Android Apps on Samsung devices

Some Samsung devices such as the Note range of handsets can display two apps at the same time in two windows. Samsung calls this two window feature as MultiWindow and supported apps are activated from Samsung's Traybar, a vertical or horizontal strip launcher on the sides of the screen. Tweaking your Android app so that it can run in MultiWindow mode is very easy - just add some meta data tags in the AndroidManifest.xml file as shown in the example below. Then recompile the app.

<?xml version="1.0" encoding="utf-8"?>
<manifest xmlns:android="http://schemas.android.com/apk/res/android"
package="com.dom925.trainsity.kualalumpur"
android:installLocation="auto"
android:versionCode="3"
android:versionName="1.0.2" >
<uses-permission android:name="android.permission.INTERNET" />"
<uses-permission android:name="android.permission.ACCESS_NETWORK_STATE" />

<uses-sdk
android:minSdkVersion="11"
android:targetSdkVersion="19" />
 
<application
android:name="com.dom925.trainsity.kualalumpur.App"
android:allowBackup="true"
android:icon="@drawable/ic_launcher"
android:label="@string/app_name"
android:theme="@style/AppTheme" >
<activity
android:name="com.dom925.trainsity.kualalumpur.MapListActivity"
android:label="@string/app_name" >
<intent-filter>
<action android:name="android.intent.action.MAIN" />
<category android:name="android.intent.category.LAUNCHER" />
<!-- add this category tag here -->
<category android:name="android.intent.category.MULTIWINDOW_LAUNCHER" />
</intent-filter>
</activity>
<!-- some stuff deleted here for clarity -->
<!-- add the following meta-data tags here -->
<meta-data 
android:name="com.samsung.android.sdk.multiwindow.enable" 
android:value="true" />
<meta-data 
android:name="android.intent.category.MULTIWINDOW_LAUNCHER" 
android:value="true" />
<meta-data 
android:name="com.sec.android.intent.category.MULTIWINDOW_LAUNCHER" 
android:value="true" />"
</application>
 
</manifest>
An app that supports MultiWindow will be visible in the Traybar launcher. Simply drag out the app from the Traybar launcher. The screenshot below shows a Note device running a Chrome browser and a metro app in MultiWindow mode.