Monday, August 26, 2013

Retaining GeoTiff metadata for an image after editing in Photoshop

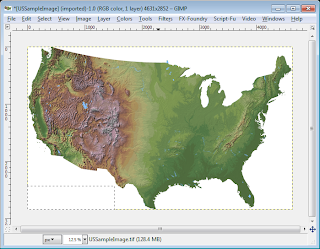
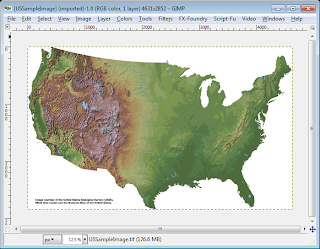
Sometimes for whatever reason, we have to edit a GeoTiff image in a photo manipulation software application like Photoshop. These image editing applications usually do not retain the geo-referencing information of the GeoTiff file after editing. The following screenshots show a GeoTiff image being edited in GIMP to remove some text from the image.

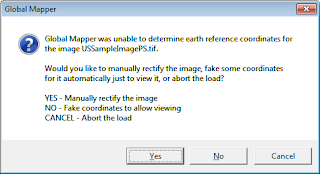
When the edited file is opened in a mapping software application e.g. Global Mapper, the software will be unable to detect any geo-referencing information, as shown below.


There is a way to apply back the geo-referencing information from the original GeoTiff file. As long as the edited image pixel sizes (width and height) remain the same as the original GeoTiff image, we can copy the GeoTiff metadata from the original file to the edited file using the listgeo and geotifcp executables. These programs can be downloaded as part of FWTools.

The following shows how to use the listgeo and geotifcp executables.

  1. Open up a command prompt. Type in the following:

    C:\> listgeo -no_norm original.tif > metadata.geo

    The GeoTiff file's geo-referencing metadata is copied out from the input original.tif and written to the output file metadata.geo.
  2. Next, type in the following:

    C:\> geotifcp -g metadata.geo edited.tif output.tif

    The geo-referencing info in the metadata.geo file is applied to the edited.tif file and written out to output.tif.  When the output.tif file is loaded in a mapping application, the image is placed in the correct geographic location.


Monday, August 19, 2013

Simple C# example using SharpMap and OGR to read a DGN file

SharpMap is an easy to use library for working with GIS data. It comes with wrappers for OGR and GDAL. I recently had to work with DGN files. I thought I would share that experience by posting a simple C# wrapper for reading a Microstation DGN file (version 7) as SharpMap geometries.

The example code below simply opens up a DGN file as an OGR data source. The wrapper exposes a public method to return all the DGN elements as SharpMap geometries for further manipulation.


//...etc...
using SharpMap;
using SharpMap.Geometries;
using SharpMap.Converters.WellKnownBinary;
using SharpMap.Converters.WellKnownText;
using OSGeo.OGR;
 
//A simple example DGN file wrapper using SharpMap and OGR
public class DGNFile
{
#region private member variables
//Variable for the OGR DGN data source
private DataSource _dataSource = null;
private ArrayList _layers = new ArrayList();
#endregion
public DGNFile(string filename)
{
//Register OGR drivers
Ogr.RegisterAll();
string format = string.Empty;

//Attempt to open the DGN file with OGR. 
//If successful, the format string "DGN" will be returned. 
//Otherwise, throw an exception
_dataSource = Ogr.Open(filename, 0);
if (_dataSource != null)
{
format = _dataSource.GetDriver().GetName();
}
if (format.CompareTo("DGN") != 0 || _dataSource == null)
{
throw new Exception("Unable to open DGN file");
}
 
//Get a list of the DGN layers. 
//Note: so far, I have not encountered more than 1 layer
for (int i = 0; i < _dataSource.GetLayerCount(); i++)
{
Layer layer = _dataSource.GetLayerByIndex(i);
if (layer != null)
{
FeatureDefn def = layer.GetLayerDefn();
_layers.Add(def.GetName());
}
}
}
//Just a destructor to free up the OGR resources
~DGNFile()
{
if (_dataSource != null)
{
_dataSource.Dispose();
}
}
//A public method to get all the DGN elements as SharpMap geometries
public ArrayList GetElements()
{
ArrayList geometries = new ArrayList();
 
for (int i = 0; i < _layers.Count; i++)
{
string layerName = (string) _layers[i];
Layer layer = _dataSource.GetLayerByName(layerName);
FeatureDefn def = layer.GetLayerDefn();

//A reset is necessary if you want to read the DGN from the top of the file again
layer.ResetReading();
Feature fea;

//Loop through all the elements
while ((fea = layer.GetNextFeature()) != null)
{
OSGeo.OGR.Geometry geom = fea.GetGeometryRef();
if (geom != null)
{
wkbGeometryType geomType = geom.GetGeometryType();
geom.FlattenTo2D();

//Allocate a buffer to store the WKB geometry
Byte[] buff = new Byte[geom.WkbSize()];
geom.ExportToWkb(buff);

//Convert the WKB geometry to SharpMap geometry
SharpMap.Geometries.Geometry sharpMapGeom = GeometryFromWKB.Parse(buff);
geometries.Add(rec);

//Free up resources
geom.Dispose();
}
fea.Dispose();
}
layer.Dispose();
}
//Return the DGN elements formatted as SharpMap geometries
return geometries;
}        
Monday, August 12, 2013

Android App for monitoring 911 incidents in the City of Portland, Oregon


Users can monitor the City of Portland, Oregon's Police 911 Dispatch Incidents using this made for Android app - Portland 911 Incidents Monitor. The 100 most recent, closed, non-confidential calls for service received by the City of Portland's 911 system can be viewed as a text list or on a map as icons. Incident details can be viewed by touching an item on the list or a marker on the map display. A function is available to easily filter away unwanted incidents from the list or map by text. The app allows the user to send the incident location to Google Maps and/or Street View for better visualization of the 911 incident environment.
Upon launching the app, the list of incidents will be downloaded and displayed with associated icons as shown below.

The list of incidents can be filtered by using the Filter command - activated by selecting the Filter icon on the Action Bar or menu item. This will toggle the display of the filter text entry field. As you type in any text e.g. traffic, the incident list is dynamically updated.

To view all the incidents on a map, simply select the Map option item in the Action Bar menu. The filter (if any) remains in effect until it is cleared. Touching any incident icon will pop up a snippet of information about the incident. Touching the snippet will display the incident details.


Long pressing any item in the incident list will pop up a menu, as shown below, where the selected incident can be shared, located on a map, or send to the Google Maps app.


Using the Google Maps app, Street View can be activated for better visualization of the incident environment.


Android app on Google Play

Monday, August 5, 2013

Display the attribution text for Google Maps Android V2 by overriding the onPreferenceTreeClick of the PreferenceFragment activity

If you are using Google Maps Android API Version 2.0, it is necessary to include the Google Play Services attribution text as part of your Android application. I decided to implement this requirement by including a clickable "Legal Notices" preference on a settings fragment activity. The following shows how this is done.

In the Android preference XML file under the project\res\xml\ folder, create a preference with a title for Legal Notices as shown below. This preference is given the key string prefLegalNotices.


<?xml version="1.0" encoding="utf-8"?>
<PreferenceScreen xmlns:android="http://schemas.android.com/apk/res/android" >
 
<PreferenceCategory
android:title="About the dataset"
>
<Preference
android:key="prefLegalNotices"
android:title="Legal notices"
/>    
</PreferenceCategory>
 
</PreferenceScreen>

Then in the PreferenceFragment source file, override the onPreferenceTreeClick method.


public class SettingsFragment extends PreferenceFragment implements OnPreferenceChangeListener {
@Override
public boolean onPreferenceTreeClick(PreferenceScreen preferenceScreen,
Preference preference) {
String key = preference.getKey();

//if the user click on the Legal Notices preference, display the license
if (key.equalsIgnoreCase("prefLegalNotices")){
String LicenseInfo = GooglePlayServicesUtil.getOpenSourceSoftwareLicenseInfo(getActivity());
AlertDialog.Builder LicenseDialog = new AlertDialog.Builder(getActivity());
LicenseDialog.setTitle("Legal Notices");
if (LicenseInfo!=null){
LicenseDialog.setMessage(LicenseInfo);
LicenseDialog.show();                
}            
}
return super.onPreferenceTreeClick(preferenceScreen, preference);
}
}

The screenshots below show how it works.