There is a white paper from Intergraph detailing a workflow where you can create PDFs from batch plotting using Adobe Acrobat's Distiller. In this posting, I will describe an alternative method to create PDFs using the open source software ImageMagick instead of Distiller. While ImageMagick is free, the trade off is that the map image in the output PDF file is a raster image. Basically, the method is easy: just use BatchPlot to export to an image file, then use ImageMagick's convert utility to create a PDF file from the image file.
Step 1: Use BatchPlot to create the image file
If you are familiar with the BatchPlot utility in GeoMedia, you'd know that it can create bmp, jpg or tif image files of the map layout window contents. You can use the BatchPlot graphical user interface or the command line interface to create the image file.
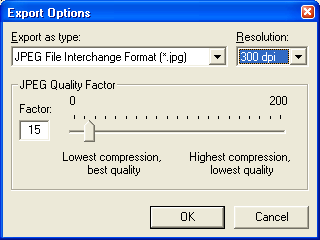
Or for example from the command line:
C:\> BatchPlot export -file "C:\Temp" -type jpg -resolution 300 "C:\MyDocuments\geomedia.gbp"
The above example will create the JPG files in the folder C:\Temp.
Step 2: Use ImageMagick to convert to PDF
The convert utility has a long list of options but for our purpose, we only need to specify the input file name and the output PDF file name. For example from the command line, type in the following:
C:\> convert "C:\Temp\MapImage.jpg" "C:\Temp\MapImage.pdf"
This will create the PDF file from the image file generated by the BatchPlot utility.
That's it. Simple.
Monday, April 28, 2008
Monday, April 14, 2008
Editing GeoMedia Terrain Models
The documentation that comes with GeoMedia Terrain 6.0 does not provide clear details on practical usage of the terrain model editing commands. While writing a GeoMedia Terrain training course guide, I figure out that displaying the terrain model vertices and triangle edges goes a long way in helping users understand how to use the editing commands. By the way, this is not described in the delivered documentation.
Displaying Terrain Model Triangle Edges and Vertices
Now that you can see the triangle vertices and edges, editing the model is so much easier.
You need to activate the Edit Z dockable control toolbar to perform editing on the Z-elevations of the terrain model. Select Terrain > Edit > Edit Z in the GeoMedia menus.
The Edit Z dockable control appears.
Edit Individual Vertex's Z Value
Displaying Terrain Model Triangle Edges and Vertices
- In the GeoMedia menus, select Legend > Add Legend Entries.
The Add Legend Entries dialog box appears. - Expand the Terrain Warehouse connection node that contains your TIN terrain model.
- Check the {Your
ModelName}_TriangleVertices feature on. - Check the {YourModelName
}_ TriangleEdges feature on.
The Add Legend Entries dialog box should like as shown below. - Click OK.
The triangles and edges are displayed in the active map window.
Now that you can see the triangle vertices and edges, editing the model is so much easier.
- In the GeoMedia menus, select Terrain > Edit > Edit Model Vertices.
The Edit Vertices dockable control is displayed.
- In the Action drop down list, choose Insert.
You are prompted to "Select vertex to insert" in the GeoMedia status bar. - In the Operate on drop down list, choose Individual vertices.
- In the Z field, enter an elevation value e.g. 5000.
- In the map window, click a new vertex point.
A new vertex is created in the map window. You can see the model triangle edges and points dynamically adjust themselves to accomodate the new vertex. - You can click to insert more vertices.
- If you made a mistake, you can do a mouse right click in the map window.
The Edit Model Vertices context menu pops up. - Choose Undo to remove the last vertex.
- After you have inserted all the vertices that you want, do a mouse right click in the map window.
- Choose Update Model to save the new vertices permanently into the terrain model.
- Right click and choose Cancel to terminate the command.
- In the Action drop down list, select Move.
The cursor becomes a cross hair cursor. You are prompted to "Select vertex to move". - In the map window, click on a vertex.
The vertex is highlighted and you are prompted to "Select location to move". - Click on the new location in the map window.
The selected vertex is moved to the new location. - In the map window, do a mouse right click and select Update Model.
The changes are saved permanently.
- In the Action drop down list, select Delete.
The cursor becomes a cross hair. You are prompted to "Select vertex to delete". - In the map window, click on a vertex.
The selected vertex is removed and you are prompted to "Select another vertex to delete". - In the map window, right click and choose Update Model.
The changes are saved permanently.
- Click on the Select Tool icon.
- Then click on two or more vertices in the map window. Note that if you want to add to the selection set, then you need to press down the CTRL key on the keyboard while clicking.
- After you are done with selection, in the Action drop down list, select Move.
- In the Operate on drop down list, choose Select set.
You are prompted to "Input X,Y values to move the vertices. - Then key in the relative X and Y offsets in the X and Y fields, e.g. X=500, Y=500.
You are prompted to Click Process Move to move the vertices. - Do a mouse right click in the map window. In the context menu, choose Process Move.
A message box appears showing the number of vertices moved and the number failed. - Click OK.
The vertices in the selection set are moved by the relative X and Y offsets. - In the map window, right click and choose Update Model to save the changes permanently.
You need to activate the Edit Z dockable control toolbar to perform editing on the Z-elevations of the terrain model. Select Terrain > Edit > Edit Z in the GeoMedia menus.
The Edit Z dockable control appears.
Edit Individual Vertex's Z Value
- In the Edit Z control's Applies to drop down list, select Individual vertices.
You are prompted to "Select vertices to edit". - In the control's Operator field, choose None.
- In the control's New Z field, enter an elevation e.g. 6000.
- Click on an existing vertex in the map window.
You are prompted to "Select another vertex or choose 'Edit Vertices' to perform the edit. - Click on additional vertices.
- When you are done, right click in the map window and choose Edit Vertices to perform the edits.
The message box appears showing the number of vertices edited or failed. - Click OK.
All the selected vertices' elevation values are updated.
- In the control's Applies to drop down list, select Vertices with same Z.
- In the control's Original Z field, enter the Z elevation of the vertices to change e.g. 6000.
- In the control's Operator drop down list, select an operator e.g. +.
- In the control's Operand field, enter the delta value e.g. 500.
The control's New Z field shows the resultant Z value,
e.g. New Z= {Original Z=(6000)}{Operator=(+)}{Operand=(500)}=6500. - In the map window, right click and choose Edit Vertices.
After processing, the message box showing the number of vertices edited or failed appears. - Click OK.
- In the map window, right click and choose Update Model to save the changes permanently.
Thursday, April 10, 2008
GeoMedia 6.0 Command Wizard for Visual Studio 2005
GeoMedia version 6.0 does not come with a command wizard for Visual Studio 2005. I found out that there is a zip file GeoMediaWizardVS2005v60.zip available from the Intergraph website http://synergy.intergraph.com (login required). Download and extract the contents of this file and follow the following procedure to install it as an add-in to Visual Studio 2005.
- Extract templates.zip to
Drive:\Program Files\GeoMedia\wizard\Templates folder. - Extract Regwiznet.zip to
Drive:\Program Files\GeoMedia \wizard\ folder. - Extract GeoMediaCmdWizNet8.zip to
Drive:\Program Files\GeoMedia \wizard\ folder. - Run
Drive:\Program Files\GeoMedia \wizard\Regwiznet.exe . - Start Visual Studio 2005.
- Select Tools > Add-in Manager (notice the GeoMedia Command Wizard Add-in)
Note: If you are using GeoMedia version 6.1, then you no longer need to do the above as 6.1 comes with the Visual Studio 2005 add-in.
Thursday, April 3, 2008
Work around GeoMedia Map Publisher's Slow Dialog Boxes Display Problem
GeoMedia Map Publisher is a brand new product from Intergraph for cartographic map production including project management, instance-based cartographic editing and display management. I tried out the spanking new Intergraph GeoMedia Map Publisher 6.1 software, released in December 2007. Overall, it is a pretty cool product but like all new software, there is bound to be some irritating program bugs. The first thing that I noticed was that the dialog box display of the product takes an annoyingly long time to complete refresh (if at all). This makes it difficult to work as you cannot see the text fields until the refresh completes. After discussing the problem with an Intergraph support engineer, he suggested the following workaround outlined below. Basically, the problem will go away if the Windows DirectX acceleration is disabled.
Workaround Steps:
- On the Windows Desktop, right-click the mouse and select Properties in the context menu to bring up the Display Properties dialog box.
- Press the Settings tab.
- Click the Advanced button to bring up the Plug and Play Monitor Advanced Settings dialog box.
- Click the Troubleshoot tab.
- Move the Hardware acceleration slider to the third scale mark. Make sure that the description below is saying something like "Disable all DirectDraw and Direct accelerations...", as shown in the screen shot below.
- Click OK. That's it! From now on, the annoying slow dialog box display will be gone.
Subscribe to:
Posts (Atom)