Friday, July 3, 2009

Create multiple lines of text with Geomedia functional attributes

GeoMedia's Functional Attributes can be used to create multi-line text geometries from database attribute values. As an example, I have the following database fields label1 and label2 in my database table as shown in the figure below.
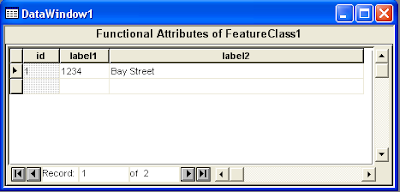


I want to form a multi-line text geometry using label1 as the first line and label2 as the second line. The Functional Attributes can be used to form the multi-lines. Here are the steps.
  1. Select Start > All Programs > GeoMedia > GeoMeda. Open an existing workspace.

  2. Select Analysis > Functional Attributes.

    The Functional Attributes dialog box appears.


  3. Click New.

    The Functional Attribute dialog box appears.


  4. Under Categories, click Geometry. Double click CREATETEXTPOINT under Functions.

  5. In the Expression field, form the following string by keying in or double clicking the names under Attributes.

    CREATETEXTPOINT(Input.Geometry, Input.label1+Constant.NewLine+Input.label2, 0)

    Note: + is the string concatenate operator and Constant.NewLine is the new line character.


  6. Click Add. Then click Close.


  7. Click OK.

    The multi-line text point geometry is created in the Map Window.

Wednesday, July 1, 2009

Correct GPS elevation readings for geoid heights with GeoMedia

Intergraph GeoMedia's coordinate system engine can be used to convert your GPS receiver's elevation readings to the correct topographic height taking into account the reference geoid height. Besides GeoMedia, I have not seen vertical datum conversion functions in other software like Global Mapper or Safe FMe but I am sure ESRI ArcGis should have those functions too. For more information about geoid correction for GPS and topographic height, you can visit this site.

As an example of using GeoMedia to convert the GPS measured elevations to topographic height, I use an Excel spreadsheet containing just 2 GPS points as shown below as my source data.


And now, the procedure. There are many ways to read in data in GeoMedia but in this example I chose to attach it as a table in a Microsoft Access database.
  1. Run GeoMedia or GeoMedia Professional and open a read-write connection to a Microsoft Access database.

  2. Select Warehouse | Feature Class Definition.

    The Feature Class Definition dialog box appears.


  3. Select the Access connection e.g. tmp. Click Attach.

    The Attach dialog box appears.


  4. In the Type drop down list, select Excel 97. Click Browse and select the Excel spreadsheet containing the GPS readings.

    The selected spreadsheet name is displayed.


  5. Change the target table name if you like. Click OK.

    The Excel spreadsheet is attached as a table to the Access database connection.


  6. Now make sure the workspace coordinate system is Geographic WGS84 with EGM96 vertical datum. Select View | Coordinate System.

    The GeoWorkspace Coordinate System dialog box appears.


  7. Click OK.


  8. Select Analysis | Geocode Coordinates.

    The Geocode Coordinates dialog box appears.


  9. In the Geocode attributes in field, choose the attached Excel spreadsheet table e.g. gps.

  10. Click Coordinate System.

    The Coordinate System Properties dialog box appears.


  11. Make sure the coordinate system is Geographic WGS84. In the Vertical datum drop down list, select Ellipsoid (geometric).


  12. Click OK.

  13. In the Longitude field, select the Excel spreadsheet column for longitude values e.g. lngdeg.

  14. In the Latitude field, select the Excel spreadsheet column for latitude values e.g. latdeg.

  15. In the Height field, select the Excel spreadsheet column for the GPS elevation readings e.g. gpshgt.


  16. Click OK.

    The geocoded GPS points are displayed in the map window.

We have now corrected the GPS elevation readings. To verify this, just review the Z values of the point features.
  1. Use the Select Tool command and click on one of the GPS points.

    The point is selected and shown in green.

  2. Select Edit | Select Set Properties.

    The Properties dialog box appears.


    Note that the Z value shown is now the topograhic height i.e. the GPS reading minus the geoid height at that location.