Monday, August 27, 2012

Javascript example code to create a silhouette of an image using the Canvas

The HTML5 Canvas object can be used to do simple image processing tasks such as blurring, sharpening, darkening etc. provided the proper algorithm is written into the Javascript code. This post will provide an example of turning a transparent image such as the sample image on the right into a silhouette.

The code logic is quite straightforward - draw the image onto the canvas, then read each RGBA pixel from the canvas and set the RGB values to zero while keeping the alpha channel values intact.

The following is just the HTML code for laying out the image and button elements.

<!DOCTYPE html>
<html>
<head>
<title>Create Silhouette from an Image using the Canvas</title>
<script type="text/javascript" src="silhouette.js">
</script>
</head>
<body>
<p>
<img id="sourceImg" src="silhouette01.png" />
<img id="silhouetteImg" src="" />
</p>
<p>
<input type="button" value="Create Silhouette" id="createSilhouetteButton" />
</p>

</body>
</html>

The HTML page is rendered in a browser as shown above. 

The following is the Javascript code that converts the source image into a silhouette when the button is clicked.
window.onload = init;
function init() {
    document.getElementById("createSilhouetteButton").onclick = onButtonClick;
}
function onButtonClick(){
    var canvas = document.createElement("canvas");
    var sourceImg = document.getElementById("sourceImg");
    var silhouetteImg = document.getElementById("silhouetteImg");
    var ctx = canvas.getContext('2d');
    canvas.width = sourceImg.width;
    canvas.height = sourceImg.height;
    ctx.drawImage(sourceImg,0,0);
    var imgData = ctx.getImageData(0,0,canvas.width,canvas.height);
    var pix = imgData.data;
    //convert the image into a silhouette
    for (var i=0, n = pix.length; i < n; i+= 4){
        //set red to 0
        pix[i] = 0;
        //set green to 0
        pix[i+1] = 0;
        //set blue to 0
        pix[i+2] = 0;
        //retain the alpha value
        pix[i+3] = pix[i+3];
    }
    ctx.putImageData(imgData,0,0);
    silhouetteImg.src = canvas.toDataURL();
};

When the button is clicked, this resultant silhouette image is created. 

Monday, August 20, 2012

View LiDAR LAS files with CloudCompare's ccViewer

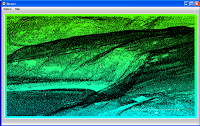
I found this new open-source software CloudCompare for 3D point cloud and mesh processing, which comes along with a light weight viewer ccViewer. The interesting thing for LiDAR professionals is that the viewer is compiled with support for reading and displaying LiDAR LAS files. The display performance is pretty good even for large LAS files, but that's just about it for the viewer, other than some basic viewing perspectives and basic display coloring. It only has the ability to color the LiDAR points by classification or by elevation. On the other hand, the source code is available and if you have the time and the inclination, you can fork or contribute to the project and make the software work better with LiDAR LAS files.

Running ccViewer
To run the software, simply double click on the ccviewer.exe executable extracted out from the downloaded binaries as shown below. Note the presence of the libLAS.dll in the extracted folder.


This should open up the ccViewer application window.


Now all that is needed to display LiDAR LAS files is to drag and drop the file onto the ccViewer application window.

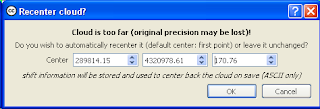
The following prompt might appear but simply click OK and the LiDAR point cloud will be displayed.


 For more information, visit the project's web site at http://www.danielgm.net/cc/, where the binaries and souce code for the CloudCompare and the ccViewer software can be downloaded.

Monday, August 13, 2012

Use Gimp to create icon shadows for Google Maps

If you make your own custom Google Maps icons, then it is sometimes necessary to create suitable shadow icons for them. There are a few free online tools to do the job but I thought I would try to use Gimp to do the task. I figured out the basic steps:


  1. Duplicate the custom icon, 
  2. De-saturate and darken the duplicate, 
  3. Scale the duplicate in half vertically and skewed it horizontally, 
  4. Reduce the shadow opacity and make another duplicate shadow layer, 
  5. Refine the shadow layers.
  6. Save the shadow icon


Make a duplicate layer of the custom icon

  1. Start Gimp. Load the custom icon e.g. fair.png.

    Note the dimensions of the custom icon in the title bar at the top; 32 by 32 pixels in this example.
  2. If the Layers pane is not displayed, then press CTRL+L. Select the original icon layer, which is usually labelled as Background.


  3. Click the Duplicate layer icon as shown above.

    A duplicate named Background copy is created.
  4. Click the eye icon for the Background copy layer to turn off the display for that layer.
De-saturate and darken a duplicate layer
  1. In  the Layers pane, select the Background layer.
  2. In the menu bar, select Colors | Hue-saturation.

    The Hue-Saturation dialog box appears.


  3. In the Lightness scroll field, drag the handle to the left. Similarly, drag the Saturation handle all the way to the left. Click OK.

    The layer is grayed and darkened.


Scale vertically by half and skew horizontally by half the shadow layer
  1. Select Layer | Scale Layer.

    The Scale Layer dialog box appears.
  2. Toggle the chain off as shown below. This turns off the constant aspect ratio.


  3. In the Height field, type in half the current height e.g. 16. Click Scale.

    The layer is scaled vertically in half.
  4. Press SHIFT+T.

    The Shear dialog box appears.


  5. In the Shear magnitude X field, type in negative half of the current height e.g. -16. Click Shear.

    The layer is sheared horizontally by half.
Adjust the shadow opacity, location and make duplicate the shadow layer
  1. Select the Move Tool in the tool box or press M. Drag the layer until the layer border is aligned as shown below.

  2. Select Image | Fit Canvas to Layers.

    The canvas is expanded to fit the skewed layer.
  3. In the Layers pane, drag the Opacity scroll handle to reduce the opacity e.g. 25%.

  4. Click the Duplicate icon.

    The shadow layer is duplicated as Background copy#1 layer.
Refine the shadow layers by scaling and blurring
  1. In the Layers pane, select the upper shadow layer e.g. Background copy#1.
  2. Select Layer | Scale Layer.

    The Scale Layer dialog box appears.
  3. Make sure the chain icon is connected. In the Width field, reduce the size by a few pixels e.g. from 48 to 43. Click Scale.

    The upper shadow layer is scaled down while maintaining the aspect ratio.
  4. In the Layers pane, select the lower shadow layer e.g. Background.
  5. Select Filters | Blur | Gaussian Blur.

    The Gaussian Blur dialog box appears.


  6. In the Horizontal and Vertical fields, type in a radius e.g. 5.0. Click OK.

    The lower layer is blurred.


Save the shadow icon
  1. Select File | Save As.

    The Save Image dialog box appears.
  2. In the Name field, type in a name e.g. fair-shadow.png. Click Save.

    The Export File prompt pops up.
  3. Toggle Flatten Image on. Click Export.

    The Save as PNG dialog box appears.


  4. Click Save.

    The shadow icon is saved.


Monday, August 6, 2012

Google Mapplet to show geo-referenced image overlays

In standard desktop GIS software applications, it is a common task to display geo-referenced images. I wanted to be able to do the same using just a modern browser and an Internet connection. So after a few late nights, I completed writing this Google Mapplet to load and display local image files with associated ESRI world files as custom overlays in Google Maps. I had to use the HTML5 FileReader objects so only modern browsers such as Chrome, FireFox, Internet Explorer 10 will work.

  1. To run the mapplet, simply go to the site http://dominoc925-pages.appspot.com/mapplets/geoimage.html.

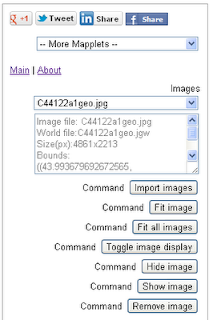
  2. In the sidebar, click the Import Images button.

    The Import image dialog box appears.

  3. In the Image file field, click the button. Browse and select an image file e.g. C44122a1geo.jpg.
  4. In the World file field, click the button. Browse and select the corresponding ESRI world file e.g. C44122a1geo.jgw.
  5. If the image file is in the non-projected coordinate system, then choose Geographic in the Coordinate system type combo box. If the image file is in a projected coordinated system, then choose Projected.

    Note: the raster image transformation for projected coordinate system to the Google Maps Mercator coordinate system is not very accurate. The positioning would be more accurate if the raster image were already in non-projected or Mercator coordinate system.
  6. If the image file is in a projected coordinate system, then choose the correct projection in the Projection combo box.
  7. In the Geodetic Datum field, choose the horizontal datum of the image file, e.g. WGS84, Global Definition.


  8. Click Start Import.

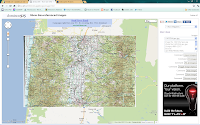
    The image is loaded and displayed.

    If necessary, click the Fit image or Fit all images buttons in the sidebar to center the map display on the image(s)
    .

  9. Optional. If you want to load more images, then repeat the previous steps 3 to 8.
  10. Click Close.