- Start QGIS.
The QGIS application appears.
- Select Layer | Add SpatiaLite Layer.
The Add SpatiaLite Table(s) dialog box appears.
- Click New. Browse and select a SpatiaLite database e.g. roads.sqlite. Click Open.
The selected database is added to the Databases drop down list.
- If not selected, then choose the database in the Databases drop down list. Click Connect.
The list of tables is displayed.
- Select roads. Click Add.
The roads layer is displayed in the map.
- Select Database | SpatiaLite | QSpatiaLite.
The QspatiaLite dialog box appears.
- In the SQL entry field, type in the following:
SELECT * FROM roads_network_net
WHERE nodefrom = 1
AND nodeto = 1000
Note: this queries the network graph for the shortest path between the from node #1 and the to node #1000. The node ids from the nodes table. - Click Run SQL.
The result is displayed.
Note: only the first record has a geometry. This geometry object contains the geometry of the shortest path. The subsequent rows list out each segment of the shortest path. - In the SQL entry field, type in the following:
CREATE TABLE route1 AS
SELECT * FROM roads_network_net
WHERE nodefrom = 1
AND nodeto = 1000
AND geometry IS NOT NULL
Note: this will create a route1 table that can be displayed in QGIS. - Click Run SQL.
A table named 'route1' is created. - In the SQL Entry field, type in the following:
SELECT RecoverGeometryColumn('route1','Geometry',4326,'LINESTRING','XY')
Note: change 4326 to the appropriate SRID of your data. - Click Run SQL.
The 'route1' table is registered as a spatial table. - In the list of tables of the QSpatiaLite dialog box, right click on the newly created table 'route1'.
A pop up menu appears. - Choose Load in QGIS.
The shortest path result layer is loaded in the map.
Monday, September 30, 2013
Routing analysis using Quantum GIS and SpatiaLite
After preparing a network graph in a SpatiaLite database for routing analysis in my previous post, you can perform shortest path analysis just by typing in SQL commands in the SpatiaLite-gui. The results are returned as result set rows which are textual - functional but difficult to visualize. It is more fun to do it in a visual environment such as Quantum GIS or QGIS for short as shown below.
Monday, September 23, 2013
Using Spatialite to prepare road segments for routing analysis
SpatiaLite is a extension to the light weight database Sqlite that extends the database with spatial processing capabilities similar to what PostGis gives PostgreSQL. One of the capabilities that I wanted to use recently was the ability to perform shortest path routing analysis using the Dijkstra algorithm. In order to perform the analysis, the roads network data has to be processed into a suitable form for SpatiaLite to use. The following illustrates how to do the processing (assuming the road data is topologically correct). It can be done using the spatialite-gui executable which can be downloaded from http://www.gaia-gis.it/gaia-sins/.
Create a new SpatiaLite database
Create a new SpatiaLite database
- Run the spatialite-gui.exe.
The spatialite-gui [a GUI tool for SQLite/SpatiaLite] application appears.
- Select Files | Creating a new (empty) SQLite DB.
The Creating a new, empty DB dialog appears.
- Type in a new database name e.g. roads.sqlite. Click Save.
The database is created.
Load in the road segments data
- Select Files | Load Shapefile.
The Load Shapefile dialog appears. - Select a shapefile e.g. roads.shp. Click Open.
The Load Shapefile dialog box appears.
- If necessary, choose an appropriate Charset Encoding, e.g. UTF-8.
- If necessary, type in the correct coordinate system SRID for the Shapefile e.g. 4326. Click OK.
The Shapefile is loaded.
Preprocess the road segments for network building
- In the SQL entry field, type in the following statement.
CREATE VIEW tmp_roads AS
SELECT *, STARTPOINT(geometry) AS startp, ENDPOINT(geometry) AS endp
FROM roads
- Then click the button Execute SQL Statement.
The view is created. - Type in the following SQL statement to create a nodes table containing all the starting and ending nodes.
CREATE TABLE nodes AS
SELECT ROWID AS id, a.p AS geometry FROM
(
SELECT DISTINCT tmp_roads.startp AS p FROM tmp_roads
UNION
SELECT DISTINCT tmp_roads.endp AS p FROM tmp_roads
) a
GROUP BY a.p - Click the Execute SQL Statement button.
The nodes table is created. - Type in the following SQL statement.
CREATE TABLE roads_network AS
SELECT a.*, b.id AS start_id, c.id AS end_id
FROM tmp_roads AS a
JOIN nodes AS b ON a.startp = b.geometry
JOIN nodes AS c ON a.endp = c.geometry - Click the Execute SQL Statement button.
The roads_network table is created.
Build the Network
- Select Files | Build Network.
The Build Network dialog box appears.
- In the Base Table [graph] field, select the table created in the previous step, e.g. roads_network.
- In the NodeFrom column field, select the column start_id.
- In the NodeTo Column field, select the column end_id.
- In the Geometry Column field, select Geometry.
- Choose Uni-Directional or Bi-Directional.
- Choose the Cost type - GLength or Cost Column. If Cost Column is chosen, then select the Cost Column e.g. Cost.
- If necessary, choose Using OneWay columns or Not. If Using is chosen, then select the From To Column and To From Column.
- Click OK.
The network is created.
Monday, September 16, 2013
Trainsity Singapore Android app
 This is an Android app that simply displays the Singapore MRT and LRT train network maps. The maps are high resolution vector files instead of raster images; the file sizes are small and you can zoom closer without having the details becoming blurred or "pixelated", like bitmap images. The maps also have some interactivity coded in - when the train station labels are touched (or clicked), an option menu will pop up. Users can then choose to send the station location to the Google Maps or the Google Street View apps, where they can visualize the surroundings and/or perform directions routing.
The following screenshots show how the app behaves on a mobile handset.
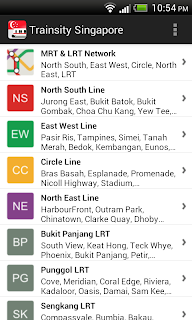
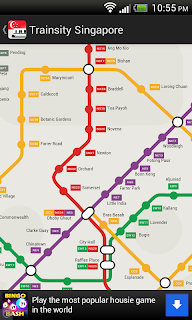
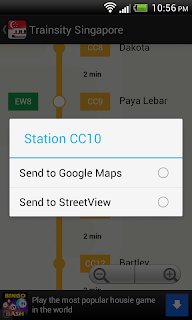
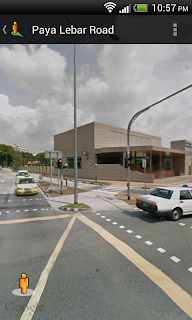
On tablets, the app will automatically configure itself as a two pane display, as shown below. An ActionBar toggle button can be used to toggle the map display from two pane to full screen.
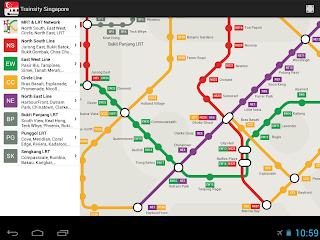
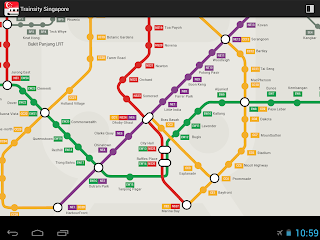
The app can be download from the Google Play Store.

Monday, September 9, 2013
Android error: "Failed to load map. Error contacting Google servers. This is probably an authentication issue"
I encountered the error message "Failed to load map. Error contacting Google servers. This is probably an authentication issue" when I found my published KoordKonverter Android App was not displaying any Google Maps tiles in the MapView. I thought I had tested the App properly prior to publishing and I remembered it was functioning but apparently not.
I spent many frustrating hours checking and rechecking the code and recreating the Google Maps for Android V2 license keys. I validated my steps with the Android Maps V2 Quick Start here https://docs.google.com/document/pub?id=19nQzvKP-CVLd7_VrpwnHfl-AE9fjbJySowONZZtNHzw and everything checked out.
In the end, it turned out that my production license key was problematic. During testing and debugging, I simply replaced the good debug license key in the AndroidManifest.xml file with the bad production key without clearing the cache on the device. The cached debug license key was still being used while testing and that was why the Google Maps tiles were still being displayed in the MapView.
To properly test the app with the production license key, the app must be uninstalled from the device first.
I spent many frustrating hours checking and rechecking the code and recreating the Google Maps for Android V2 license keys. I validated my steps with the Android Maps V2 Quick Start here https://docs.google.com/document/pub?id=19nQzvKP-CVLd7_VrpwnHfl-AE9fjbJySowONZZtNHzw and everything checked out.
In the end, it turned out that my production license key was problematic. During testing and debugging, I simply replaced the good debug license key in the AndroidManifest.xml file with the bad production key without clearing the cache on the device. The cached debug license key was still being used while testing and that was why the Google Maps tiles were still being displayed in the MapView.
<?xml version="1.0" encoding="utf-8"?>
<manifest xmlns:android="http://schemas.android.com/apk/res/android"
package="com.dom925.convertor.koordkonverter"
android:versionCode="4"
android:installLocation="auto"
android:versionName="1.2.1" >
<permission
android:name="com.dom925.convertor.koordkonverter.permission.MAPS_RECEIVE"
android:protectionLevel="signature"
></permission>
<uses-permission android:name="com.dom925.convertor.koordkonverter.permission.MAPS_RECEIVE" />
<uses-permission android:name="com.google.android.providers.gsf.permission.READ_GSERVICES" />
<uses-permission android:name="android.permission.ACCESS_WIFI_STATE" />
<uses-permission android:name="android.permission.ACCESS_NETWORK_STATE" />
<uses-permission android:name="android.permission.INTERNET" />
<uses-permission android:name="android.permission.WRITE_EXTERNAL_STORAGE" />
<uses-sdk
android:minSdkVersion="10"
android:targetSdkVersion="18" />
<uses-feature
android:glEsVersion="0x00020000"
android:required="true"
/>
<application
android:allowBackup="true"
android:icon="@drawable/ic_launcher"
android:label="@string/app_name"
android:theme="@style/AppTheme" >
<activity
android:name="com.dom925.convertor.koordkonverter.MainActivity"
android:configChanges="keyboard|keyboardHidden|orientation|uiMode|screenSize|smallestScreenSize|screenLayout"
android:label="@string/app_name" >
<intent-filter>
<action android:name="android.intent.action.MAIN" />
<category android:name="android.intent.category.LAUNCHER" />
</intent-filter>
</activity>
<activity
android:name="com.dom925.convertor.koordkonverter.GoogleMapsFragmentActivity"
android:configChanges="keyboard|keyboardHidden|orientation|uiMode|screenSize|smallestScreenSize|screenLayout"
android:label="@string/app_name"
android:exported="false"
>
</activity>
<activity
android:name="com.google.ads.AdActivity"
android:configChanges="keyboard|keyboardHidden|orientation|uiMode|screenSize|smallestScreenSize|screenLayout" >
</activity>
<!-- Remember to uninstall and install the app after changing the Google Maps key below -->
<meta-data
android:name="com.google.android.maps.v2.API_KEY"
android:value="BIzaSyC5-hI2kloom7O7XC1h2vtoyuk26IFb2A0"
/>
</application>
</manifest>
To properly test the app with the production license key, the app must be uninstalled from the device first.
Monday, September 2, 2013
Connecting HP Touchpad to the Android ADB on Windows 7
If the Android SDK Android Debug Bridge (ADB) does not recognize the HP Touchpad tablet installed with Android 4.2 Jelly Bean, then the ADB driver for the Touchpad has to be installed onto the Windows 7 operating system. But before the driver can be installed, it is necessary to determine the USB Hardware ID for the Touchpad. Then the ID must be added to the SDK's USB configuration file.
Determine the Hardware IDs
Determine the Hardware IDs
- On Windows 7, open up the Device Manager. Right click on My Computer, then choose Properties and finally Device Manager.

- Right click on the *tenderloin* name under the Other devices node. Choose Properties.
The Properties dialog appears.
- Click the Details tab. Choose Hardware Ids from the Property combo box.

- Note down or copy the two IDs.
USB\VID_0BB4&PID_6860&REV_0227&MI_01
USB\VID_0BB4&PID_6860&MI_01 - Close the Properties dialog.
Add the Hardware Ids to the SDK's USB driver configuration file
- Use a text editor to open up the SDK file android_winusb.inf. This is located under the [Android SDK]\extras\google\usb_driver\ folder.
- Locate the section titled [Google.NTx86]. Add in the hardware IDs determined previously under that section.
; HP Touchpad
%SingleAdbInterface% = USB_Install, USB\VID_0BB4&PID_6860&REV_0227&MI_01
%CompositeAdbInterface% = USB_Install, USB\VID_0BB4&PID_6860&MI_01
- Locate the section [Google.NTamd64] and type in the same hardware IDs as the previous step.
- Save and close the text editor.
Install the driver
- In the Device Manager, right click on the *tenderloin* name under the Other Devices node. Choose Update Driver Software.
The Update Driver Software dialog appears.
- Choose Browse my computer. Click Next.
- Click Browse. Choose the folder [Android SDK]\extras\google\usb_driver\. Click Next.
The driver should be installed. If not, then you can try to choose from the list of drivers instead.
- Choose Let me pick from a list of device drivers.
The Update Driver Software dialog appears.
- Choose Android Device. Click Next.

- Choose Android ADB Interface. Click Next.
The driver is installed.
- To verify, open the Device Manager.
The Android Device node shows the Android ADB Interface child node.
The ADB devices command can now detect the connected HP Touchpad device, as shown below.
Subscribe to:
Comments (Atom)
