Monday, September 28, 2015

How to create and use an Android Archive (*.aar) using Android Studio

Besides a plain old Java archive file (*.jar), Android Studio can be used to create an Android archive file (*.aar) that can contain classes and methods that make use of Android classes and related files. Like creating the Jar file, an Android project must be created first, then the Android library module can be created and added. The following steps illustrate the process in creating a Android archive file.

Generating the Android archive (*.aar) file

  1. Start up Android Studio.
  2.  Select Start a new Android Studio project.

    The Create New Project dialog box appears.
  3. Type in an Application name and a Company Domain. Select a Project location. Click Next.

    The Target Android Device page appears.
  4. Choose a Minimum SDK, e.g. API 14. Click Next.

    The Add an activity to Mobile page appears.
  5. Select Add No Activity. Click Finish.

    The Android project is created.
  6. Select File | New | New Module.

    The Create New Module dialog box appears.

  7. Select Android library. Click Next.

    The Configure your new module page appears.

  8. In the Application/Library name field, type in e.g. MyAarLibrary.
  9. In the Module name field, type in e.g. myaarlibrary.
  10. If necessary, edit the Package name and/or change the Minimum SDK.
  11. Click Next.

    The myaarlibrary library is created.
  12. In the newly created myaarlibrary module node, create the classes and methods of the library in the editor, e.g. LibraryClass class with a printLog method.

    Note: the example printLog uses the Android.Util.Log class to print a debug log message.


  13. In the Project tree view, select the newly created module node, e.g. myaarlibrary. Then open the Gradle projects pane on the right side. Expand the Tasks node, as shown below.


  14. Double click on assembleRelease.

    The Android archive file is generated, e.g. myaarlibrary-release.aar.

     
Using the Android archive (*.aar) file
  1. In Android Studio, create a new project or open up an existing project that you want to use the Android archive file library.
  2. In the Project view, expand the libs node of the app.
  3. Using the Mac Finder or Windows Explorer, select and copy the Android archive file (*.aar) e.g. myaarlibrary.aar. Paste the aar file into the libs node in Android Studio.

    The Copy dialog box appears.

  4.  If necessary, change the name. Click OK.

    The Aar file is added to the project.
  5. In Android Studio, open the app's build.gradle file in the editor.


  6. Add in the following line to the dependencies section.

    implementation files ( 'libs/myaarlibrary-release.aar')

    Now the classes and methods in the Android archive file can be used in your app, as shown in the example below.


Monday, September 21, 2015

How to create and use a Jar archive using Android Studio

I wanted to consolidate some Java classes into a common library so that it can be shared among Android projects. A Java archive file (*.jar) is a typical container for this purpose. Android Studio can generate and use a Java archive (Jar) file containing commonly used classes and resources. But since we are using Android Studio, an Android project must be created first, then a Jar module can then be created and added. The following steps illustrate the process in creating a Jar file.

Generating a Java archive (*.jar) file

  1. Start up Android Studio.


  2.  Select Start a new Android Studio project.

    The Create New Project dialog box appears.

  3. Type in an Application name and a Company Domain. Select a Project location. Click Next.

    The Target Android Devices page appears.

  4.  Choose a Minimum SDK, e.g. API 14. Click Next.

    The Add an activity to Mobile page appears.

  5. Select Add No Activity. Click Finish.

    The Android project is created.
  6. Select File | New | New Module.

    The Create New Module dialog box appears.

  7. Select Java library.

    The Customize the Activity page appears.

  8. In the Library name field, type in the name of the library e.g. libDijkstra. In the Java class name field, type in the name of the class e.g. MyClass. Press Enter.

    The library is created.
  9. Type in the classes and methods of the library in the editor e.g. printHello method in the MyClass.java file.
  10. In the Project tree view, select the newly created module node, e.g. libdijkstra. Then open the Gradle projects pane on the right side. Expand the Tasks node, as shown below.


  11. Double click on build.

    The Java archive file is generated, e.g. libdijkstra.jar.

Using the Java archive (*.jar) file
  1. In Android Studio, create a new project or open up an existing project e.g. MyApplication that you want to use the Java archive file library.
  2. In the Project view, expand the libs node of your app, as shown below.


  3. Using the Windows Explorer, select and copy the Java archive file (*.jar) e.g. libdijkstra.jar. In Android Studio, right click on the libs folder of the app. Paste the Jar file.

    The Copy dialog box appears.

  4. If necessary, change the name. Click OK.

    The Jar file is added to the project.
  5. Select File | Project Structure.

    The Project Structure dialog box appears.

  6. Select app. On the right side, click the plus +.

    The Select Path dialog box appears.

  7. Browse and select the Java archive file e.g. libdijkstra.jar. Click OK.

    Now the classes and methods in the Java archive file can be used in your app, as shown in the example below.

Wednesday, September 9, 2015

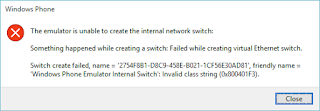
Cannot start the Windows Phone emulator with the message "The emulator is unable to create the internal network switch"

On a Windows 10 Pro notebook, I encountered this error while trying to run the Windows phone emulator from Visual Studio 2015.

A few quick Internet search results came up with the following suggestions:

  1. Use the Hyper-V Manager to manually create the "Windows Phone Emulator Internal Switch" but I found this did not fully resolve the problem, as running the emulator will create additional network switches.

  2. Uninstall Oracle Virtual Box. However, I required Virtual Box for other purposes. 
The solution that work for me was to do the following:
  1. In Windows, search for "View network connections" to bring up the Network Connections panel.


  2. Look for all VirtualBox Host-Only Ethernet Adapter connections e.g. Ethernet 3. Mouse right click on each connection.
  3. In the pop up menu, choose Disable
It may be necessary to restart Windows. Now the Windows Phone emulator should be able to start up.