Monday, July 29, 2019

ROS: Fix "Unable to get message class for type custom_msgs/gnssSample"

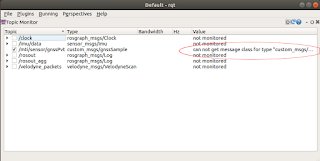
I recently received a ROS bag file recorded with a Velodyne VLP-16 LiDAR sensor and a XSens IMU-GPS sensor. When playing back the bag file, the ROS rqt plugins could not expand the XSens messages. The error message: can not get message class for type "custom_msgs/gnssSample" is shown in the screen shot below.
 
I found a deprecated Github repository for the XSens MTi ROS node at https://github.com/xsens/xsens_mti_ros_node that has the definitions for the custom message gnssSample. However, the repository's package name is xsens_msgs while the bag file's package name is custom_msgs. I had to rename the package to get ROS to recognize the bag file's messages. So the following steps were how I resolved the problem.
  1. Follow the tutorial at https://wiki.ros.org/ROS/Tutorials/CreatingPackage to create a Catkin workspace e.g. /home/yourname/catkin_ws/.
  2. Open up a Terminal and change the directory to /home/yourname/catkin_ws/src/.

    $ cd /home/yourname/catkin_ws/src
  3. Download the XSens MTi ROS Node repository.

    $ git clone https://github.com/xsens/xsens_mti_ros_node
  4. Using a text editor, open up the file /home/yourname/catkin_ws/src/xsens_mti_ros_node/src/xsens_msgs/package.xml.


  5. Change the package name to custom_msgs as shown below.


  6. Open up the file /home/yourname/catkin_ws/src/xsens_mti_ros_node/src/xsens_msgs/CMakeLists.txt.


  7. Change the project name to custom_msgs as shown below.


  8. Now in a Terminal change to the catkin root directory.

    $ cd /home/yourname/catkin_ws
  9. Compile the package by entering the command:

    $ catkin_make
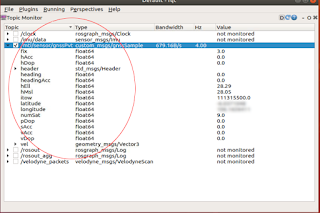
If the compilation is successful, now when reviewing the messages with rqt, the custom_msgs/gnssSample message can be expanded, as shown below.

Monday, July 22, 2019

Convert multiple images to WebP format using Android Studio

WebP (https://en.wikipedia.org/wiki/WebP) is a lossy and lossless compressed image format with a resultant file size smaller than JPEG. Using Android Studio, you can easily convert one or more images intoWebP format.
  1. Run Android Studio and open a project.
  2. In the Project pane on the left, select one or more images.


  3. Press the mouse right button. In the pop up menu, choose Convert to WebP....

    The Converting Images to WebP dialog box appears.

  4. Optional. If necessary, change the parameters e.g. encoding. Click OK.

    The Preview and Adjust Converted Images dialog box appears.

  5. Optional. If necessary, adjust the quality parameter. Click Next to preview the next conversion, or click Accept All to convert all images.

    The images are converted to WebP.

Monday, July 15, 2019

Setup an Ubuntu VM instance on a Windows host for remote ssh access

An Ubuntu VM VirtualBox instance running as a guest OS on a Windows host can be remotely accessed via the secured ssh shell but the VirtualBox and the host OS must be configured to allow the networking traffic to pass through the ssh ports. The basic steps are: (a) to configure the Windows firewall, (b) to configure the port forwarding in Oracle VirtualBox, and (c) to install and setup the ssh server on the Ubuntu instance.

Open up the Windows firewall for Oracle VirtualBox
  1. In Windows, search for the Windows Defender Firewall with Advanced Security App and open it.


  2. Select Inbound rules. Check the VirtualBox Manager rules and if they are not enabled, double click and enable the rules.
Forward the TCP ssh ports to the Ubuntu VM
  1. Start Oracle VirtualBox.


  2. Select the Ubuntu VM, e.g. Ubuntu19. Click Settings. Then click Network.


  3. Click Port Forwarding.


  4. Click the Plus icon. Add in a new rule for Ssh with the Host Port set to 3022 and the Guest Port set to 22.

    Note: 3022 would be the port number to use to remotely access the Ubuntu VM.
  5. Click OK to all the dialog boxes.
Install openssh-server on the Ubuntu VM
  1. In Oracle VirtualBox, start the Ubuntu VM, e.g. Ubuntu19.
  2. Optional. If the openssh-server is not installed, then open up a Terminal and run the following command.

    $ sudo apt install openssh-server


  3. After the installation is completed, either reboot or restart the ssh service with the following command.

    $ service ssh restart

Remote access via ssh
  1. On a remote PC, open up a Terminal.
  2. Type in the following command to connect to the remote Ubuntu VM instance.

    $ ssh 192.168.8.157 -p 3022

    Note: where 3022 is the port number and 192.168.8.157 is the example IP address of the Windows PC hosting the Ubuntu VM instance.
    The ssh prompt appears.

Monday, July 8, 2019

Setup an Ubuntu VirtualBox instance on Windows 10 to connect to a Velodyne VLP-16 sensor

An Ubuntu 18.04 guest OS virtual machine running on a Windows 10 host can connect to a Velodyne VLP-16 LiDAR sensor and process the sensor's data and positioning packets. However, the VirtualBox Ubuntu guest OS must be configured properly to transfer the LiDAR data packets from the host OS to the guest OS. The following steps show how to perform the settings.
  1. On Windows, open the Internet and Network Settings.

     
  2.  Click the Change adapter options.

    The Network Connections window opens.
  3. Right click on the Local Area Connection icon. Choose Properties.

    The Local Area Connection Properties dialog box appears.
  4. Select Internet Protocol Version 4. Click Properties.

    The Internet Protocol Version 4 (TCP/IPV4) Properties appear.
  5. Toggle on Use the following IP address. In the IP address field, type in the following address:

    192.168.1.77
  6. Click OK to all the dialog boxes.

    The local Windows machine IP address is changed to 192.168.1.77


  7. Optional. If necessary, use the Windows Defender Firewall with Advanced Security App to open up the host Windows OS UDP ports for Oracle VirtualBox. In the Inbound Rules, make sure the VirtualBox Manager entries are enabled, as shown below.


  8. Now start Oracle VirtualBox.

    The Oracle VM VirtualBox Manager appears.
  9. Select the Ubuntu instance, e.g. Ubuntu18. Then click Settings.

    The Ubuntu18 Settings dialog box appears.
  10. Click Network. Then click the Port forwarding button.

    The Port forwarding rules dialog box appears.
  11. Click the Plus icon and add in two UDP protocol rules as shown below.


    Note: The rules will forward UDP packets from ports 2368 and 8308 on the Windows host to the same ports on the Ubuntu guest.
  12. Click OK.
  13. Now start the Ubuntu18 host.
  14. Login to Ubuntu and run Veloview. In Veloview, connect to the Velodyne VLP-16 sensor stream as per normal.

    The LiDAR point cloud is displayed.

Monday, July 1, 2019

How to setup a Ubuntu VirtualBox for remote telnet access

An Ubuntu 19.05 VirtualBox instance running on a Windows machine can be configured to be accessible remotely via telnet.

This can be simply by configuring the Ubuntu VirtualBox instance's network port forwarding in the VirtualBox graphical user interface. The following points illustrate the procedure.

Configure Oracle VirtualBox
  1. Start Oracle VirtualBox.

  2. Select the Ubuntu instance e.g. Ubuntu19. Click the Settings icon.
  3. In the Settings dialog box, select Network.

  4. Click the buton Port forwarding.

    The Port Forwarding Rules dialog box appears.
  5. Click the Add icon.

  6. Change the Host Port to an unused port e.g. 3023. Change the Guest Port to 23.

    Note: in this example, when accessing remotely, the port called should be 3023.
  7. Click OK to all the boxes.
Now run up the Ubuntu instance. If the telnet server is not installed, the open up a Terminal and run the following command.

$ sudo apt install telnetd

Then either restart the service or simply reboot.

On a remote computer, type in the following command to access the Ubuntu instance.

$ telnet 192.???.???.??? 3023

Note: replace 192.???.???.??? with the IP address of the Windows host

Note: If all the parameters are correct, the telnet response should be displayed as shown below.