Monday, December 28, 2020

How to setup a C++ WebAssembly component to run in a create-react-app React project

I had a hard time trying to get a C/C++ WebAssembly component to work in a React application generated from the create-react-app utility. Some blogs suggested using the react-app-rewired package to override the configuration and use the wasm-loader; but I kept getting magic header not detected errors when loading the wasm file or some ES6 syntax errors. Finally I found a StackOverflow post that gave me some ideas on getting it to work. 

In this post, I outline the steps I did to create, use a C/C++ WebAssembly in a ReactJS application generated by the create-react-app tool, on a Linux Ubuntu machine. This example will call the WebAssembly's function to add in two numbers (1 and 2) and return the resultant value. The resultant value would be displayed at the top of the web page as shown in the screen shot below.

Create a ReactJS application with create-react-app

  1. Open up a Terminal. Change to your project directory and type in the following commands to create the ReactJS application cra-wasm-adder.

    $ cd /path/to/reactprj/
    $ npx create-react-app cra-wasm-adder


    The cra-wasm-adder ReactJS application is created.

  2. Underneath the root of the newly created project, create a source directory, e.g. src_cpp for the C/C++ WebAssembly code.

    $ cd /path/to/reactprj/cra-wasm-adder/
    $ mkdir src_cpp


    The src_cpp directory is created.

Create the C/C++ source code files

  1. In the newly created src_cpp directory, use a favorite source code editor to create a C/C++ file, e.g. adder.cpp. Enter the following code.


    Note: the adder function simply sums up two integer numbers and returns the value.

  2. Create a Shell script file, e.g. make.sh to call the Emscripten compiler emcc to compile the C/C++ source code.

    Note: the emcc compiles the C/C++ source code into a Javascript plumbing helper file and a WebAssembly (*.wasm) file.

  3. In the make.sh file, define the module name and output file names.


  4. Then type in the emcc command to generate a Javascript plumbing helper file and the WebAssembly (*.wasm) file.


    Note: the Javascript generated by the emcc compiler (my version is 2.0.5) is not fully compatible with the ReactJS transpiler. The file has to be edited for compatibility purposes. This modifications may differ for different versions of the compiler

  5. Type in the sed command to insert a line /* eslint-disable */  at the top of the Javascript plumbing file to disable the Ecmascript linting.


  6. Type in the sed command to replace the import.meta.url string to the WebAssembly file relative to the root of the public directory of the ReactJS project, e.g. /path/to/reactprj/public/.


    Note: in this example, the *.wasm file is placed directly underneath the root of the /path/to/reactprj/public/; so the resultant change looks like the code below.


  7. Type in the sed command to add in the window object to the self.location.href string.


    The result change Javascript looks like the snippet below.


  8. Type in the sed commands to comment out the dataURIPrefix declaration  and isDataURI function block.


    The resultant Javascript code is shown below.


  9. Next, type in the sed commands to modify the wasmBinaryFile variable to point to the actual relative location in the ReactJS' public directory and to remove and replace the getBinary and getBinaryPromise function blocks.


    After running the commands, the Javascript should like the code below:


  10.  Finally, type in the sed command to remove the call to the isDataURI function in the instantiateAsync function.


    The resultant Javascript:


  11. The last thing the make.sh script needs to do is to move the generated WebAssembly file to the /path/to/reactprj/public/ directory and the modified Javascript file to the /path/to/reactprj/src/ directory.

    mv $OUTPUT_JS ../src/
    mv $OUTPUT_WASM ../public/


    The directory structure should look like the screen shot below:

Run the Shell script

  1. In a Terminal, change directory to the location of the make.sh shell script.

    $ cd /path/to/reactprj/src_cpp/

  2. Type in the following to run the script.

    $ bash make.sh

    If the compilation is successful, the resultant Javascript and WebAssembly should be placed in the directories as shown below.


Create WebAssembly React component

  1. In a text editor, create the React component under the /path/to/reactprj/src/ directory to use the WebAssembly component, e.g. AddNumbers.js .


  2. Type in the following code to import in the generated Javascript plumbing file and call the WebAssembly adder function.


Running the ReactJS application

  1. In a Terminal, run the React JS application.

    $ npm run start

    The browser opens up the development site.


  2. Note the message at the top which prints out the result of calling the WebAssembly's adder function: Hello 1+2=3.

The source code for this example is freely available on https://gitlab.com/dominoc925/cra-wasm-adder


Monday, November 16, 2020

How to enable regular user to set the Ubuntu system date as root without a password

I wanted to use the the time from a GPS to set the Ubuntu operating system date and time in an automated script; and I don't want the script to be interrupted with a prompt for an administrator password. So I tried to configure the sudoers configuration file to allow the group my user name belongs to to run the /bin/date command as root without a password. 

 For a long frustrating time, no matter what I configured, the date command would still prompt me for a password. Eventually, I got it working by doing the following: 

  1. Open up a Terminal and type in the commands to create my own configuration file.

    $ sudo visudo -f /etc/sudoers.d/10-override-date


  2. In the text editor, type in the following:

    %dialout ALL=NOPASSWD: /bin/date


    Note: dialout is the group I wanted to assign the ability to run date as root without a password.

  3. Save and exit.

  4. Subsequently, using the date command as any user in the dialout group would be executed successfully without a password prompt, as shown below.


Monday, October 26, 2020

Using CloudCompare to determine a 3D rotation matrix's euler angles and vice versa

Working with 3D transformation matrices and Euler angles can be a little confusing with all that complex mathematical calculations. I found the Apply Transformation tool in CloudCompare to be useful in helping to calculate the Euler angles i.e. roll, pitch, and yaw given the transformation matrix, or vice versa. 

To use the tool the find the roll, pitch and yaw, you can do the following:

  1. Start up CloudCompare. Load a point cloud file and select it in the tree pane.


  2. Next, select Edit > Apply transformation.

    The Apply transformation dialog box appears.


  3. Type in the transformation matrix you want to determine the Euler angles.


  4. Then click the Euler angles tab.

    The calculated angles are displayed as Phi (yaw), Theta (pitch) and Psi(roll).

To determine the transformation matrix from the Euler angles, just type in the yaw, pitch, and roll values in the Phi, Theta and Psi fields. Then click the Matrix 4x4 tab. 

Monday, October 19, 2020

WebApp to convert an Applanix smooth best estimated trajectory (SBET) binary file to comma-separated value (CSV) file

An Applanix (https://www.applanix.com) smooth best estimated trajectory (SBET) binary file is a common file you may encounter when working in field LiDAR, and aerial photo data collection. It is basically a refined trajectory of the real time navigation of the path taken in the field data collection process.

I wrote an online WebApp tool (https://dominoc925-pages.appspot.com/webapp/sbetcsv/default.html) to convert an SBET file (typically with an extension *.out) to a comma-separated value (CSV) file, and compressed to a ZIP file for easier transportation. The extraction, conversion and compression processes take place inside a Web browser locally only; there is no requirement to upload to a web server so that will save on the time and data connection costs.

To use this converter, simply visit the web site https://dominoc925-pages.appspot.com/webapp/sbetcsv/default.html with any modern web browser.

Then, just drag and drop an SBET file, e.g. SBET.OUT onto the indicated area. Or click the Browse button and select the SBET file. Then click Open.

A process indicator will be displayed while the conversion is taking place. After the conversion has completed, a download link will appear as shown below.


Click the link to download the zip file and extract out the converted CSV file. An example of the result of the conversion is shown below. 


Monday, August 17, 2020

Android Studio: Fix for Default Activity not found warning

Recently after upgrading Android Studio to version 4.x, I found some of my old Android projects showing a warning message: "Warning: Default Activity not found" when I tried to run the project in the emulator; and Android Studio would not be able to launch the app. 

I tried the following:

  • Build | Clean project in Android Studio
    • Invalidate Caches / Restart in Android Studio
  • Verified AndroidManifest.xml is declaring the main activity correctly
  • Deleted the Android Studio caches - .idea/, .gradle/, *.iml

None worked.

When I tried to edit the run configuration, no matter what launch options I chose, the warning message still persisted, as shown in the screenshot below and I could not run the application. 

Finally, systematically I discovered the problem to be related to the Google Play Services AdMob dependency. The app's build.gradle snippet below shows the dependency.

dependencies { 
 
 implementation 'com.google.android.gms:play-services-ads:19.3.0'

}

Note: When using the newer Google Play Services Ads, the minimum SDK must now be set to at least 16. 

The screenshot below shows the Android Studio project when using 14 as the minimum SDK level. Notice the large red cross.

The screenshot shows the state of the Android Studio project after changing the minimum SDK level to 16 and selecting File | Sync Project with Gradle Files. Notice the large red cross is no longer displayed. Android Studio should be able to launch the app from this point on.
 

Monday, June 1, 2020

Configure an Ubuntu VirtualBox guest instance for ssh access from the host OS

I use VirtualBox to run guest OS such as Ubuntu 18.04 virtual machines for trying out stuff and experiments to prevent messing up my host operating system, e.g. Ubuntu. For convenience, the guest Ubuntu OS running in the VirtualBox can be accessed remotely from the host OS by creating a network adapter that bridges between the host and the guest. This post describes the configuration needed to allow the host OS to connect to the guest OS remotely through a secured shell (ssh).

The following steps assume an Ubuntu virtual machine has been created in VirtualBox and shutdown.

Create a bridge network adapter
  1. Run VirtualBox.

    The VirtualBox Manager is displayed.

  2. Select the Ubuntu virtual machine e.g. vm1. Click Settings.

    The Settings appear.

  3. Select Network.


  4. Select the Adapter 2 tab. Toggle on the Enable Network Adapter field.


  5. Choose Bridged Adapter in the Attached to field.
  6. In the Name field, choose the network you want the virtual machine to join, e.g. wlp3s0. Click OK.

    The bridged network adapter is created in the virtual machine.
 Identify the virtual machine's IP address on the bridged network
  1. In VirtualBox, run the guest virtual machine, e.g. vm1.
  2. Log in to the guest OS. Open up a Terminal.
  3. Type in the ifconfig command at the prompt:

    A list of network adapters and related information is displayed.


  4. Note down the virtual machine's ip address, e.g. 192.168.0.189.

Install SSH server
If the SSH server is not installed in the guest Ubuntu OS, then do the following steps.
  1. Open a Terminal.
  2. At the prompt, type in the command:

    $ sudo apt-get install openssh-server
  3. At the prompt, type in the command to enable the ssh service.

    $ sudo systemctl enable ssh
  4. Start the ssh service by entering the following command.

    $ sudo systemctl start ssh
Remote access to the guest virtual machine
Now the virtual machine can be accessed from the host operating system. With the virtual machine running, the following commands can be used to access the guest OS.
  1. Open up a Terminal. Type in the following command:

    $ ssh remote_user@192.168.0.189

    Note: where remote_user is the login name for the guest OS and 192.168.0.189 is the IP address of the virtual machine on the host's network.

Monday, May 4, 2020

Gazebo: make an animated box using a separate model file(s)

The Gazebo tutorial at http://gazebosim.org/tutorials?tut=actor&cat=build_robot shows how to make a box actor rotate around the vertical axis using only a world file. I wanted to use create a separate actor model and include it in the world file so I don't have to repeat the code. After fiddling around, I managed to figure out the procedure to do it. This post summarizes the steps.

Create an actor model
  1. In the user's home directory ~/.gazebo/models/, create a model folder, e.g. animated_box

    $ cd ~/.gazebo/models/
    $ mkdir -p animated_box/materials/scripts
    $ mkdir -p animated_box/materials/textures


  2. Change directory into the animated_box folder.

    $ cd animated_box


  3. Using a text editor, create a model.config file. Type in the following:
    <?xml version="1.0" encoding="utf-8"?>
    <model>
     <name>Animated Box</name>
     <version>1.0</version>
     <sdf version="1.4">model.sdf</sdf>
     <description>My animated box</description>
    </model>


  4. Using a text editor, create a model.sdf file. Type in the following:

    Note: instead of the model tag, use the actor tag.
    <?xml version="1.0" encoding="utf-8"?>
    <sdf version="1.4">
     <actor name="animated_box">
      <static>false</static>
       <link name="link">
        <visual name="visual">
         <geometry>
          <box>
           <size>0.2 0.2 0.2</size>
          </box>
         </geometry>
        </visual>
       </link>
       <script>
        <loop>true</loop>
        <delay_start>0.0</delay_start>
        <auto_start>true</auto_start>
        <trajectory id="0" type="square">
         <waypoint>
          <time>0.0</time>
          <pose>-1 -1 1 0 0 0</pose>
         </waypoint>
         <waypoint>
          <time>1.0</time>
          <pose>-1 1 1 0 0 0</pose>
         </waypoint>
         <waypoint>
          <time>2.0</time>
          <pose>1 1 1 0 0 0</pose>
         </waypoint>
         <waypoint>
          <time>3.0</time>
          <pose>1 -1 1 0 0 0</pose>
         </waypoint>
         <waypoint>
          <time>4.0</time>
          <pose>-1 -1 1 0 0 0</pose>
         </waypoint>
        </trajectory>
       </script>
    
     </actor>
    </sdf>


Create and run the world file
  1.  Using a text editor, create a world file, e.g. my_animated_box.world. Type in the following commands:
    <?xml version="1.0" ?>
    <sdf version="1.3">
     <world name="default">
      <include>
      <uri>model://sun</uri>
      </include>
      <include>
       <uri>model://ground_plane</uri>
      </include>
      <include>
       <uri>model://animated_box</uri>
      </include>
     </world>
    </sdf>
    

    Note: the previously created animated_box model is included as a model.

  2. Run the world file.

    $ gazebo my_animated_box.world

    Gazebo opens and an animated box is shown circling the z axis.

    Monday, April 13, 2020

    Setup to launch ROS nodes on a remote computer on a network

    ROS nodes can be setup to run on a remote computer from a local computer on the same network. However, there are some setup to be done. After reading the tutorials and trying out on my own, the following steps summarized what worked for me.

    Create known hosts
    On the local Linux computer e.g. a Raspberry Pi (local1) do the following:
    1. Open a Terminal.
       
    2. Type in the command.

      $  ssh -oHostKeyAlgorithms='ssh-rsa' remote_user1@remote1

      The prompt appears: Are you sure you want to continue connecting (yes/no)?
    3. Type in yes. Press RETURN.
    4. When prompted, type in the password for the remote1 computer's remote_user1.

      The Terminal is now connected to the computer remote1 and remote_user1 is logged in.

      The remote1 computer name is encrypted with the RSA encryption and stored in the Raspberry Pi's /home/local_user1/.ssh/known_hosts file.

    5. Type in exit.

      The connection to remote1 is closed.
    6. If necessary, repeat the previous steps 2 to 4 for the IP address of the computer remote1.

      $ ssh -oHostKeyAlgorithms='ssh-rsa' user1@192.168.8.101

      Note: where 192.168.8.101 is the IP address for the computer remote1.
    Create SSH public and private keys for authentication
    1. On the local1 computer, open a Terminal.
    2. Type in the command:

      $ ssh-keygen -t rsa

      Enter file in which to save the key (/home/local_user1/.ssh/id_rsa):
    3. Press RETURN.

      Enter passphrase (empty for no passphrase):
    4. Press RETURN.

      Enter same passphrase again:
    5. Press RETURN.

      The private key is generated in /home/local_user1/.ssh/id_rsa.
      The public key is generated in /home/local_user1/.ssh/id_rsa.pub
      .
    Install the public key(s) to the remote computer
    1. On the computer local1, open a Terminal.
    2. Type in the command:

      $ ssh-copy-id remote_user1@remote1
    3. When prompted, type in the password for remote_user1.

      The public keys are installed on computer remote1.
    Create a remote ROS environment shell script file
    The following steps should be executed on the remote computer remote1.
    1. Using a text editor, create a shell script file e.g. /opt/ros/melodic/env_remote1.sh with the following content.

      #!/bin/bash
      
      export ROS_MASTER_URI=http://remote1:11311
      
      source /opt/ros/melodic/setup.bash
      source /home/remote_user1/catkin_ws/devel/setup.bash
      
      exec "$@"
      

    2. Open a Terminal. Make the shell script executable.

      $ sudo chmod a+x env_remote1.sh

    Create and run local launch file
    The following should be done on the local computer local1.
    1. Using a text editor, create a launch file e.g. run_remote.launch.
      <launch>
              <machine
                      name="remote1"
                      address="remote1"
                      env-loader="/opt/ros/melodic/env_remote1.sh"
                      default="true"
                      user="remote_user1"
              />
              <node machine="remote1" pkg="beginner_tutorials" name="hello_doubles" type="hello_doubles" />
      </launch>
      

      Note: this launch file will run the hello_doubles node from the beginner_tutorials package on the remote1 computer.

    2. Open a Terminal. Type in the following command assuming the launch file is in the current directory:

      $ roslaunch remote.launch
      The following messages may appear. Ws06 in this example screenshot is the remote computer.
      Monday, March 16, 2020

      How to run a shell script from a ROS launch file

      I wanted to execute a bash shell script from the ROS launch file but the ROS Wiki were not very clear. After some trial and error, I figured out how to do it. The following steps illustrate the procedure I used:

      Create a shell script
      1. In the ROS workspace package, e.g. /path/to/workspace/package/script/ folder, create a shell script e.g. run_script.sh.
      2. Type in the script commands, e.g. see the code listing below.

        Note 1: ensure the shebang statement is at the top i.e. #!/bin/bash and a exit status code (0 for success or other values) is returned from the script.

        Note 2: Use the chmod command to make the script executable, e.g. $ chmod a+x run_script.sh

      #!/bin/bash
      
      # just print this out
      echo "Hello ROS world"
      
      # exit gracefully by returning a status 
      exit 0


      Create a launch file
      1. In the ROS workspace package launch folder, create a launch file e.g. /path/to/workspace/package/launch/hello_script.launch.
      2. Using a text editor, type in the following:

        Note: fill in the package name, e.g. beginner_tutorials, and the type, which should be the shell script name; name is any label you want to associate with the script node.


      <launch>
              <node pkg="beginner_tutorials"
                      type="run_script.sh" name="run_script"
                      output="screen"
              />
      </launch>
      

      Run the launch file
      1. In a terminal, type in the ros launch command:

        $ roslaunch beginner_tutorials hello_script.launch

        Note: change beginner_tutorials to your package name and hello_script.launch to the launch file created previously.

        The script is executed as shown in the print out of "Hello ROS world" below.

      Monday, March 9, 2020

      Using Saga GIS' Terrain Analysis Swath Profile (interactive) function

      Saga GIS has a couple of interactive terrain profiling functions, a single profile and a swath profile. This post shows how to use the interactive swath terrain profile command.

      Load a grid file such as a USGS SRTM file
      1. Run Saga GIS. Select Geoprocessing | File | Grid | Import | Import USGS SRTM Grid.

        The Import USGS SRTM Grid dialog box appears.
      2. Click the Browse button in the Files field. Choose an SRTM file e.g. N21E093.hgt.

      3. Click Open.

      4. Click Okay.

        The SRTM file is loaded and shown in the Data tab.
      Start the swath profile command
      1.  Under the Data tab, mouse right click on the loaded grid file e.g. N21E093.
      2. In the pop up context menu, choose Add to Map.

        The grid file is displayed in a map window.
      3. Select Geoprocessing | Terrain Analysis | Profiles | Swath Profle [Interactive].

        The Swath Profile dialog box appears.
      4. In the Grid system field, choose the loaded grid file's system e.g. 0.000833; 1201x 1201y; 93x 21y option.
      5. In the DEM field, choose the loaded grid file, e.g. N21E093.
      6. Optional. Change the Swath Width if necessary.

        The message Interactive tool execution has been started is displayed in the Messages pane.
      Digitize the swath profile
      1. In the Toolbar, click the Action icon (that looks like a black NW arrow).
      2. In the map window, click a few points to draw the swath profile.


      3. To complete the drawing, press the mouse right button.
      4. To exit the interactive command, select Geoprocessing | Swath Profle [Interactive].

        The Tool Execution prompt appears.
      5. Click Yes.

        The message: "Interactive tool execution has been stopped" is shown in the Messages pane.

        Note: This may take a while as the command will sample the terrain to calculate the points.
      Display the swath profile graphically
      1.  In the Data pane, mouse right click on the newly created profile points e.g. Profile [N21E093].

      2. In the pop up menu, choose Attributes | Diagram.

        The Properties dialog box appear.
      3. In the X Axis Values field, choose D (for Distance).
      4. In the X Axis Label field, choose D.
      5. In the Attributes field, toggle on Z, Z [min], Z[max].
      6. Set other options if necessary.
      7. Click Okay.

        The profile line(s) are displayed.

      Monday, March 2, 2020

      git authentication failed after changing password or installing a new version of git for Windows

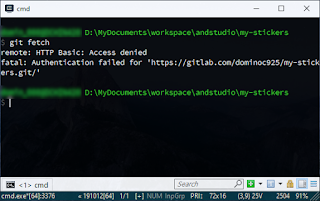
      After installing a new version of git for Windows or changing the git repository password, the following git error messages may appear when trying to access the git repository: "...access denied...fatal authentication failed for ..."
       
      This problem can be resolved by resetting the git password in the Windows Credential Manager.

      1. Click the Windows Start button.
      2. Start typing in "Credential Manager". When the Credential Manager icon is displayed, click the icon.

        The Credential Manager dialog box appears.

      3. Click the Windows Credentials icon.
      4. Scroll down the credential list and look for a git generic credential, e.g. git:https://gitlab.com. Click on the credential.

        The git credential properties appear.

      5. Click Remove.


        The git credential is removed.
      6. Close the Credential Manager.

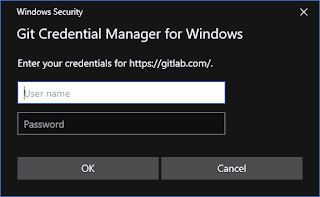
      Now, running any git command to access the repository will cause Windows to pop up a dialog box to enter the login and pasword, as shown below.
      Entering the correct login and password will allow the git command to be executed successfully.