- To run this WebApp, go to https://dominoc925-pages.appspot.com/webapp/svgimg/

- Optional. Click Settings on the right pane and change the Background color, transparency, scale factor, or the image format.

- Simply drag and drop the SVG files into the dashed box. Or click the Choose Files button and select one or more SVG files.

The SVG file(s) are converted to raster image format.
- To save the converted image(s) one by one, just right click on the image and choose Save image as. Alternatively, click Main | Generate zip file on the right pane to generate a zip file containing all the converted images.

Monday, January 25, 2016
WebApp for batch conversion of SVG vector files to raster PNG/JPEG images
This is a simple HTML5 WebApp for converting one or more SVG format files into raster image files in PNG or JPEG formats. At the same time, the user can choose to resultant raster image dimensions, whether it will be scaled at 25%, 50%, 75% or at a custom scale. The HTML5 canvas element is used to perform the conversion locally using the user's Internet browser without having to upload the SVG file to the web server.
Monday, January 18, 2016
Columbia, Missouri 911 incidents monitoring WebApp
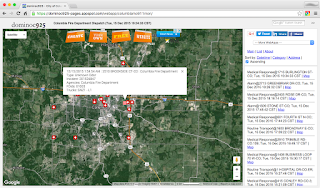
The 911 incidents are shown as clickable icons with tool tips on Google Maps. Clicking on an icon will bring up more details about the incident. Users can utilise additional built-in Google Maps feature such as Street View to immerse themselves in the incident's environment.
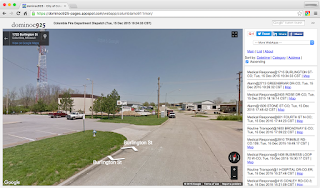
The 911 incidents are also shown as a list in the right pane. The list can be sorted by incident category, date-time and address - either in ascending or descending order. Clicking the Maps hyperlink will automatically locate, zoom, and center the incident in the Map View.
The WebApp can be launched from this link https://dominoc925-pages.appspot.com/webapp/columbiamo911mon/
Monday, January 11, 2016
IOS UIButton's image aspect fit mode does not work
I encountered a problem with displaying image icons in UIButton elements in IOS. As shown in the screenshot below, the icon images are stretched out disregarding the aspect fit mode set in Xcode.
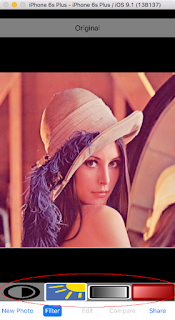
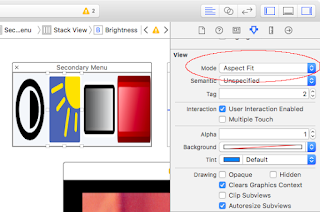
After troubleshooting the issue, I found that setting the UIButton's image content mode manually to scale by aspect fit will solve the problem.
In Xcode, I link all the buttons with icons to an outlet. Then I loop through the buttons and set the content mode property, as shown in the example code listing below.
The image buttons are now correctly rendered as shown in the screenshot below.
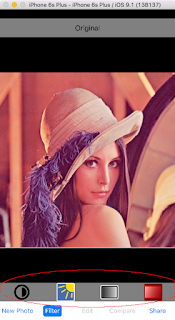
After troubleshooting the issue, I found that setting the UIButton's image content mode manually to scale by aspect fit will solve the problem.
In Xcode, I link all the buttons with icons to an outlet. Then I loop through the buttons and set the content mode property, as shown in the example code listing below.
@IBOutlet var filterButtons: [UIButton]?

//...etc...

override func viewDidLoad() {
     super.viewDidLoad()
// Do any additional setup after loading the view, typically from a nib.

//Workaround to keep the button icons scaled properly
   for button in filterButtons! {
       button.imageView?.contentMode = UIViewContentMode.ScaleAspectFit
    }
}
The image buttons are now correctly rendered as shown in the screenshot below.
Monday, January 4, 2016
Normalize a Lidar LAS file with Fusion ClipData
There are occasions when it is necessary to normalise a LiDAR las point cloud file, i.e. removing the terrain heights. This can be useful if you are interested in the heights of objects e.g. vegetation canopy above the ground and not the undulations of the terrain below. An example of a las file point cloud is shown below; the shape of the terrain is very much evident.
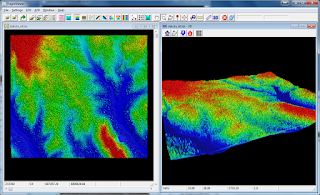
The ClipData utility from the open source Fusion software can be used to normalise a LiDAR point cloud. The following steps illustrate how to normalise a point cloud.

The ClipData utility from the open source Fusion software can be used to normalise a LiDAR point cloud. The following steps illustrate how to normalise a point cloud.
- In a Command Prompt, type in the following to convert a digital terrain model DTM from ESRI Ascii ArcGrid to Fusion's DTM format, using the ASCII2DTM.exe utility.
C:\> ascii2dtm.exe output.dtm m m 0 0 0 0 input_dem.asc
An example run is shown below.
- At the prompt, type in the following.
C:\> clipdata.exe /height /dtm:dakota_dem.dtm dakota.las output.las 606034 4889354 607400 4890580
Note:
/height tells the utility to normalise the point cloud
/dtm:dakota_dem.dtm specifies the input digital terrain in Fusion's DTM format.
dakota.las is the input las file
606034 is the minimum bounding x value
4889354 is the minimum bounding y value
607400 is the maximum bounding x value
4890580 is the maximum bounding y value
An example run is shown below:
A screenshot showing the normalised point cloud. Notice the point cloud no longer undulates with the terrain.
Subscribe to:
Comments (Atom)
