Normally these images are created using RGB-D cameras, where D stands for depth. However it is also possible to workaround it without a RGB-D camera by uploading to Facebook two images - an RGB image and its corresponding grayscale depth image, and making sure the depth image has the same name as the RGB image with a '_depth' suffix. The depth image is grayscale only with values ranging from dark to light - the dark pixels representing the furthest pixels and the light pixels representing the nearest pixels.
Using the ideas above, the following steps illustrate how to create a Facebook 3D Photo image from a SRTM digital elevation model (DEM) using QGIS.
- Startup QGIS. Create a new project. If the canvas background is not already black, select Project | Project Properties.
The Project Properties dialog box appears.

- In the Background color field, change the color to black. Click OK.
The canvas background becomes black.

- Drag and drop a DEM file onto the canvas e.g. srtm_54_07.tif.

- Optional. To serve the purpose of having a background, an OpenStreetMap (OSM) layer is displayed behind the DEM layer.

- Optional. To display only DEM heights above an elevation of interest, e.g. 200 meters, right click on the DEM layer and choose Properties. Then add in a new transparent entry to the transparent pixel list from 0 to 200 meters, as shown below. Then click OK.
The Layer Properties dialog box appears.


The DEM display is updated.

- Make a duplicate of the DEM layer by right clicking on the DEM layer and choosing Duplicate. Rename the copy as 'depth' as it will serve to generate a depth image later on.

- Right click on the top most DEM layer and choose Properties. In the Layer properties dialog box, click Style.

- Change the Render Type to Hillshade. Click OK.
The DEM layer is now rendered as a hill shade.

- Make a duplicate copy of the hill shaded DEM layer by right clicking the layer and choosing Duplicate. Rename the copy as 'hillshade' as shown below.

- Right click on the top most DEM layer and choose Properties. Select the Style tab.

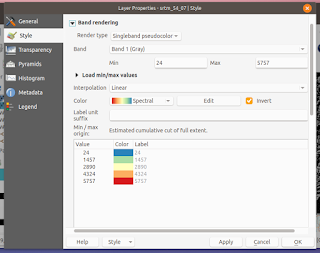
- In the Rendering type field, choose Singleband pseudocolor. Choose a suitable color gradient e.g. Spectral and toggle Invert if necessary. Choose a suitable Blending mode e.g. Screen.

- Click OK.
The DEM layer is rendered with a colored gradient.

- With the gradient colored, hill shaded and OSM layers displayed on and the depth layer displayed off, export out the canvas by selecting Project | Save as image and specifying an output file name e.g. srtm.png.
The srtm image is generated.

- Now turn off the gradient, hill shaded and OSM layers. Turn on the depth layer as shown below.

Select Project | Save as image to export out the depth image with a '_depth' suffix e.g. srtm_depth.png.
The srtm_depth image is generated.

- Now open up Facebook in a browser and click the Post Photo/Video button.
The File Upload dialog box appears.

- Browse and select the generated srtm.png and srtm_depth.png files. Click Open.
Facebook generates the 3D Photo.

A live example is available here at https://www.facebook.com/permalink.php?story_fbid=1251984134967474&id=101193703379862

No comments:
Post a Comment