Monday, September 15, 2014

Android App for monitoring 911 incident calls in Tampa Bay, Florida


Users can monitor Tampa City's Fire Dept.'s call for services (updated every 10 minutes), the Police Department's calls for service (updated within 30 to 45 minutes), and traffic related calls for service (updated every 15 minutes); and Pinellas County's fire call for services. The incidents can be viewed as a text list or on a map as icons or as a heat map. Examples of incidents include burglary, accident, fire, assault, drugs, death, and many more. Incident details can be viewed by touching an item on the list or a marker on the map display. A function is available to easily filter away unwanted incidents from the list or map by text. The app allows the user to send the incident location to Google Maps and/or Street View for better visualization of the 911 incident environment.

Upon launching the app on a handset, the list of incidents will be downloaded (if not downloaded before) and displayed with associated icons as shown below. Subsequently, the user will have to explicitly tap the Refresh icon and choose a feed to download again. 
The list of incidents can be filtered by using the Filter command, which is activated by selecting the Filter icon on the Action bar or menu item. This will toggle the display of the filter text entry field. As you type in any text, e.g. medical, the incident list is dynamically updated. 
To view all the incidents on a map, just tap the Map option item in the Action Bar menu. The filter (if any) remains in effect until it is cleared. Touching any incident icon will pop up a snippet of information about the incident. Touching the snippet will display the incident details.
Users can visualize the incidents a heat map instead of as marker icons. This can be done by choosing the Heat map option item in the Action Bar menu, as shown below. To display as marker icons again, just choose the Markers option item in the Action Bar menu. 
Long pressing any item in the incident list will pop up a menu, as shown below, where the selected incident can be shared, located on a map, or sent to the Google Maps or Street View apps. 

On a tablet, the app will display a two pane layout - an incident list on the left, and a map view on the right, as shown below. 

As on a handset, the incidents can be displayed as marker icons or as a heat map. 
Long pressing an item on the list will pop up a menu.

To refresh the incident list, tap the Refresh icon and choose a feed to download. 

You can download this app on the Play Store.
Get it on Google Play

Monday, September 8, 2014

C# code snippet to write a Stanford Polygon binary file

The Stanford Polygon file format (PLY) is a standard three-dimensional file format typically used in 3-D software such as Blender, 3D Studio Max and many others. I looked for some C# source code to write 3-D data into a file in binary PLY format but could only find C++ examples. So I came up with my own code snippet which just writes out simple 3-D vertices without additional properties, as shown below.

using System;
using System.Collections.Generic;
using System.Linq;
using System.Text;
using System.IO;
 
SomeFunction()
{
BinaryWriter writer = new BinaryWriter(new FileStream("myBinaryFile.ply", FileMode.Create), Encoding.ASCII);
//Write the headers for 3 vertices
writer.Write(str2byteArray("ply\n"));
writer.Write(str2byteArray("format binary_little_endian 1.0\n"));
writer.Write(str2byteArray("element vertex 3\n"));
writer.Write(str2byteArray("property float x\n"));
writer.Write(str2byteArray("property float y\n"));
writer.Write(str2byteArray("property float z\n"));
writer.Write(str2byteArray("end_header\n"));

//Write the 1st vertex
writer.Write(float2byteArray((float)1000.0));
writer.Write(float2byteArray((float)1230.3));
writer.Write(float2byteArray((float)2390.1));

//... write the remaining 2 vertices here

//Close the binary writer
writer.Close();
}
private byte[] float2byteArray(float value)
{
return BitConverter.GetBytes(value);
}
private byte[] str2byteArray(string theString)
{
return System.Text.Encoding.ASCII.GetBytes(theString);
}
This example is meant only for little endian machines.

Monday, September 1, 2014

How to build 3D Toolkit's SLAM6D on Ubuntu 64 bit

The open source 3D Toolkit http://slam6d.sourceforge.net/index.html provides tools to process 3D point clouds. The binary executables can be downloaded but unfortunately they may be outdated. The latest and greatest can be downloaded from the source code repository but you must build and compile the code. I could not compile it successfully on Windows but I could do it on the latest Ubuntu 14.04 64 bit operating system.

The following steps show how to build SLAM6D on Ubuntu.

  1. In Ubuntu, open a Terminal window.
  2. If necessary, update Ubuntu and download the g++ compiler and other development essentials. Run the following commands.

    $ sudo apt-get update
    $ sudo apt-get install build-essential

  3. Download the latest SLAM6D source code to a folder e.g. /home/obama/Documents/slam6d-code.

    $ svn checkout http://svn.code.sf.net/p/slam6d/code/trunk slam6d-code
  4. Install the prerequisite Boost libraries.

    $ sudo apt-get install libboost-all-dev libcv-dev freeglut3-dev libxmu-dev libxi-dev
  5. Use an Internet browser to download the latest OpenCV source code for Linux from http://opencv.org/downloads.html. Extract the files into a folder e.g. /home/obama/Documents/opencv-2.4.9/.
  6. In a Terminal window, use cmake to configure OpenCV source code by entering the following commands.

    $ cd opencv-2.4.9
    $ mkdir release
    $ cd release
    $ cmake -D CMAKE_BUILD_TYPE=RELEASE -D CMAKE_INSTALL_PREFIX=/usr/local ..

  7. Now compile and install OpenCV.

    $ make
    $ sudo make install

  8. Compile and build the SLAM6D source code downloaded previously.

    $ cd slam6d-code
    $ make

At this point, the SLAM6D executables would have been built and can be used to process 3D point clouds.

Monday, August 25, 2014

Using Android L Material Design color palette swatches in Inkscape

In the previous post, I showed how to import the upcoming Android "L" Material Design color palettes for styling Android apps into Gimp. The palette swatches can be downloaded from http://www.google.com/design/spec/style/color.html and used in Adobe Illustrator and Adobe Photoshop. If you want to import and use the swatches in the free and open source vector drawing software Inkscape, the following must be done:

  • Import the swatches into Gimp palette files, as described in the previous post. 
  • Then copy the imported Gimp palette files into Inkscape's palettes folder. 
 More details are below on how to copy the palette files into Inkscape, assuming they have been imported into Gimp.

  1. Using the Windows Explorer, browse and locate the imported Gimp palette files, e.g. C:\users\xxx\.gimp-2.8\palettes\.

    Note: xxx is the log in user name.
  2. In Windows Explorer, select the two *.gpl files. Press CTRL-C.
  3. In Windows Explore, browse to the Inkscape palette folder, e.g. C:\Program Files (x86)\Inkscape\share\palettes\.

  4. Press CTRL-V.

    The two files are copied into the palette folder.
  5. Start Inkscape.

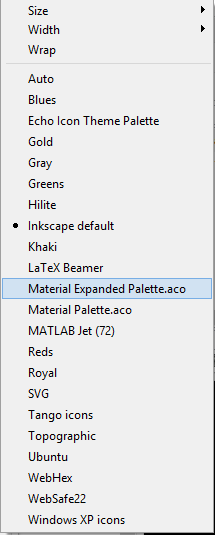
  6. In the bottom right, next to the horizontal color palette boxes, click the black arrow icon.

    A pop up menu appears.
  7. Choose one of the Material Design palette, e.g. Material Expanded Palette.aco.

    The selected color palette preview is updated.
  8. Now you can use any of the Material Design colors. Click on one of the colors to use for styling vector drawing elements.

Monday, August 18, 2014

Using Android L Material Design color swatches in Gimp

The upcoming Android "L" Material Design introduces new color palettes for styling Android apps. The palette swatches can be downloaded from http://www.google.com/design/spec/style/color.html and used in Adobe Illustrator and Adobe Photoshop. It is a little more inconvenient if your are using Gimp, the free and open source photo editing software. Fortunately, it is possible to import the Material Design swatches into Gimp so that they can be used. The following steps illustrate how.

  1. Download the Material Design color palette swatches from http://quantum-paper.storage.googleapis.com/downloads/color_swatches.zip. Extract the zip file into a folder e.g. D:\Temp\.

    The files Material Expanded Palette.aco and Material Palette.aco are extracted.

  2. Start Gimp.


  3. Select Windows | Dockable Dialogs | Palettes.

    The Palettes dialog appears.

  4. Click Configure this tab (left pointing icon in a rectangle somewhere on the top right). In the pop up menu, choose Palettes Menu | Import a New Palette.


    The Import a New Palette dialog appears.

  5. Toggle Palette file on. In the Palette file field, click the folder icon.


    The Select Palette file dialog appears.

  6.  Browse and select one of the extracted Material Design palette swatch file e.g. D:\Temp\color_swatches\photoshop\Material Expanded Palette.aco. Click Open.

    A preview of the palette is displayed.

  7. Click Import.

    The selected palette is displayed at the top of the list.

  8. Repeat the previous steps 4 to 7 to import the second Material Design palette swatch.


  9. In the Palettes dialog, double click one of the imported swatches e.g. Material Expanded Palette.aco.

    The Palette Editor appears.

  10. In the Palette Editor, just click on the color you want to use in the image editing process.

Monday, August 11, 2014

Windows Phone 8 App for converting GPS Week time and local time

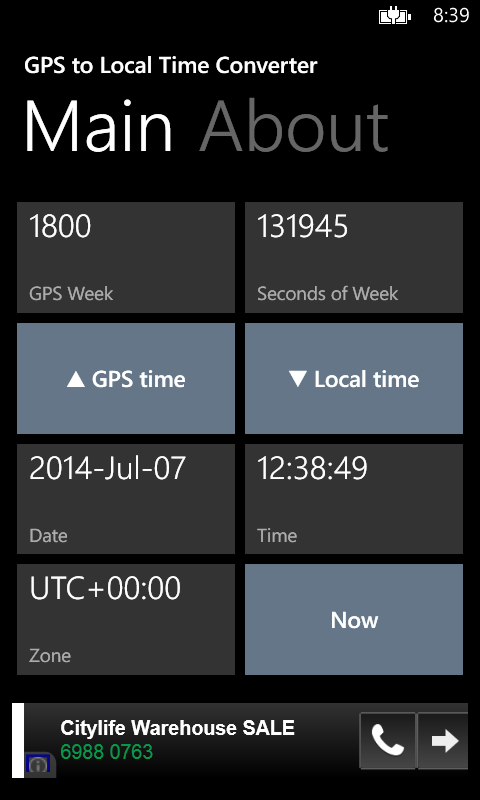
The date time used by the Global Positioning System (GPS) date time is normally expressed as a week number and a seconds-of-week number. This format is not as easy to work with as a normal calendar date time. This app can help to convert the GPS week-seconds format into the equivalent local date time and vice-versa. It has the option to choose which local UTC time zone to use for conversion. The app will automatically adjust the local time for GPS leap seconds.

This Windows Phone app is based on a similar app written for Android earlier. The app was written as an exercise to learn the ins and outs of developing for the Windows Phone 8 platform. It turned out that the app has to be rewritten from scratch as the two platforms are not the same, especially the look and the behavior has to be specially tailored to the platform.

Using the Windows Phone app is simple. Just click on the GPS Local Time tile to launch the app.


Convert from GPS week and seconds of week to the local time

  1. Tap the GPS week button to set the source GPS week number in the picker screen.


  2. Tap the GPS seconds of week button to set the source GPS seconds of week number in the picker screen.
  3. Optional. Tap the Zone button to set the destination UTC zone in the picker list.


  4. Tap the To Local time button to do the conversion.

    The GPS time is converted to the equivalent local date time.
Convert from the local date time to GPS week time
  1. Optional. Tap the Zone button and choose a source UTC zone in the picker.
  2. Tap the Date button and choose the source date in the picker.


  3. Tap the Time button and choose the source time in the picker.


  4. Tap the To GPS Time button.

    The local date time is converted to the equivalent GPS week, seconds time.
Display the current GPS and Local time
  1. Optional. Tap the Zone button and choose the destination UTC zone in the picker.
  2. Tap the Now button.

    The current GPS week, seconds and local date, time are displayed.

The app can be downloaded from the Windows Phone store.


Monday, August 4, 2014

Extend and style a Button to display two labels in Windows Phone 8 with a Tilt animation effect

While developing a Windows Phone 8 app, I wanted to create a button that can display two lines of  text and has a tilt animation effect when pressed, similar to the standard Windows Phone UTC time zone list screen, as shown below. 
After some research, I found out how to do it by doing the following:
  • Extending the Button class to add in an additional property for the second text label
  • Create and use a new Button style resource for the extended Button class
  • Download and include the Control Tilt Effect example TiltEffect.cs file
Extend the Button class
In the Windows Phone solution, create a new class that extends the Button class, and expose a new property; I named the property as 'Content2'. 

namespace Example
{
public class TwoLabelButton : Button
{
public static readonly DependencyProperty Content2Property =
DependencyProperty.Register("Content2", typeof(string), typeof(TwoLabelButton), new PropertyMetadata(default(string)));
 
public string Content2
{
get { return (string)GetValue(Content2Property); }
set { SetValue(Content2Property, value); }
}
}
}
Define a new Button style resource
In the XAML file that I want to use the new two label extended button, create a new style resource. I name this as the TimeZoneButtonStyle. In the code snippet below, the style resource is placed in a Grid.Resources block, as I wanted to use the style in a grid layout. In the style I wanted the two labels (to be bounded to the Content and Content2 properties) to be in two TextBlocks, oriented vertically in a StackPanel. The upper TextBlock will be styled with the standard PhoneTextTitle2Style while the lower TextBlock will be styled with the standard PhoneTextSubtleStyle.


<Grid.Resources>
<Style x:Key="TimeZoneButtonStyle" TargetType="local:TwoLabelButton">
<Setter Property="Template">
<Setter.Value>
<ControlTemplate TargetType="local:TwoLabelButton">
<StackPanel Orientation="Vertical">
<TextBlock
Style="{StaticResource PhoneTextTitle2Style}"
TextWrapping="Wrap"
Text="{TemplateBinding Content}"></TextBlock>
<TextBlock
Style="{StaticResource PhoneTextSubtleStyle}"
Text="{TemplateBinding Content2}"></TextBlock>                                
</StackPanel>
</ControlTemplate>
</Setter.Value>
</Setter>
</Style>
</Grid.Resources>
Download and include the example TiltEffect.cs file
Follow the instructions on the MSDN web site http://msdn.microsoft.com/en-us/library/ff941094 to download and include the TiltEffect.cs file in your solution.
In my case, I edited the TiltEffect.cs file and changed the namespace to be consistent with my solution. Then in the XAML file where I wanted to use the effect, I added in the page level property to enable the tilt effect for the whole page as shown in the snippet below.

<phone:PhoneApplicationPage
    x:Class="Example"
    xmlns="http://schemas.microsoft.com/winfx/2006/xaml/presentation"
    xmlns:x="http://schemas.microsoft.com/winfx/2006/xaml"
    xmlns:phone="clr-namespace:Microsoft.Phone.Controls;assembly=Microsoft.Phone"
    xmlns:shell="clr-namespace:Microsoft.Phone.Shell;assembly=Microsoft.Phone"
    xmlns:d="http://schemas.microsoft.com/expression/blend/2008"
    xmlns:mc="http://schemas.openxmlformats.org/markup-compatibility/2006"
    xmlns:local="clr-namespace:Example"
    local:TiltEffect.IsTiltEnabled="True"
    FontFamily="{StaticResource PhoneFontFamilyNormal}"
    FontSize="{StaticResource PhoneFontSizeNormal}"
    Foreground="{StaticResource PhoneForegroundBrush}"
    SupportedOrientations="PortraitOrLandscape" Orientation="Portrait"
    mc:Ignorable="d"
    Loaded="PhoneApplicationPage_Loaded"
    shell:SystemTray.IsVisible="True">

The complete example XAML file is shown below. To display the list of time zones, I bounded a DataTemplate to a collection of my custom TimeZone class.

<phone:PhoneApplicationPage
x:Class="Example"
xmlns="http://schemas.microsoft.com/winfx/2006/xaml/presentation"
xmlns:x="http://schemas.microsoft.com/winfx/2006/xaml"
xmlns:phone="clr-namespace:Microsoft.Phone.Controls;assembly=Microsoft.Phone"
xmlns:shell="clr-namespace:Microsoft.Phone.Shell;assembly=Microsoft.Phone"
xmlns:d="http://schemas.microsoft.com/expression/blend/2008"
xmlns:mc="http://schemas.openxmlformats.org/markup-compatibility/2006"
xmlns:local="clr-namespace:Example"
local:TiltEffect.IsTiltEnabled="True"
FontFamily="{StaticResource PhoneFontFamilyNormal}"
FontSize="{StaticResource PhoneFontSizeNormal}"
Foreground="{StaticResource PhoneForegroundBrush}"
SupportedOrientations="PortraitOrLandscape" Orientation="Portrait"
mc:Ignorable="d"
Loaded="PhoneApplicationPage_Loaded"
shell:SystemTray.IsVisible="True">
 
<phone:PhoneApplicationPage.Resources>
<local:TimeZones x:Key="TimeZones" />
</phone:PhoneApplicationPage.Resources>
<!--LayoutRoot is the root grid where all page content is placed-->
<Grid x:Name="LayoutRoot" Background="{StaticResource PhoneChromeBrush}">
<Grid.RowDefinitions>
<RowDefinition Height="Auto"/>
<RowDefinition Height="*"/>
</Grid.RowDefinitions>
 
<Grid.Resources>
<Style x:Key="TimeZoneButtonStyle" TargetType="local:TwoLabelButton">
<Setter Property="Template">
<Setter.Value>
<ControlTemplate TargetType="local:TwoLabelButton">
<StackPanel Orientation="Vertical">
<TextBlock
Style="{StaticResource PhoneTextTitle2Style}"
TextWrapping="Wrap"
Text="{TemplateBinding Content}"></TextBlock>
<TextBlock
Style="{StaticResource PhoneTextSubtleStyle}"
Text="{TemplateBinding Content2}"></TextBlock>                                
</StackPanel>
</ControlTemplate>
</Setter.Value>
</Setter>
</Style>
</Grid.Resources>
 
<!--TitlePanel contains the name of the application and page title-->
<StackPanel Grid.Row="0" Margin="12,17,0,28">
<TextBlock Text="SELECT A TIME ZONE" Style="{StaticResource PhoneTextNormalStyle}"/>
</StackPanel>
 
<!--ContentPanel - place additional content here-->
<Grid x:Name="ContentPanel" Grid.Row="1" Margin="12,0,12,0">
<phone:LongListSelector
ItemsSource="{StaticResource TimeZones}"
HorizontalAlignment="Stretch"
VerticalAlignment="Stretch"
>
<phone:LongListSelector.ItemTemplate>
<DataTemplate>
<!--<TextBlock Text="{Binding Path=DisplayName}" />-->
<local:TwoLabelButton
Tap="TimeZoneButton_Tap"
Style="{StaticResource TimeZoneButtonStyle}"
Content="{Binding Path=DisplayName}"
Content2="{Binding Path=ZoneOffset}"
HorizontalContentAlignment="Left" BorderThickness="0" RenderTransformOrigin="0.5,0.5">                                
</local:TwoLabelButton>
<!--<TextBlock Text="{Binding Path=ZoneOffset}" />-->
</DataTemplate>
</phone:LongListSelector.ItemTemplate>
</phone:LongListSelector>
</Grid>
</Grid>
 
</phone:PhoneApplicationPage>

The code listing for the TimeZone class is shown below.

namespace Example
{
public class TimeZone
{
private string _displayName = string.Empty;
private string _zoneOffset = string.Empty;
public string DisplayName
{
get { return _displayName; }
set { _displayName = value; }
}
public string ZoneOffset
{
get { return _zoneOffset; }
set { _zoneOffset = value; }
}
public TimeZone(string zoneOffset, string displayName)
{
_displayName = displayName;
_zoneOffset = zoneOffset;
}
}
public class TimeZones : List<TimeZone>
{
public TimeZones()
{
Add(new TimeZone("UTC-12:00", "International Date Line West"));
Add(new TimeZone("UTC-11:00", "Samoa"));
Add(new TimeZone("UTC-10:00", "Hawaii"));
Add(new TimeZone("UTC-09:00", "Alaska"));
Add(new TimeZone("UTC-08:00", "Pacific Time (US & Canada)"));
//...etc...
}
}
}
The following screenshot shows how the example XAML file looks rendered on a Windows Phone.