Monday, September 23, 2019

Installing Vim-youcompleteme for Ubuntu 18.04

Modern text editors in IDE such as Visual Studio comes with a useful feature so-called Intellisense or automatic text completion. The venerable vi text editor can also have this feature enabled by installing and configuring suitable plug-ins such as vim-youcompleteme. I thought it might be fun using this and found a lot of methods to get it installed and running on Ubuntu 18.04, including fiddling with the .vimrc file. But the simplest way I found was to simply do the following:
  1. In a Terminal, run the command:

    $ sudo apt install vim-youcompleteme
  2. Next, run the command:

    $ vim-addon-manager install youcompleteme
Now, when editing a code file, vi will pop up an auto-completion list as you type, as shown in the screenshot below.

Monday, September 16, 2019

Allocating more space to an emulated Raspbian disk image

The Raspberry Pi Raspbian images from http://downloads.raspberrypi.org/raspbian/images/ for QEMU have limited disk space, just enough for booting up and not much else. In the screenshot below, the image has just 3.3GB to it.

In order to work with ROS or other applications, the disk image has to be resized with more free disk space. This can be done by doing the following.
  1. Optional but recommended. Make a copy of the original Raspbian image and rename it, for example as raspbian.img.

    $ cp 2019-06-20-raspbian-buster.img raspbian.img
  2. Extend the copied image's size with the following command in the Terminal.

    $ qemu-img resize raspbian.img +6G


    Note: +6G means to extend the original size by 6 gigabytes
  3. Next, boot up the newly resized image with QEMU.

    $ qemu-system-arm -kernel kernel-qemu-4.4.34-jessie \
      -cpu arm1176 \
      -m 256 \
      -M versatilepb \
      -serial stdio \
      -append "root=/dev/sda2 rootfstype=ext4 rw" \
      -hda raspbian.img \
      -net nic \
      -net user,hostfwd=tcp::5022-:22 \
      -no-reboot


    The QEMU window appears.

  4. In the QEMU window, open up a Terminal.
  5. Enter the following commands to delete and create a new partition.

    $ sudo fdisk /dev/sda
  6. Print out the current partitions by entering p. Make a note of the starting offset of the second partition e.g. 540672.


  7. Delete the second partition by entering d followed by 2. Then recreate the second partition by entering c, n, p, 2, followed by the starting address noted from the previous steps e.g. 540672. Leave the signature alone when prompted.


  8. Now, reboot the emulated Raspbian OS.
  9. When QEMU has restarted the Raspbian OS, open a Terminal and enter the command to resize the file system.

    $ sudo resize2fs /dev/sda2

  10. To see the available disk space, enter the command:

    $ df -h

Monday, September 9, 2019

How to emulate a Raspbian OS in QEMU on Windows 10

I wanted to test out developing for a Raspberry Pi on a Windows 10 PC platform running an emulated Raspbian OS. After trying out a few methods to get  the emulator running, I settled on the following procedure.

Install QEMU for 64-bit Windows 10
  1. Go to the following web site https://www.qemu.org/download/ and download the latest QEMU installer for Windows 64bit.
  2. Run the installer.

    The QEMU executable files are installed, e.g. C:\Program Files\qemu\
Download a Linux kernel
  1. Go to the following web site https://github.com/dhruvvyas90/qemu-rpi-kernel and download a suitable kernel, e.g. kernel-qemu-4.4.34-jessie.
  2. Place the kernel file in a folder e.g. D:/Temp/raspbian/kernel-qemu-4.4.34-jessie
Download an Raspbian OS image
  1. Go to the following web site http://downloads.raspberrypi.org/raspbian/images/ and download the latest image e.g. 2019-06-20-raspbian-buster.zip
  2. Unzip the image file into a folder, e.g. D:/Temp/raspbian/2019-06-20-raspbian-buster.img

Create a Windows bat file
  1. Run a text editor.
  2. Type in the following lines.

    "c:\Program Files\qemu\qemu-system-arm.exe" ^
    -kernel kernel-qemu-4.4.34-jessie ^
    -cpu arm1176 ^
    -m 256 ^
    -M versatilepb ^
    -serial stdio ^
    -append "root=/dev/sda2 rootfstype=ext4 rw" ^
    -hda 2019-06-20-raspbian-buster.img ^
    -net nic ^
    -net user,hostfwd=tcp::5022-:22 ^
    -no-reboot


    Note: rename the kernel and image file names (in bold) to match the downloaded file names accordingly.

  3. Save as a bat file e.g. run_raspbian.bat and close the editor.
Run QEMU
  1. Open up a Command Prompt.
     
  2. Change directory to the folder containing the kernel and image files e.g. D:/Temp/raspbian.
  3. Type in the command:

    D:\> run_raspbian.bat


    The QEMU window appears running Raspbian OS

Monday, September 2, 2019

Resolving VeloView not displaying live sensor data from Velodyne Lidar sensors

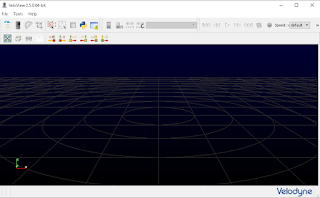
This is a fairly common problem when running VeloView with a real Velodyne Lidar sensor on Windows - even though the sensor e.g. VLP-16 or HDL-32 are powered on and connected to the host computer, no live point cloud data is displayed in VeloView. All you get is a blank screen as shown below.


The probable reason is that the Windows Defender firewall is set to block VeloView from accessing the ports used by the Velodyne sensors. Normally, Windows will prompt whether to allow the program to access the ports on the first startup of the program. If you click no to the prompt, then Windows will never ask again. To enable the ports for VeloView, you will have to manually open the ports. The steps are shown below.

  1. Click the Windows Start button. Start typing "firewall with advanced...".

    A list of matches appear.


  2. Click on Windows Defender Firewall with Advanced Security.

    The Windows Defender Firewall with Advanced Security dialog box appears.

  3. Click on Inbound Rules. Scroll the list and look for entries with the name Veloview.


  4. For each Veloview entry, double click on it.

    The Veloview Properties appear.

  5. Toggle on Enabled. Choose Allow the Connection. Click OK. Repeat for each Veloview entry.

    The entry in the list should be marked with a green tick icon.

  6. Close the dialog.

    VeloView should be able to display the live data from the Velodyne sensor.

Monday, August 26, 2019

Creating faux square Android Navigation Drawer icons

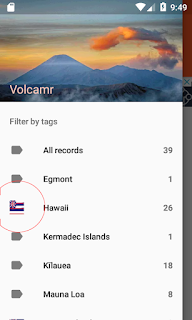
The Navigation drawer widget in Android can display vector SVG icons, but if the vector icons are non-rectangular, Android will distort the dimensions to force them into squares. This can be seen in the screenshot of the Hawaii flag icon below.


It is possible to extend the drawer by code to display non-rectangular icons but I prefer to adjust the SVG icon instead. The way I did it was to change the page size to a square and then placing a transparent square box around the page. The following steps illustrate:

Change the page to a square
  1. Open up the SVG icon in Inkscape.


  2. Select File | Document Properties.


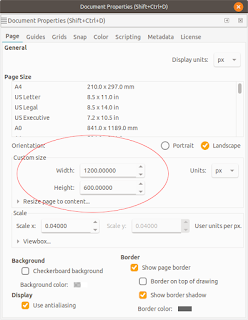
    1. Under the Page tab, change the Width and Height to be equal e.g. 1200 x 1200 px. Close the dialog box.

      The page display changes to a square.

  3. Using the Align and Distribute tools, align the graphics to the middle of the page.


Create a transparent square
  1.  Next, click the Create rectangles and squares (F4) icon. Place a stroke only, no-fill rectangle on the page.


  2. Change the width and height of the rectangle to match the page dimensions e.g. 1200 by 1200 px.


  3. Change the origin to the upper left corner of the page, e.g. X=0, Y=0.

  4. Open the Fill and stroke pane. Change the stroke opacity to low or zero opacity, e.g. 0.


  5. Save the file.
Import the SVG vector icon into an Android drawable icon
  1.  In Android Studio, right click on the /path/to/app/res/drawables folder and choose New | Vector Asset.


  2. Toggle on Local File (PNG, SVG). Choose the new SVG icon file from the previous section.
  3. Click Next. Click OK.

    The drawable is created.
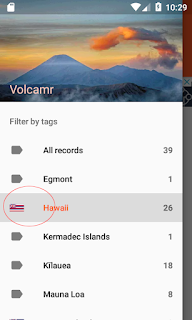
Using this new icon, the Navigation drawer can now display the icon seemingly with the correct proportions, as shown below.

Monday, August 19, 2019

Set Android system bar to be transparent when Navigation drawer is opened

While developing Android apps, a lot of times I broke the code and made the Android system bar opaque when the Navigation drawer is opened, as shown in the screenshot below.

Then I had to waste precious time hunting down the cause. So I am putting down the requirements to enable the Android system bar to be transparent over the Navigation drawer.
  1. In Android Studio, open up the XML layout file e.g. activity_main.xml for the activity with the Navigation Drawer. In the AndroidX DrawerLayout widget, make sure the property fitsSystemWindows is set to true.


  2. Next, create a "no action bar" style e.g. AppThem.NoActionBar in styles.xml to be used by the activity with the Navigation Drawer. In the example below, the style inherits the theme Theme.AppCompat.DayNight.DarkActionBar style for day and night mode styling.


  3. Set the properties windowActionBar to false and windowNoTitle to true.
  4. Then create the same "no action bar" style for Android API 21 and above e.g. /path/to/res/values-v21/styles.xml. Set the properties windowDrawsSystemBarBackgrounds to true and statusBarColor to "@android:color/transparent" as shown below.


  5. Compile and run the application. The system bar should be transparent over the Navigation Drawer now.

Monday, August 12, 2019

Resolving Android Studio "Cannot fit requested classes in a single dex file" error

After I added an additional library to an Android app, this error "null, Cannot fit requested classes in a single dex file (# methods: 66445 > 65536)" occurred while trying to build the application in Android Studio, as shown in the screenshot below.
 
The solution to this is to enable multi dex support in the Android app. The following steps show how to do this:
  1. In Android Studio, add in a new dependency to the androidx.multidex:multidex library to the app's build.gradle file.

    dependencies {
    ...etc...
    implementation 'androidx.multidex:multidex:2.0.1
    ...etc...
    }

  2. Then in the same app build.gradle file, toggle true the multiDexEnabled property.

    android {
      defaultConfig {
        ...etc...
        multiDexEnabled true
        ...etc...
      }
    }

Now, compiling the Android application should no longer result in the dex error.