Thursday, April 30, 2009

Publish GeoMedia Text Labels to Google Earth KML

In my previous post I showed how easy it is to use GeoMedia and GeoMedia Professional 6.1.5.x to publish features into Google Earth's KML format. This works for point, line, and polygon geometries. However, you may have noticed that GeoMedia text label features in your legend are not published to KML. An example of text label features is shown in the screen shot below. 
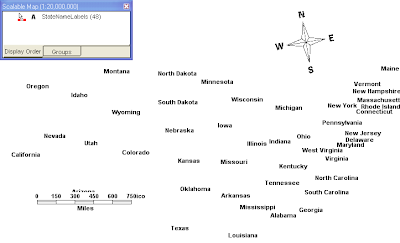
In this post, I describe a method to enable your text labels to be published to KML from GeoMedia. The method can be summarized in two points - (1) convert the text label feature to a GeoMedia point feature, and (2) expose the text label string as an attribute field in the point feature.

The steps below outline the details to publish the GeoMedia text labels into KML. 
  1. Open up your GeoMedia Workspace and select Analysis > Functional Attributes

    The Functional Attributes dialog box appears.


  2. In the Add Functional attributes for drop down list, select the label feature you want to publish to KML, e.g. StateNameLabels.

  3. Click New.

    The Functional Attribute dialog box appears.


  4. In the Functional attribute name field, enter a meaningful name, e.g. pointGeometry.
  5. Now define the Expression. Choose Geometry under Categories. Double click ORIGIN under Functions. Under attributes, double click the text label feature's geometry field name e.g. Input.Offset

    The Expression ORIGIN(Input.Offset) is formed.


  6. Click Add.

    The Functional attribute PointGeometry is added. The Functional Attribute dialog box resets to default values

  7. In the Functional attribute name field, enter a meaningful attribute name for the field to store the label string, e.g. theLabel

  8. Now form the Expression to extract the text string. Double click Geometry under Categories. Under Functions, double click on GRAPHICSTEXTSTRING. Under Attributes, double click the text label feature's geometry field name, e.g Input.Offset

    The Expression GRAPHICSTEXTSTRING(Input.Offset) is formed.


  9. Click Add. Click Close.

    The Functional Attributes dialog box appears.

  10. In the Query name field, enter a meaningful name e.g. PointStateNameLabels. Toggle off Display functional attributes in data window.


  11. Click OK

    The PointStateNameLabels point feature is displayed in the map window.


  12. Select File > Publish > Configure KML Publishing

    The Configure KML Publishing dialog box appears.


  13. Under Legend Entries, choose PointStateNameLabels

  14. In the Get placemark names from drop down list, select the exposed attribute field that contains the text string labels e.g. theLabel

  15. Click OK.

  16. Select File > Publish > Publish Map.

    The Publish Map dialog box appears.


  17. Specify the output KML file name and click OK.

    The KML file is published with the text labels and displayed in Google Earth.

Wednesday, April 22, 2009

Using PostGIS to convert SVY21 easting/northing to latitude/longitude coordinates

Besides commercial software like GeoMedia, Global Mapper, FME, ArcGis, etc. there are also free open source tools that can be used to convert SVY21 easting/northing coordinates to geographical latitudes/longitude coordinates. A great open source software is PostGIS and in this posting I will show how to use it without any programming or customization to convert SVY21 coordinates in CSV (comma separated values) files to geographical coordinates.

Note: Prior to doing the conversion, the SVY21 projection parameters must be added to the PostGIS spatial reference system table as shown in the previous posting here

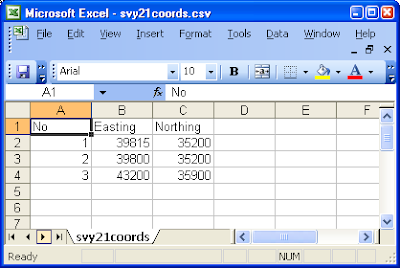
The source CSV file is shown in the screen shot below. The file has only three columns - a running number, the easting coordinate and the northing coordinate. 

  1. Open up the pgAdmin GUI by selecting Start | All Programs | PostgreSQL 8.3 | pgAdmin III.

    The pgAdmin III application appears.

  2. Connect to your PostgreSQL server and select your database e.g. svy21.

  3. Select Tools | Query Tool.

    The Query dialog box appears.

  4. Enter the following SQL command to create a database table to store the records from the CSV file.

    CREATE TABLE svy21coords   ( id SERIAL NOT NULL,   easting DOUBLE PRECISION,   northing DOUBLE PRECISION,
    CONSTRAINT id_pkey PRIMARY KEY (id)  ); 
  5. On the keyboard, press F5 to execute the command.

    The table svy21coords is created.

  6. Select Edit | Clear Window. Enter the following SQL command to load in the SVY21 records from the CSV file. Note: replace C:/temp/svy21coords.csv with the name of your file.

    COPY svy21coords (id, easting, northing)  FROM 'c:/temp/svy21coords.csv'   WITH CSV HEADER ; 
  7. Press F5 to execute the command.

    The records are loaded to the table.

  8. Select Edit | Clear Window. Enter the following SQL command to create a geometry field that is associated with the SVY21 coordinate system.

    SELECT AddGeometryColumn 
    ( 'public', 'svy21coords', 'the_geom', 93414, 'POINT', 2 ); 
    Note: 93414 is the SRID of the SVY21 coordinate system in the spatial_ref_sys table.

  9. Press F5 to execute the command.

    The geometry field is appended to the table.

  10. Select Edit | Clear Window. Enter the following SQL command.

    SELECT 'UPDATE svy21coords SET the_geom=GeomFromText(''POINT('||easting||' '||northing||')'',93414) WHERE id='||id||';'  FROM svy21coords; 
  11. Press F5 to execute the query.

    The query results are displayed in the bottom pane of the Query window.


  12. Select all the query results by clicking the first row and shift-clicking the last row. Press CTRL-C to copy the selected results to the Windows Clipboard.

  13. Click the top pane. Select Edit | Clear Window. Select Edit | Paste.

    The results are pasted into the top pane of the query window. Note the double quotation marks on every line. 
    "UPDATE svy21coords SET the_geom=GeomFromText('POINT(39815 35200)',93414) WHERE id=1;"
    "UPDATE svy21coords SET the_geom=GeomFromText('POINT(39800 35200)',93414) WHERE id=2;"
    "UPDATE svy21coords SET the_geom=GeomFromText('POINT(43200 35900)',93414) WHERE id=3;"


  14. Select Edit | Find and Replace.

    The Find and Replace dialog box appears.


  15. In the Find what field, enter ". Click Replace All. Close the Find and Replace dialog box.

    All the double quote marks are removed.
    UPDATE svy21coords1 SET the_geom=GeomFromText('POINT(39815 35200)',93414) WHERE id=1;
    UPDATE svy21coords1 SET the_geom=GeomFromText('POINT(39800 35200)',93414) WHERE id=2;
    UPDATE svy21coords1 SET the_geom=GeomFromText('POINT(43200 35900)',93414) WHERE id=3;


  16. Press F5 to execute the SQL command.

    The geometry field the_geom is updated with the SVY21 point coordinates.

  17. Select Edit | Clear Window. Enter the following SQL command to transform the SVY21 geometries to geographical latitude/longitude and write the records to a temporary table CSVOUTPUT.

    CREATE TABLE CSVOUTPUT  AS SELECT id,easting,northing, x(ST_Transform(the_geom,4326)),y(ST_Transform(the_geom,4326))  from svy21coords  Note: 4326 is the SRID of the geographical lat/lng coordinate system. 
  18. Press F5.

    The SVY21 points are transformed into latitude/longitude and written to the output table.

  19. Select Edit | Clear Window. Enter the following SQL command to save the converted coordinates to an output CSV file. Note: replace C:/temp/out/svy21coords.csv with your output file name.

    COPY CSVOUTPUT TO 'C:/TEMP/OUT/svy21coords.csv' WITH CSV HEADER
  20. Press F5.

    The output file is created as shown in the Excel screen shot below.

Tuesday, April 21, 2009

How to add SVY21 coordinate system to PostGIS

SVY21 projection does not come with the default installation of my PostGIS 1.3.5 running on PostgreSQL 8.3. If you have geometries with SVY21 easting and northing coordinates and you need to do coordinate transformation e.g. between SVY21 and latitude/longitude in PostGIS, then you have to insert the SVY21 projection parameters into the spatial_ref_sys table in your database. The parameters are a pain to type in. Fortunately, there is a website http://spatialreference.org where you can simply copy the SQL INSERT statement and execute it in the PgAdmin GUI or the PSQL command prompt. 

The exact link to the SVY21 SQL INSERT statement is here below:

Below is the actual statement:
INSERT into spatial_ref_sys  ( srid,  auth_name,  auth_srid,  proj4text,  srtext )  values  (  93414,  'epsg',  3414,  '+proj=tmerc +lat_0=1.366666666666667 +lon_0=103.8333333333333 +k=1 +x_0=28001.642 +y_0=38744.572 +ellps=WGS84 +units=m +no_defs ',  'PROJCS["SVY21 / Singapore TM",GEOGCS["SVY21",DATUM["SVY21",SPHEROID["WGS 84",6378137,298.257223563,AUTHORITY["EPSG","7030"]],AUTHORITY["EPSG","6757"]],PRIMEM["Greenwich",0,AUTHORITY["EPSG","8901"]],UNIT["degree",0.01745329251994328,AUTHORITY["EPSG","9122"]],AUTHORITY["EPSG","4757"]],UNIT["metre",1,AUTHORITY["EPSG","9001"]], PROJECTION["Transverse_Mercator"], PARAMETER["latitude_of_origin",1.366666666666667], PARAMETER["central_meridian",103.8333333333333], PARAMETER["scale_factor",1], PARAMETER["false_easting",28001.642], PARAMETER["false_northing",38744.572], AUTHORITY["EPSG","3414"], AXIS["Easting",EAST],AXIS["Northing",NORTH]]' );
Simply execute the statement to add in the SVY21 projection to your PostGIS database. The SRID for SVY21 is 93414 here. 

Monday, April 20, 2009

Convert SVY21 coordinates to latitude/longitude using FME

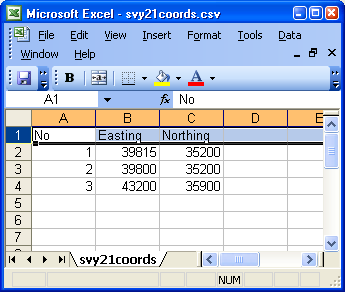
FME can be used to reproject points from one coordinate system to another. In this example, I'm going to show how to convert easting/northing points in SVY21 coordinate system to geographical latitude/longitude points using the FME Workbench and FME's Reprojector and 2DPointAdder transformers. The following paragraphs describe the conversion steps from the source CSV (comma separated value) file to the destination CSV file. The source CSV file looks like the Excel screen shot shown below.

  1. Run the FME Workbench and choose Comma Separated Value as shown below.


  2. Click Next

    The Locate your source data page appears.

  3. Click Browse.

    The Select source Comma Separated Value files dialog box appears.


  4. Browse and select the CSV file or enter the file name in the File name field. Click Open.

  5. Click Settings.

    The CSV Input Settings dialog box appears.


    Toggle on the Field Names On First Line option. Click OK

  6. Click Next.

    The Select your destination format page appears


  7. Choose Comma Separated Value in the drop down list. Click Next. Click Finish

    The FME Workbench application appears.

  8. Drag and drop the 2DPointAdder transformer onto the FME Workbench. Connect the source CSV to the 2DPointAdder. Open up the 2DPointAdder properties. 

    The Edit 2DPointAdder Parameters dialog box appears.


  9. In the X Value Attribute drop down list, choose Easting. In the Y Value Attribute drop down list, choose Northing. Click OK

  10. Drag and drop the Reprojector transformer onto the Workbench. Connect the output of the 2DPointAdder transformer to the input of the Reprojector transformer. Open up the Reprojector properties.

    The Edit Reprojector Parameters dialog box appears


  11. In the Source Coordinate System field, choose the SVY21 coordinate System.

    Note: by default, FME does not have the SVY21 coordinate system defined. Refer to this posting for the steps on how to add it in. 

  12. In the Destination Coordinate System drop down list , choose LL84.

    Note: LL84 refers to Latitude, Longitude on WGS84.  

  13. Click OK.

  14. Drag and drop the BoundsExtractor transformer onto the Workbench. Connect the output of the Reprojector transformer to the input of the BoundsExtractor transformer. 

  15. Connect the output of the BoundsExtractor transformer to the input of the destination CSV. Open up the destination CSV properties.

    The Feature Type Properties dialog box appears.


  16. Click the User Attributes tab. Add in two double numerical attributes: Latitude and Longitude as shown above. Click OK.

  17. In the Workbench, connect the BoundsExtractor transformers' xmin to the destination CSV's Longitude attribute. Similarly connect the ymin to the Latitude attribute.

    The Workbench should look like this at this point.

  18. Run the translation and specify the output folder.

    The CSV file is created with the SVY21 coordinates converted to latitude/longitude.

Friday, April 17, 2009

Adding SVY21 coordinate system to FME

By default, FME does not include the SVY21 coordinate system definitions. If you plan to use FME to perform any coordinate reprojections, then you have to modify the LocalCoordSysDefs.fme or MyCoordSysDefs.fme and coordsys.db parameter files to include in the SVY21 definitions. Fortunately, this is very easy and it is simply a matter of putting in the correct values. 

Using your favorite text editor, add in the following lines in the LocalCoordSysDefs.fme or MyCoordSysDefs.fme files. They can be found in the folder {FME install directory}\Reproject\

# SVY21 Projection
#------------------------
COORDINATE_SYSTEM_DEF SVY21 \
DESC_NM "Singapore_Transverse_Mercator_WGS_1984" \
PROJ TM \
UNIT METER \
DT_NAME WGS84 \
PARM1 103.8333333333333333333333 \
SCL_RED 1.0 \
ORG_LAT 1.366666666666666666666667 \
X_OFF 28001.642 \
Y_OFF 38744.572 \
MAP_SCL 1.0
Then add in the following line to the coordsys.db file. This file can normally be found in the {FME install directory}

SVY21|Singapore Transverse Mercator WGS84|Singapore|WGS84||TM|METER

After you have completed amending the parameter files, when you run the FME workbench or the FME Universal Translator to define the coordinate system, you would be able to see the SVY21 coordinate system in the dialog boxes (as shown below). 


Monday, April 13, 2009

Batch SVY21 Easting/Northing to Geographical Latitude/Longitude Coordinates Conversion with Global Mapper

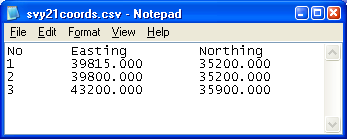
Continuing my exploration of using Global Mapper to convert SVY21 coordinates to geographic latitude and longitude coordinates, Global Mapper 10 has a batch convert function that does coordinate conversions of one or many input files. I tried it out on a sample comma separated values (CSV) file (a screenshot of it in Excel is shown below) and the function works well. It is easy to use without having to go through convoluted setup procedures and no programming is required; so end-users can definitely use something like this to do batch coordinate transformation. 


Here's how to do the batch SVY21 coordinates to geographic latitude and longitude coordinates conversion (from CSV to CSV format).
  1. In Global Mapper, select File > Batch Convert/Reproject.

    The Select File Type to Convert From dialog box appears.


  2. In the Select Type drop down list, select CSV (Comma-Separated Text). Click OK.


    The Select File Type to Convert To dialog box appears.


  3. In the Select Type drop down list, select CSV (Comma Separated Point File). Click OK.


    The Batch Convert dialog box appears.


  4. Click Add Files.

    The Open dialog box appears.

  5. Browse and select a file e.g. svy21coords.csv. Click Open.

  6. In the File Names group, toggle on Use Source File Name. In the Append field, type in a file suffix name e.g. _conv.


  7. In the Projection group box, click Change.

    The Select Destination File Projection dialog box appears.


  8. In the Projection drop down list, select Geographic (Latitude/Longitude). In the Datum drop down list, select WGS84. Click OK.

    The Generic ASCII Text File Import Options dialog box appears.


  9. In the Import Type group, toggle on Point Only. In the Coordinate Column Order group, enter 1 for Columns to Skip at Start of Line. In the Coordinate Delimiter group, toggle on Comma. Toggle on Column headers in first row of file

    The Generic ASCII Text File Import Options dialog box may look like this.


  10. Click OK.

    The Select Destination File Projection dialog box appears.


  11. In the Projection drop down list, select Transverse Mercator. In the Datum drop down list, select WGS84.
    In the CENTRAL MERIDIAN parameter, enter 103.833333333333333333333
    In the ORIGIN LATITUDE parameter, enter 1.366666666666666666666667
    In the FALSE EASTING parameter, enter 28001.642
    In the FALSE NORTHING parameter, enter 38744.572

  12. Click OK.

    The Unknown Projection dialog box appears.


  13. Click OK.

    The input file svy21coords.csv is converted from SVY21 to geographic latitude and longitude coordinates in the output file svy21coords_conv.cvs. A screenshot of the resultant file is shown below in Excel.


Thursday, April 9, 2009

Another Global Mapper method to convert SVY21 coordinates to latitude and longitude

There are a variety of ways to convert SVY21 coordinates to geographical latitude and longitude coordinates in Global Mapper. I have previously posted about using the Coordinate Convertor and the Batch Convert/Reproject functions. I describe another way in this post. Global Mapper allows you to change the map display's coordinate system to any desired coordinate system; then whatever points you have displayed in Global Mapper will be exported out in that coordinate system. That essentially sums up the approach in this conversion method here. 

For example, I have a CSV file containing the SVY21 coordinates as shown in the screenshot below. I want to convert the easting and northing coordinates to geographic latitude and longitude values. The steps are outlined below.
  1. Run Global Mapper 10.

  2. Select Tools > Configure.

    The Configuration dialog box appears.

  3. Click Projection.

  4. In the Projection drop down list, select Geographic (Latitude/Longitude). In the Datum drop down list, select WGS84

    The Configuration dialog box may look like this.


  5. Click OK.

  6. Select File > Open Generic ASCII Text File.


  7. Browse and select a file e.g. svy21coords.csv. Click Open.

    The Generic ASCII Text File Import Options dialog box appears.


  8. In the Import Type group, toggle on Point Only (All Features are Points).

  9. In the Coordinate Column Order group, enter 1 for the Columns to Skip at Start of Line.

  10. Toggle on Include attributes from lines with coordinate data. Toggle on Column headers in first row of file (points only).

    The Generic ASCII Text File Import Options may look like this at this point


  11. Click OK.

    This message box appears.


  12. Click OK.

    The Select Projection dialog box appears.


  13. In the Projection drop down list, choose Transverse Mercator. In the Datum drop down list, select WGS84
  14. In the CENTRAL MERIDIAN parameter, enter 103.83333333333333333333333.
    In the ORIGIN LATITUDE parameter, enter 1.366666666666666666666666667.
    In the FALSE EASTING parameter, enter 28001.642.
    In the FALSE NORTHING parameter, enter 38744.572.

  15. Click OK.

    The SVY21 points are displayed in Global Mapper


  16. Select File > Export Vector Data > Export CSV.

    The message appears.


  17. Click OK.

    The CSV Export Options dialog box appears.


  18. Toggle on Include attribute names in first row of file.

  19. Click OK.

    The Save As dialog box appears


  20. In the File name field, type in the name of the output file. Click Save.

    The converted SVY21 points are saved in the output file. The contents of the file is shown below