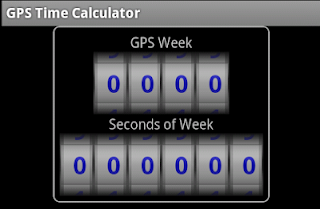
To define a rounded border drawable using the Android Development Toolkit, in Eclipse, the following steps can be done:
Create a new Android drawable XML file
- In the Package Explorer pane of Eclipse, right click on the drawable folder.
A pop up menu appears.

- Choose New | Android XML File.
The New Android XML File dialog box appears.

- In the File field, type in the name of the drawable XML file e.g. myborder.xml.
- In the Root Element list, choose shape. Click Finish.
The file is created and the following code is displayed in Eclipse.
<?xml version="1.0" encoding="utf-8"?>
<shape xmlns:android="http://schemas.android.com/apk/res/android" >
</shape>
Edit the drawable Android XML file
- In the Eclipse code editor, type in the following to define the rounded border shape.
<?xml version="1.0" encoding="utf-8"?>
<shape xmlns:android="http://schemas.android.com/apk/res/android">
<stroke
android:width="1dip"
android:color="@android:color/darker_gray" />
<solid
android:color="@android:color/background_dark" />
<padding
android:left="7dip"
android:top="7dip"
android:right="7dip"
android:bottom="7dip" />
<corners
android:radius="6dip" />
</shape>
- Save the code.
Using the drawable Android XML file in a layout
When editing the layout XML of an Activity, the newly created rounded border drawable can be referenced and used. For example, in the LinearLayout element, the android:background attribute can be set to the myborder drawable created previously, as shown in the code snippet below.
<LinearLayout
android:orientation="vertical"
android:background="@drawable/border_rounded_corner"
android:layout_width="wrap_content"
android:layout_gravity="center_horizontal"
android:layout_height="wrap_content">
<TextView
android:layout_width="wrap_content"
android:layout_height="wrap_content"
android:layout_gravity="center_horizontal"
android:text="GPS Week"
/>
<RelativeLayout
android:orientation="horizontal"
android:layout_gravity="center_horizontal"
android:layout_height="wrap_content"
android:layout_width="wrap_content">
<kankan.wheel.widget.WheelView
android:id="@+id/digit4GpsWeek"
android:padding="0dip"
android:layout_width="wrap_content"
android:layout_height="wrap_content"
/>
<kankan.wheel.widget.WheelView
android:id="@+id/digit3GpsWeek"
android:padding="0dip"
android:layout_width="wrap_content"
android:layout_height="wrap_content"
android:layout_toRightOf="@id/digit4GpsWeek"
/>
<kankan.wheel.widget.WheelView
android:id="@+id/digit2GpsWeek"
android:padding="0dip"
android:layout_width="wrap_content"
android:layout_height="wrap_content"
android:layout_toRightOf="@id/digit3GpsWeek"
/>
<kankan.wheel.widget.WheelView
android:id="@+id/digit1GpsWeek"
android:padding="0dip"
android:layout_width="wrap_content"
android:layout_height="wrap_content"
android:layout_toRightOf="@id/digit2GpsWeek"
/>
</RelativeLayout>
<!-- etc -->
</LinearLayout>
The corresponding resultant Activity may look like the screenshot below.


No comments:
Post a Comment