
In order to build 64 bit Windows binaries of liblas, the header files and 64 bit binaries for Boost must be accessible by Microsoft Visual Studio. The CMake utility from http://www.cmake.org needs to be used to configure and generate the Microsoft Visual Studio project files for liblas. The following illustrates how I build the liblas 64 bit binaries with GDAL and GeoTIFF support. Note that the 64-bit executables may not run successfully even though the compilation is successful depending on how the source code was written.
- Download the latest liblas source code from http://www.liblas.org/download.html. Extract the files to a folder e.g. E:\Work\src\liblas-1.7.0\.
- On the Windows Desktop, select Start | All Programs | CMake 2.8 | CMake (cmake-gui).
The CMake application appears.
- In the Where is the source code field, click Browse Source.
The Browse for Folder dialog box appears.
- Select the folder where the liblas archive was extracted, e.g. E:\Work\src\libLAS-1.7.0\. Click OK.
- In the Where to build the binaries field, click Browse Build.
The Browse for Folder dialog box appears.
- Select or create the folder where the Microsoft Visual Studio solution project files will be created e.g. E:\Work\src\libLAS-1.7.0\bin\. Click OK.

- Click Configure.
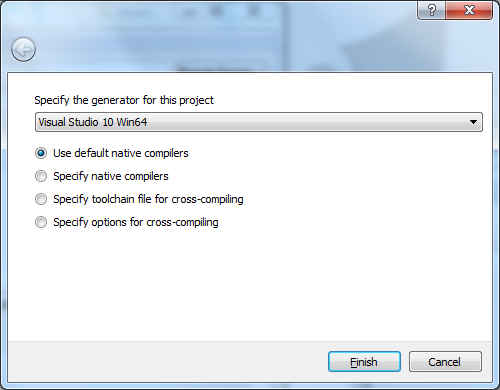
A prompt appears.
- In the combo box, choose a generator for this project e.g. Visual Studio 10 Win64. Click Finish.
A Error message appears.
- Close the message.

- In the list box, select Boost_INCLUDE_DIR. Then click the browse [...] button.
The Browse For Folder dialog box appears.
- Choose the root folder containing Boost e.g. E:\Work\src\boost_1_52_0\. Click OK.
Note: the boost folder containing the header include files should be underneath the root folder. - Click Configure again.
The configuration files are created.
- Toggle on WITH_GDAL and WITH_GEOTIFF. Click Configure.
An error message appears. - Close the message. Select GDAL_INCLUDE_DIR. Click the browse [...] button.
The Browse for Folder dialog box appears. - Select the folder containing the GDAL header include files e.g. E:\Work\src\gdal-1.9.2\gcore\. Click OK.
- Select GDAL_LIBRARY. Click the browse [...] button.
The Select File for GDAL_LIBRARY dialog box appears. - Select the GDAL library e.g. E:\Work\src\gdal-1.9.2\gdal_i.lib. Click Open.
- Click GEOTIFF_INCLUDE_DIR. Click the browse [...] button.
The Browse for Folder dialog box appears. - Select the folder containing the libGeotiff header files e.g. E:\Work\src\libgeotiff-1.4.0\. Click OK.
- Select GEOTIFF_LIBRARY. Click the browse [...] button.
The Select File for GEOTIFF_LIBRARY dialog box appears. - Choose the GEOTIFF library file e.g. E:\Work\src\libgeotiff-1.4.0\geotiff_i.lib. Click Open.
- Click Generate.
An error message appears. - Close the message. Click TIFF_INCLUDE_DIR. Click the browse [...] button.
The Browse for Folder dialog box appears. - Select the folder containing the TIFF header files e.g. E:\Work\src\tiff-4.0.3\libtiff\. Click OK.
- Click TIFF_LIBRARY. Click the browse [...] button.
The Select File for TIFF_LIBRARY dialog box appears. - Select the TIFF library file e.g. E:\Work\src\tiff-4.0.3\libtiff\libtiff_i.lib. Click Open.
- Click Generate.
The Microsoft Visual Studio project files are generated the specified destination build folder.
- Close CMake.
- Run Microsoft Visual Studio 2010. Open up the libLAS.sln file.
- Press F7 to build all the projects.
Note: it might be necessary to add in the paths to the include files if the compiler cannot locate them in the build process.
The 64 bit liblas binaries are generated.


No comments:
Post a Comment