Monday, March 29, 2021

Installing the long term release version of QGIS using Flatpak on Ubuntu

The flatpak command on Ubuntu is used to install packaged software such as QGIS from a remote flathub repository. Normally, the following Terminal command to install QGIS is as follows:

$ flatpak install qgis


By default, this will install the stable branch of QGIS. In the screen shot below, it is version 3.18, but this may not be the version you want. Perhaps you wanted to use the long term release version, which is under a different lts branch. 


To get flatpak to install the lts branch of QGIS, type in the following command in the Terminal.

$ flatpak install org.qgis.qgis//lts

And follow the prompts to complete the installation.


Finally, as a check, open up QGIS and display the version.


Monday, March 22, 2021

Find the location of a Docker volume on Windows

Like any Docker versions, Docker on Windows (with WSL2) can create and use Docker data volumes. The command to create a Docker volume (named as my-data-volume), as shown in the screenshot below is: 

$ docker volume create my-data-volume


The question then is where is the corresponding location of this data volume e.g. my-data-volume in the Windows file system.

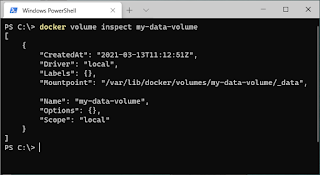
Using the inspect command below to display the Docker volume details shows the following information.

$ docker volume inspect my-data-volume


The print out indicates the my-data-volume can be found at /var/lib/docker/volumes/ but the path cannot be located with the Windows Explorer.

Instead, to go to the actual location, you will have to use the WSL path e.g.

\\wsl$\docker-desktop-data\version-pack-data\community\docker\volumes\

Typing this path in Windows Explorer shows the my-data-volume location.


Monday, March 15, 2021

Creating a simple CUDA with CMake C++ project

Assuming you have downloaded and installed the right version of the NVIDIA CUDA Toolkit for your NVIDIA GPU card, the next step is to create your awesome C++ CUDA project. In this post, I will illustrate how to create a simple Hello World project using CMake on Ubuntu. 

  1. In a folder, create a CUDA C++ file, e.g. hello.cu. Type in the following code as shown in the snippet below.

    Note: the main function simply calls an empty CUDA mykernel consisting of 1 block and 1 thread per block function. Then it prints out a hello message.

  2. Next, create a CMakeLists.txt file. Type in the following code as shown.

    Note: The CMakeLists.txt simply tells CMake to use C++ and CUDA languages and then defines the executable and its source.


  3. Create a build directory. Then change directory into the build directory and run the cmake command.

    $ mkdir build
    $ cd build
    $ cmake ..


    The processing messages appear.


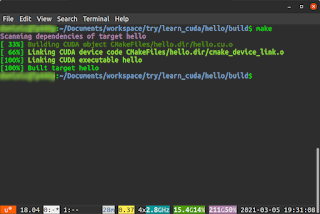
  4. Now compile the project with the make command.

    $ make


  5. Finally, run the hello executable.

    $ ./hello

    The message "Hello CUDA!" is printed to the screen.

The sample project can be downloaded from the Github repository at https://gitlab.com/dominoc925/hello-cuda-cmake

Monday, March 8, 2021

CUDA11.2.props not found in Visual Studio Community 2019

While trying out the NVIDIA CUDA development sample solutions in Visual Studio Community 2019, I encountered error messages about some CUDA11.2.props files not found. An example is shown in the screen shot below.

The solution to this is simple: simply do the following:

  1. Using the Windows Explorer, browse to the location of the NVIDIA CUDA Toolkit e.g. C:\Program Files\NVIDIA GPU Computing Toolkit\CUDA\v11.2\extras\visual_studio_integration\MSBuildExtensions\.


  2. Select and copy all the files inside the folder: CUDA 11.2.props, CUDA 11.2.targets, CUDA 11.2.xml, and Nvda.Build.CudaTasks.v11.2.dll.

  3. Browse to the folder C:\Program Files(x86)\Microsoft Visual Studio\2019\Community\MSBuild\Microsoft\VC\v160\BuildCustomizations\.


  4. Paste the copied CUDA files inside.


Now, when compiling the CUDA sample solutions, the error messages no longer appear, as shown below.