Monday, October 1, 2012

WebApp tool to apply coordinate transformation to raster world files

It is possible to perform coordinate transformation to raster files with associated ESRI world files by multiplying the matrix described in the world files with the transformation matrices (translation, rotation, scaling). An implementation of this is a simple Javascript web app at this site http://dominoc925-pages.appspot.com/webapp/transform_raster/default.html.


To use the web app to apply coordinate transformations to one or more raster files, just do the following:
  1. In the sidebar on the right, define the transformation parameters - the x and y translation offsets, the scale factor, the rotation angle (positive clockwise), and the rotation/scaling origin.
  2. Then either drag and drop the ESRI world files (*.tfw, *.pgw, *.jgw, etc.) onto the dashed box area. Or click the button and select one or more ESRI world files.

    The source world files are read and transformed. The resultant matrices are displayed in the browser page.
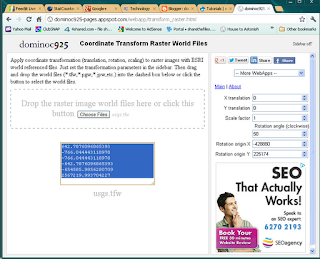
  3. Copy and paste the resultant matrix into a text editor. Save as a file with the same name as the original world file.

  4. To see the transformation results, simply display the raster file in a GIS software that recognized world files e.g. Global Mapper.
    Before
    After


Monday, September 24, 2012

Applying coordinate transformations to ESRI world files

The ESRI World file is a plain text file with numbers on six lines. These numbers actually are just the coefficients of an Affine transformation matrix. The world file helps to place the raster image on a 2-dimensional plane. Since the world file is just a matrix, it is a simple matter to perform coordinate transformations (translation, rotation, and scaling) to the raster image by applying the various transformation matrices with the world file matrix.

An example of a world file is shown below.
0.124966541755889
-0.216448399567377
-0.216438882466538
-0.124961047055157
2132.25596524947
1263.76014101498

If we label the lines as the following for discussion:
A
D
B
E
C
F

Then the Affine transformation matrix of the raster image is
A C E
B D F
0 0 1

For more information on the world file format, visit the Wikipedia site http://en.wikipedia.org/wiki/World_file.

Translation transformation
To apply a translation transformation to the raster image, it is just a matrix multiplication of the translation matrix with the world file matrix, as shown below. dx and dy are the x offset and y offset of the translation.
| 1 0 dx |   | A C E |
| 0 1 dy | * | B D F |
| 0 0 1  |   | 0 0 1 |

Scaling transformation
To apply a scaling transformation to the raster image, just multiply the world file matrix with the scaling transformation matrix. s is the scale factor.

Note: if the scaling origin is not at (0,0), then apply the translation transformation to move the origin to the scaling origin (x,y) first. After the scaling is done, the apply an inverse translation translation to move the origin back.
| s 0 0 |   | A C E |
| 0 s 0 | * | B D F |
| 0 0 1 |   | 0 0 1 |

Rotation transformation
Similarly, to apply a rotation transformation to the raster image, multiply the rotation transformation matrix with the world file matrix. r is the rotation angle in radians (positive clockwise)

Note: if the rotation origin is not at (0,0), then apply the translation transformation to move the origin to the rotation origin (x,y) first. After the rotation is done, the apply an inverse translation translation to move the origin back.
|  cos(r) sin(r) 0 |   | A C E |
| -sin(r) cos(r) 0 | * | B D F |
|  0      0      1 |   | 0 0 1 |

Monday, September 17, 2012

WebApp for batch resizing images

I wrote this simple WebApp using the HTML5 canvas element for re-sizing one or more images without having to upload the images onto a web server for processing. It will only work in modern Internet browsers that support the canvas element and the FileReader object; that leaves out Internet Explorer 9 and below.

  1. To run the WebApp, go to this site http://dominoc925-pages.appspot.com/webapp/resize_image/default.html.
  2. Then in the sidebar on the right, choose the scale factor for resizing e.g. 0.5.

  3. Optional. Choose the output image format e.g. Jpeg.

  4. Drag and drop the image files onto the dashed box. Alternatively, click the button and choose one or more image files.

    The images are resized.
  5. To save the resized images, simple right click on the image and choose Save image as. Or drag and drop the image out to a folder.


Monday, September 10, 2012

Swipe the display of raster images on and off in Global Mapper 13

Global Mapper 13 comes with a new Image Swipe Tool which as the name suggests, will swipe the display of an image on and off. As long as one or more raster layer displayed, the command can be activated. The following illustrates how the command can be used.

  1. Start Global Mapper. Load and display 2 raster layers e.g. an OpenStreetMap layer and a SRTM Worldwide Elevation Data layer.

  2. Select Tools | Image Swipe Tool.

    The Select Layer to Swipe dialog box appears.


  3. Choose the raster layer to swipe on and off. Usually this should be the uppermost layer. Click OK.

    The cursor changes to a white cross.
  4. Move the cursor to the center of the map display. Press down the left mouse button and move the cursor left or right.

    The selected raster layer display is swiped on or off at the cursor point.

Monday, September 3, 2012

Tool to create custom icon marker shadow images

I made a simple HTML5 webapp to generate shadows from transparent icon images for use as custom icon marker shadows in web mapping applications like Google Maps, Bing Maps, OneMap or OpenStreetMap. There are already a couple of online shadow creation tools available but all of them performs the transformation processes on the server, which means the source image file needs to be uploaded first.

I thought of using the HTML5 canvas object to perform the silhouetting, scaling, skewing and blurring processes required to transform the source image into a shadow - all entirely done on the user's local browser without having to incur network bandwidth to upload and download the images onto the server. The only requirement is that a modern browser like Chrome, Internet Explorer 10, or FireFox must be used.

To run this webapp, go to http://dominoc925-pages.appspot.com/webapp/create_icon_shadow/default.html.

Then simply drag and drop a marker icon image onto the dashed box, or click the button and browse and select the source image.


Monday, August 27, 2012

Javascript example code to create a silhouette of an image using the Canvas

The HTML5 Canvas object can be used to do simple image processing tasks such as blurring, sharpening, darkening etc. provided the proper algorithm is written into the Javascript code. This post will provide an example of turning a transparent image such as the sample image on the right into a silhouette.

The code logic is quite straightforward - draw the image onto the canvas, then read each RGBA pixel from the canvas and set the RGB values to zero while keeping the alpha channel values intact.

The following is just the HTML code for laying out the image and button elements.

<!DOCTYPE html>
<html>
<head>
<title>Create Silhouette from an Image using the Canvas</title>
<script type="text/javascript" src="silhouette.js">
</script>
</head>
<body>
<p>
<img id="sourceImg" src="silhouette01.png" />
<img id="silhouetteImg" src="" />
</p>
<p>
<input type="button" value="Create Silhouette" id="createSilhouetteButton" />
</p>

</body>
</html>

The HTML page is rendered in a browser as shown above. 

The following is the Javascript code that converts the source image into a silhouette when the button is clicked.
window.onload = init;
function init() {
    document.getElementById("createSilhouetteButton").onclick = onButtonClick;
}
function onButtonClick(){
    var canvas = document.createElement("canvas");
    var sourceImg = document.getElementById("sourceImg");
    var silhouetteImg = document.getElementById("silhouetteImg");
    var ctx = canvas.getContext('2d');
    canvas.width = sourceImg.width;
    canvas.height = sourceImg.height;
    ctx.drawImage(sourceImg,0,0);
    var imgData = ctx.getImageData(0,0,canvas.width,canvas.height);
    var pix = imgData.data;
    //convert the image into a silhouette
    for (var i=0, n = pix.length; i < n; i+= 4){
        //set red to 0
        pix[i] = 0;
        //set green to 0
        pix[i+1] = 0;
        //set blue to 0
        pix[i+2] = 0;
        //retain the alpha value
        pix[i+3] = pix[i+3];
    }
    ctx.putImageData(imgData,0,0);
    silhouetteImg.src = canvas.toDataURL();
};

When the button is clicked, this resultant silhouette image is created. 

Monday, August 20, 2012

View LiDAR LAS files with CloudCompare's ccViewer

I found this new open-source software CloudCompare for 3D point cloud and mesh processing, which comes along with a light weight viewer ccViewer. The interesting thing for LiDAR professionals is that the viewer is compiled with support for reading and displaying LiDAR LAS files. The display performance is pretty good even for large LAS files, but that's just about it for the viewer, other than some basic viewing perspectives and basic display coloring. It only has the ability to color the LiDAR points by classification or by elevation. On the other hand, the source code is available and if you have the time and the inclination, you can fork or contribute to the project and make the software work better with LiDAR LAS files.

Running ccViewer
To run the software, simply double click on the ccviewer.exe executable extracted out from the downloaded binaries as shown below. Note the presence of the libLAS.dll in the extracted folder.


This should open up the ccViewer application window.


Now all that is needed to display LiDAR LAS files is to drag and drop the file onto the ccViewer application window.

The following prompt might appear but simply click OK and the LiDAR point cloud will be displayed.


 For more information, visit the project's web site at http://www.danielgm.net/cc/, where the binaries and souce code for the CloudCompare and the ccViewer software can be downloaded.