- Open up gvSIG OADE and display a polygon layer e.g. States.shp.

- In the legend, press a mouse right click on the States.shp layer.
A pop up menu appears. - Choose Properties.
The Layer properties dialog box appears.
- Select the Symbology tab.

- Expand the Categories tree node. Choose Unique values.
- In the Classification field, choose the field to style with e.g. STATE_NAME.
- In the Color ramp field, choose a suitable color table.
- Click Add All.
The colors are assigned to each unique field value.
- Click OK.
The thematic map is generated.

About Geospatial Applications, FME, Visual Studio, gvSIG, Global Mapper, Programming, LiDAR, GIS, Google Maps, SAGA GIS, Android, QGIS
Monday, September 26, 2011
Create a thematic map with gvSIG
Creating thematic maps based on one or more attribute fields of a geographical feature is a fairly typical GIS task. The free and open source software gvSIG has the tools to quickly generate a thematic map of a geographical layer. The example below shows the procedure to color the thematic map according to unique attribute field values.


Monday, September 19, 2011
Convert local date time to GPS week, seconds of week Google Gadget

Note: A WebApp version of this Google Gadget is available at https://dominoc925-pages.appspot.com/webapp/calc_timegps/
This Google Gadget calculator can convert the local date time values into the equivalent GPS week and seconds of week format. The GPS leap seconds from 1980 till 2012 are taken into account in the conversion now. This came about since I found that in some situations, I need to find out the equivalent GPS week and seconds of week for a given local date time. So I wrote this gadget to do the job.
To use this calculator,
- Simply select your time zone.
- Then type in the local date time.
Note: The time should be entered in 24HR form. It is not necessary to fill in all local date time fields - the calculator will use zero values in place of blank fields. - Then click the Convert to GPS time button.
If the keyed in local date time values do not represent a valid date time string, then the calculator will simply display an error 'Invalid date time' message. Otherwise, the GPS week and seconds of week values will be shown in the GPS Time field.
Monday, September 12, 2011
Passing structures between C# and C/C++
Data structures can be passed between managed C# code and unmanaged C/C++ dynamic link libraries but it can be a little complicated. The trick is to define structures that match between the two different languages; and perhaps write wrapper functions that hide away the complexity of the memory marshaling code. I will show a couple of simple examples of passing a system time data structure from C/C++ to C# and vice versa here.
The C/C++ definition of the system time structure is as follows:
The matching C# equivalent of the system time structure can be defined as shown below.
Example 1: Passing a structure from C/C++ to C#
If the C/C++ function has the following signature:
Then the following wrapper functions can be used to call the C/C++ function.
To use the wrapper functions, simply do something like the following:
Example 2: Passing a structure from C# to C/C++
If the C/C++ function has the following signature,
Then the following wrapper functions can be used to call the C/C++ function.
Do the following to call the wrapper functions.
The C/C++ definition of the system time structure is as follows:
typedef struct _SYSTEMTIME {
WORD wYear;
WORD wMonth;
WORD wDayOfWeek;
WORD wDay;
WORD wHour;
WORD wMinute;
WORD wSecond;
WORD wMilliseconds;
} SYSTEMTIME, *PSYSTEMTIME, *LPSYSTEMTIME;
The matching C# equivalent of the system time structure can be defined as shown below.
private struct SYSTEMTIME
{
public UInt16 wYear;
public UInt16 wMonth;
public UInt16 wDayOfWeek;
public UInt16 wDay;
public UInt16 wHour;
public UInt16 wMinute;
public UInt16 wSecond;
public UInt16 wMilliseconds;
}
Example 1: Passing a structure from C/C++ to C#
If the C/C++ function has the following signature:
HRESULT GetDateTime( HANDLE hClient, SYSTEMTIME* pSysTime );
Then the following wrapper functions can be used to call the C/C++ function.
[DllImport("MyDynamicLinkLib.dll")]
private static extern int GetDateTime(IntPtr hClient, IntPtr pSysTime);
public static int GetDateTime(IntPtr hClient, out DateTime sysTime)
{
int hr = 0;
IntPtr pSysTime = IntPtr.Zero;
SYSTEMTIME theTime = new SYSTEMTIME();
sysTime = new DateTime();
pSysTime = Marshal.AllocHGlobal( Marshal.SizeOf(theTime));
hr = GetDateTime(hClient, pSysTime);
theTime = (SYSTEMTIME) Marshal.PtrToStructure(pSysTime, typeof(SYSTEMTIME));
Marshal.FreeHGlobal(pSysTime);
sysTime = new DateTime(theTime.wYear, theTime.wMonth, theTime.wDay, theTime.wHour, theTime.wMinute, theTime.wSecond, theTime.wMilliseconds);
return hr;
}
To use the wrapper functions, simply do something like the following:
IntPtr hClient = IntPtr.Zero;
DateTime dt = new DateTime();
int ret = GetDateTime( hClient, out dt);
Example 2: Passing a structure from C# to C/C++
If the C/C++ function has the following signature,
HRESULT SetDateTime( HANDLE hClient, SYSTEMTIME* pSysTime );
Then the following wrapper functions can be used to call the C/C++ function.
[DllImport("MyDynamicLinkLib.dll")]
private static extern int SetDateTime(IntPtr hClient, IntPtr pSysTime);
public static int SetDateTime(IntPtr hClient, DateTime sysTime)
{
int hr = 0;
IntPtr pSysTime = IntPtr.Zero;
SYSTEMTIME theTime = new SYSTEMTIME();
theTime.wYear = (ushort) sysTime.Year;
theTime.wMonth = (ushort) sysTime.Month;
theTime.wDay = (ushort) sysTime.Day;
theTime.wDayOfWeek = (ushort) sysTime.DayOfWeek;
theTime.wHour = (ushort) sysTime.Hour;
theTime.wMinute = (ushort) sysTime.Minute;
theTime.wSecond = (ushort) sysTime.Second;
theTime.wMilliseconds = (ushort) sysTime.Millisecond;
pSysTime = Marshal.AllocHGlobal(Marshal.SizeOf(theTime));
hr = SetDateTime(hClient, pSysTime);
Marshal.FreeHGlobal(pSysTime);
return hr;
}
Do the following to call the wrapper functions.
DateTime dt = new DateTime();
int hr = SetDateTime(hClient, dt);
Monday, September 5, 2011
Google Maps tool for creating air photo frames
In aerial digital photography, the area captured by the camera is dependent on a number of factors including the camera lens and sensor dimensions, the flying speed and height, and the capture interval. For instance, if the capture interval is too slow and the aircraft is flying too fast, the amount of overlap between photo frames could be less and there could be gaps in coverage. The pixel ground resolution is also a consideration. With this tool , it is possible to estimate the coverage, overlap, resolution, given certain input parameters prior to the actual survey mission.
This Google Maps based tool was written partly based on some information about calculating camera field of views from this site http://www.bobatkins.com/photography/technical/field_of_view.html. The tool also use geodetic functions by Chris Veness from www.movable-type.co.uk/scripts/latlong.html.
The command makes a few assumptions:
To use this tool,
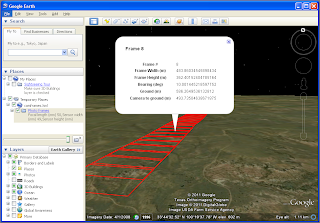
An example of the file in Google Earth is displayed in the screen shot below.
This Google Maps based tool was written partly based on some information about calculating camera field of views from this site http://www.bobatkins.com/photography/technical/field_of_view.html. The tool also use geodetic functions by Chris Veness from www.movable-type.co.uk/scripts/latlong.html.
The command makes a few assumptions:
- The camera sensor is a full frame sensor
- There is no lens distortion
- The ground elevation is flat and is based on the elevation at the center of the frame
- The earth is a perfect spheroid
- There is no roll and pitch.
To use this tool,
- Click this link http://dominoc925-pages.appspot.com/mapplets/camframes.html.
- Fill in the camera focal length e.g. 50.
- Fill in the camera sensor width e.g. 59.
- Fill in the camera sensor height e.g. 36.7.
- Fill in the camera sensor horizontal pixel dimensions e.g. 8176.
- Fill in the camera sensor vertical pixel dimensions e.g. 6132.
- Enter the aircraft altitude e.g. 1080.
- Enter the initial latitude and longitude position of the aircraft, e.g. 33.7232 and -100.3347.
- Set the capture interval e.g. 6.
- Enter the aircraft speed e.g. 33
- Enter the aircraft bearing e.g. 10
- Enter the number of frames to create e.g. 10.
- Click the Create button.
The frames are created.

An example of the file in Google Earth is displayed in the screen shot below.

Monday, August 29, 2011
Listing the exported function names in a C/C++ dll
I found myself working with some low level C/C++ API for some software to hardware interfaces. This can involve quite a bit of work figuring out function names, pointers, addresses and memory handling. Sometimes the function names in the documentation do not correlate with the DLL. To help list the exported functions in the DLL, I found the dumpbin utility from the Microsoft Visual Studio IDE to be quite useful in helping me to write C# wrappers for the C/C++ dynamic link libraries.
An example usage is shown below.

An example usage is shown below.
- Simply open up the Microsoft Visual Studio Command Prompt Window.
- Then type the following in the Command Window, where shapelib.dll should be replaced with the name of your DLL you want to read:C:\> dumpbin /exports shapelib.dll

Monday, August 22, 2011
Export ground points from a LAS file to ASCII CSV file using FME
This is one of the typical LiDAR file conversion task - converting a LAS (*.las) file to an ASCII XYZ or CSV (*.csv) file. It can be done with any number of free and commercial software. It is a simple matter to define a workspace using the FME Workbench from SAFE to do the job. Here are the steps that I used to export out only ground points from a LAS file into an output ASCII CSV file.
- Start the FME Workbench. Create a blank workspace.
- Select Readers | Add Reader. In the Format field, choose ASPRS Lidar Data Exchance Format (LAS). Choose a dataset e.g. C:\data\lub_tile1.las. Click OK.

- Select Writers | Add Writer. In the Format field, choose Comma Separated Value (CSV). Choose an output dataset e.g. C:\Temp\.

- Click Parameters. If necessary, change the extension from the default csv. Choose another Separator Character if comma is not wanted. Click OK.

- Click OK again.
The prompt appears.
- Click Yes.
The Feature Type Properties dialog box appears.
- In the Feature Type Name field, type in the output CSV file name e.g. outascii.
- Click the User Attributes tab. Define number attributes for the X,Y,Z values as shown below. Click OK.

- From the Transformer Gallery, drag and drop the PointCloudCoercer, CoordinateExtractor, and Tester transformers onto the workspace.
- Connect up the source, transformers and destination as shown below.

- Open the PointCloudCoercer Parameters. Change the Output Geometry to Point. Click the Point Components to Preserve button and select all. Click OK.

- Open the Tester Parameters. Define a Test Clause as shown below to allow only ground points (class=2). Click OK.

- Run the translation.
The output ASCII CSV file is created.


Monday, August 15, 2011
Finding the Intergraph Host ID string for license generation
In order to generate licenses for Intergraph GeoMedia products, a host id may be required as input to the license generation process. Whenever GeoMedia could not obtain a valid license, it will pop up the screen shown below.

Previously, the Host ID field contains only a 12 characters hexadecimal string e.g. 08002711d817, which is the actual host id string that can be copied and use to generate the software license. But recently, Intergraph changed the string to include additional hexadecimal characters but still labelled the entire string as the Host ID, which is confusing to users.
To get around this confusion, simply copy the first 12 characters from the entire string to use as the Host ID string, when you are prompted for it during the license generation process, as shown in the screen shots below.


Previously, the Host ID field contains only a 12 characters hexadecimal string e.g. 08002711d817, which is the actual host id string that can be copied and use to generate the software license. But recently, Intergraph changed the string to include additional hexadecimal characters but still labelled the entire string as the Host ID, which is confusing to users.
To get around this confusion, simply copy the first 12 characters from the entire string to use as the Host ID string, when you are prompted for it during the license generation process, as shown in the screen shots below.


Subscribe to:
Posts (Atom)
