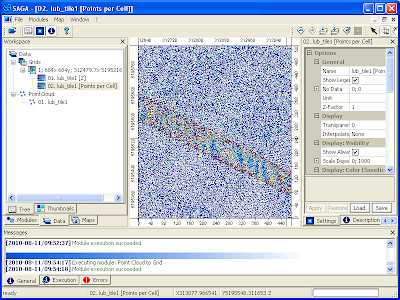
The steps to create the point density map are described below.
Import LiDAR LAS file
- Start up SAGA GIS.
- Select Modules | File | Shapes | Import | Import LAS Files.
The Import LAS Files dialog box appears. - Click the Input File row. Click the [...] button on the right.
The Open dialog box appears. - Browse and select a LAS file, e.g. lub_tile1.las. Click Open.
The selected file name is displayed in the Import LAS Files dialog box.
- If necessary to filter the LiDAR points by attributes, toggle on any Attributes to import besides x,y,z ... e.g. classification. Click Okay.
The LAS file is imported into SAGA GIS.
Note: click the Data tab of the Workspace pane to see the imported point cloud in the Data tree.
Use Convert Point Cloud to Grid Module to generate the Points Per Cell grid
- Select Modules | Shapes | Point Clouds | Conversion | Point Cloud to Grid.
The Point Cloud to Grid dialog box appears. - Click the Points row drop down list and select the previously import LAS file, e.g. 01.lub_tile1.
- In the Cellsize field, type in the desired output grid cell size e.g. 1.

- Click Okay.
The conversion has created two grid layers containing Z as well as Points per Cell values.
Each cell in the Points per Cell grid layer contains the number of LiDAR points in that cell. If the cell size you chose was 1 meter, then the cell value is directly the point density per square meter and you don't have to do any further grid calculation to get the final value. If you want to calculate the point density per classification, then prior to running the Point Cloud to Grid module, you have to filter out the Point Cloud first.
Display the Points per Cell grid layer
- In the Data tree, right click on the Points per Cell grid layer created previously, e.g. 02.lub_tile1[Points per Cell].
A pop up menu appears. - Choose Show Grid.
The grid layer is displayed. - On the right pane, click the Legend tab.
The legend of the point density is displayed.
Note: the blues have the lowest density (less than 1.2 points per square meter) while the reds have the highest density (more than 5.2 points per square meter).

1 comment:
Hi,
is possible with saga gis classify lidar data for data not classified?
thx
Post a Comment