
Start the Transformation command
- Run gvSIG OADE 2010. Load and display a raster file.

- In the toolbar, locate the Geographic transformation icon as shown below.

- Then locate and click the Transformation icon as shown below.

The Transformation dialog box appears.
Note: the raster layer can be transformed either by changing the values in the Transformation dialog box or by graphically adjusting the image in the map view. - In the Transformation dialog box, click the Center raster layer in view icon.
The raster layer is scaled, moved and centered in the map view.
Moving the raster image
- In the map view. move the cursor to the middle of the raster image.
The cursor becomes a hand. - Press down the mouse left button and drag the image.
The raster image is moved to another location.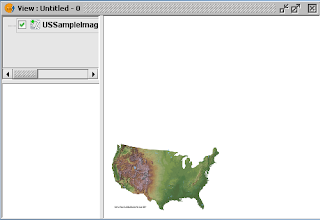
Skew the image in the Y-axis direction
- Move the cursor to the vertical sides of the raster image.
The cursor changes to an arrow with a Y label. - Press down the left mouse button and drag the image along the Y axis.
The image is skewed in the Y-axis direction.
Skew the raster image in the X-axis direction
- Move the cursor to the horizontal sides of the raster image.
The cursor changes to an arrow with the label X. - Press down the left mouse button and drag the image in the X-axis direction.
The raster image becomes skewed in the X-axis direction.
Rotate the raster image
- Move the cursor to any corners of the raster image.
The cursor changes to a rounded arrow. - Press down the left mouse button and drag the image around the corner.
The raster image is rotated.
Resize the raster image
- Move the cursor along the sides and corners of the raster image.
The cursor changes to a two-headed arrow. - Press down the left mouse button and drag the image inwards or outwards.
The raster image is resized.
Save the transformation
- In the Transformation dialog box, click the Save transformation icon.
The message appears.
- Click Yes.
The adjustments are saved.

No comments:
Post a Comment