Showing posts with label Android SDK. Show all posts

Monday, November 15, 2021

Android Studio: Fixing the warning "flatDir should be avoided"

After upgrading my gradle plugin to version 7, I encountered this warning message "Using flatDir should be avoided because it doesn't support any meta-data format".

As shown in the screenshot below, I have the word flatDir under the repositories keyword inside my Android app's build.gradle file.


This flatDir is used to point to the location of my local Android library file(s), named inside the build.gradle's dependencies section - shown below.

To fix the warning, all I needed to do was to do the following:

  1. Remove the flatDir part from the build.gradle file's repositories section. 
  2. Inside the build.gradle's dependencies section, replace the local Android library name implementation with the following relative path to the local library file name with extension :

    implementation files ( 'libs/my-local-library.aar')

    An example is shown below.


Monday, October 28, 2019

Android Studio: resolving duplicate AndroidX and support classes errors

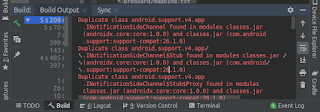
While migrating an Android project from the support libraries to use the AndroidX libraries, I encountered the following errors regarding "duplicate class android.support.v4.app xxxx found in modules classes.jar (androidx.core:core:1.0.0) and classes.jar (com.android.support:support-compat:26.1.0)"; even though all the Java/Kotlin/XML source code files have been replaced with the AndroidX versions and the old support libraries have been removed from the app's build.gradle file.

The screenshot below illustrates the error.


The solution I found was to set project wide gradle properties.
  1. In Android Studio, open up the project's gradle.properties file.
  2. Insert the following two lines:

    android.enableJetifier=true
    android.useAndroidX=true


  3. Save the file, select Build | Clean Project. Then select recompile again.

    The duplicate classes error messages no longer appear.|

Monday, May 2, 2016

Use Android Studio's Image Asset to conveniently create Android action bar menu icons from Clipart symbols

I found Android Studio's Asset Studio to be a great help in creating standard Android drawable action bar and tab menu icons e.g. Share, Search, etc . Previously, I had to search for the standard icons under the Android platform sources and manually copy them into my Android project; which is a pain as there are multiple copies of the same icon for different resolutions. The Asset Studio will create the same icon at different resolutions for you in your project from a pre-defined clip art library. The following steps illustrate how easy it is.

  1. In Android Studio, open up a project e.g. MyApplication. Mouse right click on the project's drawable folder.

    A pop up menu appears.

  2. Choose New | Image Asset.

    The Asset Studio appears.

  3. In the Asset Type field, choose Action Bar and Tab Icons. Toggle on Clipart.


  4. Click Choose.

    Clip art symbols appear.
  5. Click on a symbol.

    The chosen symbol is displayed in the Preview column at different resolutions.

  6.  In the Resource name field, type in the desired name, e.g. ic_action_exclamation.
  7. Click Next.


  8. Click Finish.

    The drawable icons are created
    .


Wednesday, January 21, 2015

How to mirror or project an Android device screen to a Mac

I wanted to be able to project the screen of an Android handset on to a Macbook to demo an app to an audience. I found a post for a Windows PC on this site http://dmzilla.com/2014/07/21/how-to-display-or-mirror-an-android-device-screen-on-pc-no-root/ but not for a Mac. The post describes downloading and using the Android SDK platform tools along with a Jar file to do the projection to a PC. I thought that the same Jar file could be used on a Mac so I tried out the idea, and it turned out to be functional. So here are the steps to get it to work on a Mac. I am assuming that the following has been done:

  • The Java SE Runtime Environment (JRE) has been installed
  • The Android SDK has been installed to a folder on the Mac e.g. /home/users/admin/Application/sdk/


  1. Download the Jar file http://dmzilla.com/files/display-android-on-windows-pc/%5bDMZilla%5d-Android-Screen-Monitor-(ASM).jar. Put the Jar file to the same location as the Android SDK's adb executable e.g. /home/users/admin/Application/sdk/platform-tools/.

    Note: the actual souce code is available on https://code.google.com/p/android-screen-monitor/
  2. Connect an Android device to the Mac. If necessary, enable USB debugging on the device.
  3. Open up a Terminal.

  4. In the Terminal, type in the cd command to change to the location of the Jar file.

    $ cd /home/users/admin/Application/sdk/platform-tools
  5. Set the Path environment variable to include the Android SDK's platform-tools folder. In the Terminal, type in the export command.

    $ export PATH=$PATH:/home/users/admin/Application/sdk/platform-tools
  6. In the Terminal, run the Jar file.

    $ java -jar \[DMZilla\]-Android-Screen-Monitor-\(ASM\).jar
    The Select a Android Device prompt appears.
  7. In the Select a Android Device prompt, click the device label. Click OK.

    The Android Screen Monitor displays the screen contents of the Android device.
  8. Now on the Android device, run any app you want to present and project to the Mac screen.


Monday, January 5, 2015

Enabling ProGuard obfuscation in Android Studio

In Android Studio, it is possible to use ProGuard to minify and obfuscate the Java source code from decompilation. The settings are different from the Eclipse ADT as Android Studio uses the Gradle build system. But still as straightforward provide you know where and what to change. At the minimum, you only need to enable ProGuard but sometimes it may be necessary to define classes that you do not want ProGuard to obfuscate - this can be done in a ProGuard rules file. The following steps illustrate these two tasks.

Enable ProGuard

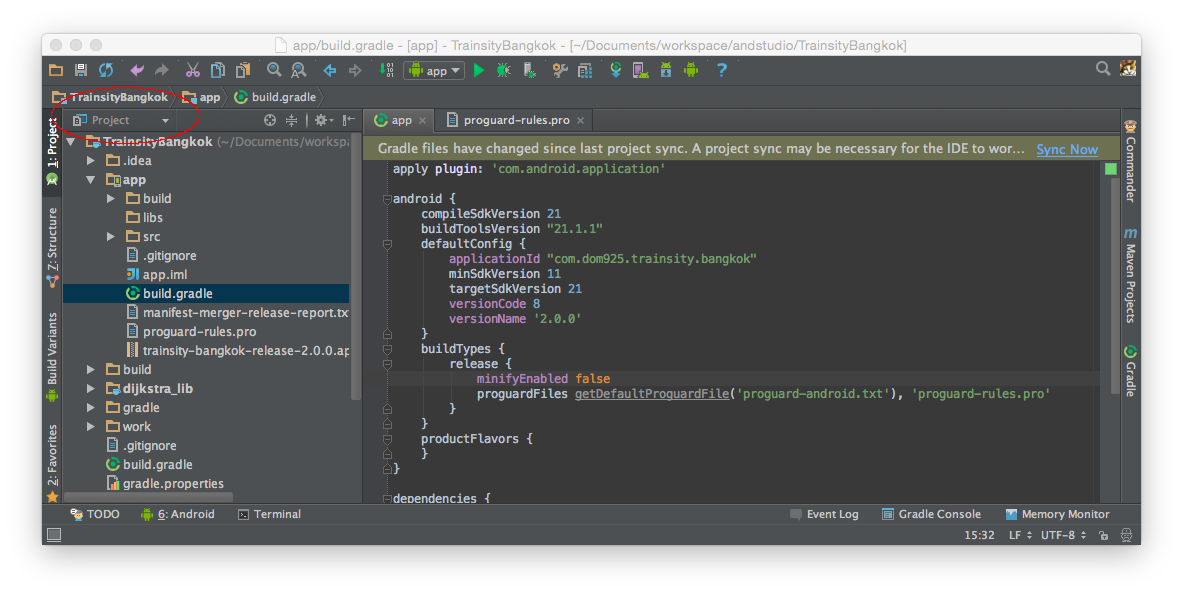
  1.  In Android Studio, open up an Android project.
  2. Change to Project View.


  3. Edit the app's build.gradle file.

    Note: make sure the correct build.gradle file is edited. Typically, it is [Android project]/app/build.gradle.
  4. Change the following line:

    minifyEnable false

    to

    minifyEnable true
Set ProGuard Rules(optional)
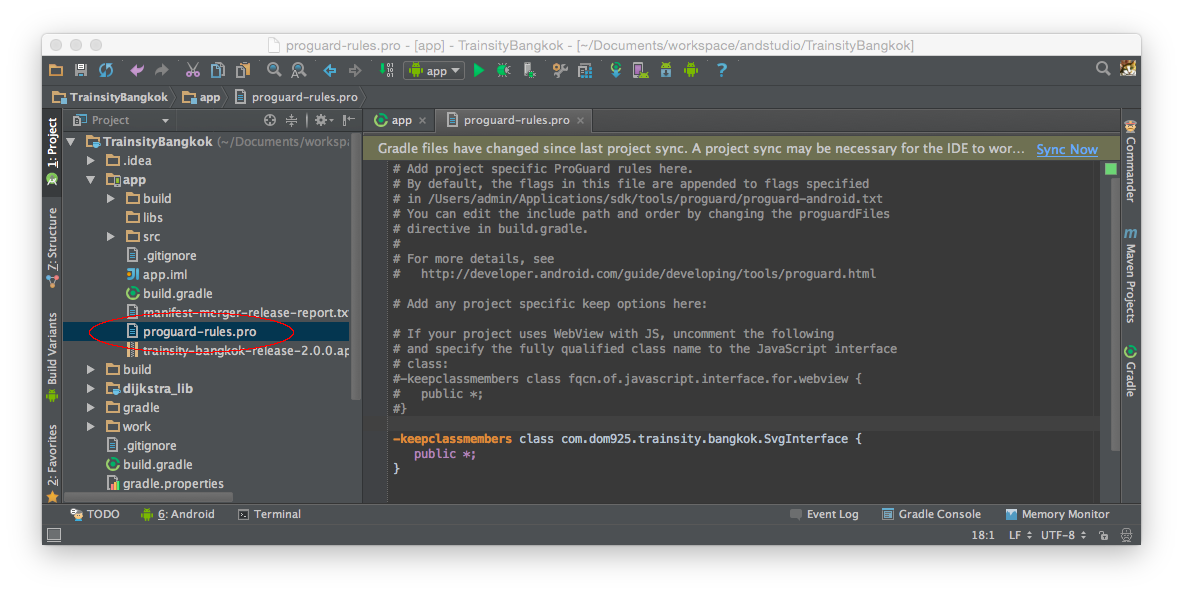
  1. In Project View, select the proguard-rules.pro file.

    Note: Typically it is [Android project]/app/proguard-rules.pro.


  2. Add in the following lines to tell ProGuard not to obfuscate certain classes. 

-keepclassmembers class com.dom925.xxxx {
   public *;
}


Now when a release build is generated using Android Studio, the app will be obfuscated. 

Monday, May 5, 2014

How to enable MultiWindow support for Android Apps on Samsung devices

Some Samsung devices such as the Note range of handsets can display two apps at the same time in two windows. Samsung calls this two window feature as MultiWindow and supported apps are activated from Samsung's Traybar, a vertical or horizontal strip launcher on the sides of the screen. Tweaking your Android app so that it can run in MultiWindow mode is very easy - just add some meta data tags in the AndroidManifest.xml file as shown in the example below. Then recompile the app.

<?xml version="1.0" encoding="utf-8"?>
<manifest xmlns:android="http://schemas.android.com/apk/res/android"
package="com.dom925.trainsity.kualalumpur"
android:installLocation="auto"
android:versionCode="3"
android:versionName="1.0.2" >
<uses-permission android:name="android.permission.INTERNET" />"
<uses-permission android:name="android.permission.ACCESS_NETWORK_STATE" />

<uses-sdk
android:minSdkVersion="11"
android:targetSdkVersion="19" />
 
<application
android:name="com.dom925.trainsity.kualalumpur.App"
android:allowBackup="true"
android:icon="@drawable/ic_launcher"
android:label="@string/app_name"
android:theme="@style/AppTheme" >
<activity
android:name="com.dom925.trainsity.kualalumpur.MapListActivity"
android:label="@string/app_name" >
<intent-filter>
<action android:name="android.intent.action.MAIN" />
<category android:name="android.intent.category.LAUNCHER" />
<!-- add this category tag here -->
<category android:name="android.intent.category.MULTIWINDOW_LAUNCHER" />
</intent-filter>
</activity>
<!-- some stuff deleted here for clarity -->
<!-- add the following meta-data tags here -->
<meta-data 
android:name="com.samsung.android.sdk.multiwindow.enable" 
android:value="true" />
<meta-data 
android:name="android.intent.category.MULTIWINDOW_LAUNCHER" 
android:value="true" />
<meta-data 
android:name="com.sec.android.intent.category.MULTIWINDOW_LAUNCHER" 
android:value="true" />"
</application>
 
</manifest>
An app that supports MultiWindow will be visible in the Traybar launcher. Simply drag out the app from the Traybar launcher. The screenshot below shows a Note device running a Chrome browser and a metro app in MultiWindow mode.

Monday, April 7, 2014

Enable the Nexus 7 to be recognized by the Android Development Toolkit ADT

After connecting a Nexus 7 running stock Android Jelly Bean 4.2.2 to a Windows 7 computer, I assumed that the Android Development Toolkit's ADB utility would be able to detect the connected Nexus 7 device. But it wasn't so. I learned later that the Developer's Options on the Nexus 7 is not enabled by default. It needs to be exposed first.

The following steps show how to expose the Developer's Options.

  1. On the Nexus 7, open up the Settings screen. Expand About Tablet.

    Information about the tablet appears.
  2. Touch the Build Number several times.

    The message "Congratulations, you are a developer" or something similar appear.
  3. Close and reopen the Settings screen.

    The setting {} Developer options should be displayed.
  4. Touch the Developer options.
  5. Toggle on USB debugging.

    The Nexus 7 should be recognized by the ADB.

Monday, March 10, 2014

Handling the Android compilation error "Unable to execute dex: Multiple dex files define" in Eclipse

I have spent a lot of time trying to get an Android project using the Google Play Services and the Google Maps Android Utility libraries to compile successfully. A typical error message is shown in the screenshot below.

Eclipse was complaining about multiple dex files; eventually I found out that I was exporting out multiple jar files with the same classes and I had to toggle off the duplicate jar files in Eclipse. The following steps ensure that my project could compile successfully with the two libraries.

Add the Google Play Services and Google Maps Android Utility libraries

  1. In Eclipse, select the Android project in the Package Explorer. Right click and choose Properties.

    The Properties for xxx project appears.
  2. Choose Android. Click Add.

    The Project Selection dialog appears.

  3. Choose Google Play Services library. Click OK.

    The library is added.
  4. Repeat steps 2 and 3 to add the Google Maps Android Utility library.

    The library is added.
Check for Duplicate JARs
  1. Click Java Build Path.

    The Java Build Path page appears.
  2. Click the Libraries tab.


  3. In the JARS and class folders tree, expand the top level nodes.
  4. Make a note of any duplicate JAR files.

    Note: In this example, the android-support-v4.jar is duplicated. There is a copy in my Android project and there is another copy in the Google Maps Android Utility library.

  5. Click the Order and Export tab.


  6. Toggle off one the items that contain the duplicate JAR files e.g. the android-support-v4.jar file in my Android project.
  7. Click OK.

    The Properties for XXXX project is closed.

  8. If necessary, select Project | Clean to clean up the previous compilation temporary files and compile/run the project again.

    The project should now compile successfully.

Monday, September 2, 2013

Connecting HP Touchpad to the Android ADB on Windows 7

If the Android SDK Android Debug Bridge (ADB) does not recognize the HP Touchpad tablet installed with Android 4.2 Jelly Bean, then the ADB driver for the Touchpad has to be installed onto the Windows 7 operating system. But before the driver can be installed, it is necessary to determine the USB Hardware ID for the Touchpad. Then the ID must be added to the SDK's USB configuration file.

Determine the Hardware IDs

  1. On Windows 7, open up the Device Manager. Right click on My Computer, then choose Properties and finally Device Manager.


  2. Right click on the *tenderloin* name under the Other devices node.  Choose Properties.

    The Properties dialog appears.

  3. Click the Details tab. Choose Hardware Ids from the Property combo box.


  4. Note down or copy the two IDs.

    USB\VID_0BB4&PID_6860&REV_0227&MI_01
    USB\VID_0BB4&PID_6860&MI_01


  5. Close the Properties dialog.
Add the Hardware Ids to the SDK's USB driver configuration file
  1.  Use a text editor to open up the SDK file android_winusb.inf. This is located under the [Android SDK]\extras\google\usb_driver\ folder.
  2. Locate the section titled [Google.NTx86]. Add in the hardware IDs determined previously under that section.

    ; HP Touchpad
    %SingleAdbInterface% = USB_Install, USB\VID_0BB4&PID_6860&REV_0227&MI_01
    %CompositeAdbInterface% = USB_Install, USB\VID_0BB4&PID_6860&MI_01


  3. Locate the section [Google.NTamd64] and type in the same hardware IDs as the previous step.
  4. Save and close the text editor.
Install the driver
  1. In the Device Manager, right click on the *tenderloin* name under the Other Devices node. Choose Update Driver Software.

    The Update Driver Software dialog appears.

  2. Choose Browse my computer. Click Next.
  3. Click Browse. Choose the folder [Android SDK]\extras\google\usb_driver\. Click Next.

    The driver should be installed. If not, then you can try to choose from the list of drivers instead.

  4. Choose Let me pick from a list of device drivers.

    The Update Driver Software dialog appears.

  5. Choose Android Device. Click Next.


  6. Choose Android ADB Interface. Click Next.

    The driver is installed.

  7. To verify, open the Device Manager.

    The Android Device node shows the Android ADB Interface child node.


    The ADB devices command can now detect the connected HP Touchpad device, as shown below.