In order to build 64 bit Windows binaries of liblas, the header files and 64 bit binaries for Boost must be accessible by Microsoft Visual Studio. The CMake utility from http://www.cmake.org needs to be used to configure and generate the Microsoft Visual Studio project files for liblas. The following illustrates how I build the liblas 64 bit binaries with GDAL and GeoTIFF support. Note that the 64-bit executables may not run successfully even though the compilation is successful depending on how the source code was written.
- Download the latest liblas source code from http://www.liblas.org/download.html. Extract the files to a folder e.g. E:\Work\src\liblas-1.7.0\.
- On the Windows Desktop, select Start | All Programs | CMake 2.8 | CMake (cmake-gui).
The CMake application appears.
- In the Where is the source code field, click Browse Source.
The Browse for Folder dialog box appears.
- Select the folder where the liblas archive was extracted, e.g. E:\Work\src\libLAS-1.7.0\. Click OK.
- In the Where to build the binaries field, click Browse Build.
The Browse for Folder dialog box appears.
- Select or create the folder where the Microsoft Visual Studio solution project files will be created e.g. E:\Work\src\libLAS-1.7.0\bin\. Click OK.

- Click Configure.
A prompt appears.
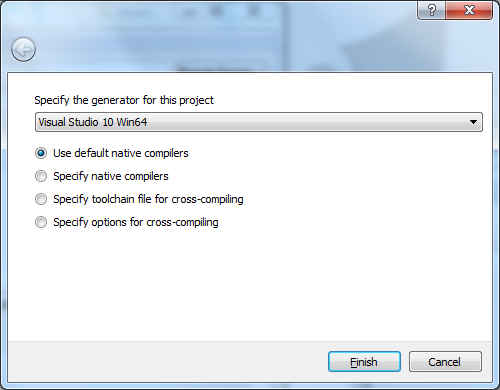
- In the combo box, choose a generator for this project e.g. Visual Studio 10 Win64. Click Finish.
A Error message appears.
- Close the message.

- In the list box, select Boost_INCLUDE_DIR. Then click the browse [...] button.
The Browse For Folder dialog box appears.
- Choose the root folder containing Boost e.g. E:\Work\src\boost_1_52_0\. Click OK.
Note: the boost folder containing the header include files should be underneath the root folder. - Click Configure again.
The configuration files are created.
- Toggle on WITH_GDAL and WITH_GEOTIFF. Click Configure.
An error message appears. - Close the message. Select GDAL_INCLUDE_DIR. Click the browse [...] button.
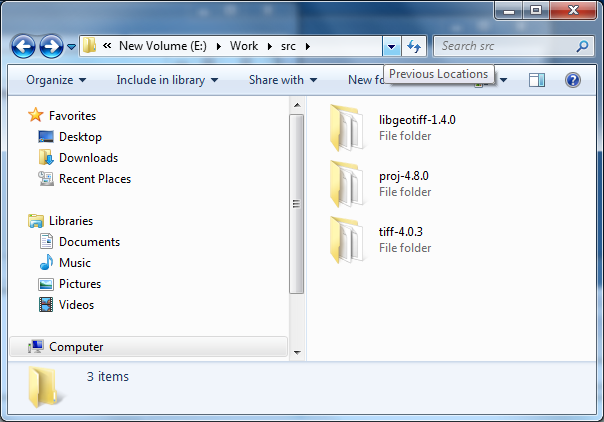
The Browse for Folder dialog box appears. - Select the folder containing the GDAL header include files e.g. E:\Work\src\gdal-1.9.2\gcore\. Click OK.
- Select GDAL_LIBRARY. Click the browse [...] button.
The Select File for GDAL_LIBRARY dialog box appears. - Select the GDAL library e.g. E:\Work\src\gdal-1.9.2\gdal_i.lib. Click Open.
- Click GEOTIFF_INCLUDE_DIR. Click the browse [...] button.
The Browse for Folder dialog box appears. - Select the folder containing the libGeotiff header files e.g. E:\Work\src\libgeotiff-1.4.0\. Click OK.
- Select GEOTIFF_LIBRARY. Click the browse [...] button.
The Select File for GEOTIFF_LIBRARY dialog box appears. - Choose the GEOTIFF library file e.g. E:\Work\src\libgeotiff-1.4.0\geotiff_i.lib. Click Open.
- Click Generate.
An error message appears. - Close the message. Click TIFF_INCLUDE_DIR. Click the browse [...] button.
The Browse for Folder dialog box appears. - Select the folder containing the TIFF header files e.g. E:\Work\src\tiff-4.0.3\libtiff\. Click OK.
- Click TIFF_LIBRARY. Click the browse [...] button.
The Select File for TIFF_LIBRARY dialog box appears. - Select the TIFF library file e.g. E:\Work\src\tiff-4.0.3\libtiff\libtiff_i.lib. Click Open.
- Click Generate.
The Microsoft Visual Studio project files are generated the specified destination build folder.
- Close CMake.
- Run Microsoft Visual Studio 2010. Open up the libLAS.sln file.
- Press F7 to build all the projects.
Note: it might be necessary to add in the paths to the include files if the compiler cannot locate them in the build process.
The 64 bit liblas binaries are generated.