Showing posts with label GPU. Show all posts

Monday, May 11, 2026

Resolving the no external monitor signal error after updating Ubuntu 24.04

After installing system updates on my Ubuntu 24.04 Thinkpad P53 with a NVIDIA T1000 GPU, sometimes my external HDMI monitor will no longer get any display signal from my laptop after rebooting. This happened to me many times over the years; and every time I had to search for the solution to the problem. This could take a while and wasted my time. So for posterity's sake, I am writing this post so that I can refer to it in the future.

If the Ubuntu system updates borks up your external monitor display, you can do the following:

 Check if the NVIDIA drivers are installed correctly

  1. Open up a terminal and type in the following command:

    $ sudo nvidia-smi

  2.  If the above command shows a table as shown below, then your drivers are installed.


  3. If not, then try to find and install the correct NVIDIA driver. 

Finding the correct NVIDIA driver for your system

  1.  In a terminal, type in the following command:

    $ sudo ubuntu-drivers devices

  2. In the following list that appears, take note of the recommended driver, e.g. nvidia-driver-595-open.


 Configure Ubuntu to use the recommended NVIDIA driver 

  1.  Click the Ubuntu icon on the desktop and then choose the Additional drivers icon. 

    The Software & Updates dialog box appears.


  2. In the list of drivers, toggle on the recommended driver, e.g. nvidia-driver-595-open. Then click Apply Changes


  3. Reboot the machine.

 After restarting, the external monitor should be displaying the signal from the laptop.

Monday, March 21, 2022

Setup a Raspberry Pi 4B to publish a webcam with hardware accelerated video encoding

The Raspberry Pi 4B has an integrated video processing unit, a so called GPU. I wanted to use the GPU to offload the video encoding processing from the CPU when I publish my webcam as a RTSP video stream from the Pi board running Ubuntu 20.04 64 bit and using ffmpeg

Download and install rtsp-simple-server

  1. Using a browser, download and extract the open source rtsp-simple-server from https://github.com/aler9/rtsp-simple-server into a folder, e.g. /path/to/rtsp/

    The files rtsp-simple-server and rtsp-simple-server.yml are extracted out.

  2. Open up a Terminal. At the prompt, change directory to the previously created folder /path/to/rtsp/.

    $ cd /path/to/rtsp/

  3. Move the binary to the folder /usr/local/bin/

    $ sudo mv rtsp-simple-server /usr/local/bin/

  4. Move the yml configuration file to the folder /usr/local/etc/

    $ sudo mv rtsp-simple-server.yml /usr/local/etc/

Configure rtsp-simple-server to publish the webcam from ffmpeg

  1.  Open up a Terminal. At the prompt, change directory to the directory /usr/local/etc/.

    $ cd /usr/local/etc

  2. Using a text editor, edit the configuration file rtsp-simple-server.yml. Create a new path name, e.g. cam under the paths key.

    paths:
      cam:
        runOnDemand: ffmpeg -hide_banner -s 1280x720 -r 25 -i /dev/video0 -b:v 2M -c:v h264_v4l2m2m -f rtsp rtsp://localhost:$RTSP_PORT/$RTSP_PATH
        runOnDemandRestart: yes
    

    Notes:
    -s 1280x720 is the source video resolution size from the webcam
    -r 25 is the source sample rate
    -i /dev/video0 is the source webcam video
    -b:v 2M is the output video bit rate
    -c:v h264_v4l2m2m is the video encoder to use


  3. Save and close the configuration file.

 Create and start the rtsp-simple-server service

  1.  Open up a Terminal. Type in the following to create the systemd service.

    sudo tee /etc/systemd/system/rtsp-simple-server.service >/dev/null << EOF
    [Unit]
    After=network.target
    [Service]
    ExecStart=/usr/local/bin/rtsp-simple-server /usr/local/etc/rtsp-simple-server.yml
    [Install]
    WantedBy=multi-user.target
    EOF
    

  2. Enable and start the service by executing the following commands. Or reboot the system.

    $ sudo systemctl enable rtsp-simple-server
    $ sudo systemctl start rtsp-simple-server

Viewing the webcam stream using VLC

  1. If the configuration parameters are correct, then start up VLC on a PC on the network.

    VLC starts up.


  2. Select Media | Open Network Stream.

    The Open Media dialog box appears.


  3. In the URL field, type in the address of the Raspberry Pi e.g. rtsp://192.168.18.5:8554/cam. Then click Play.

    If all the parameters are correct, then VLC should show a stream from the webcam.

    VLC displaying a webcam stream.


    Note: if the video stream looks wrong i.e. greenish and weird as shown above, then the ffmpeg version installed on the Raspberry Pi is an older buggy version 4.2.4 and you need to replace it by downloading the latest ffmpeg and building from source.

Replacing ffmpeg and build from source

  1. Open up a Terminal and remove the system installed ffmpeg with the following command:

    $ sudo apt remove ffmpeg

  2. Using a browser and follow the instructions on https://trac.ffmpeg.org/wiki/CompilationGuide/Ubuntu to install the latest ffmpeg.

  3. Compilation on the Raspberry Pi 4B may take a while, maybe an hour or two so be aware. After compiling successfully, you can try to use VLC and open up the webcam steam again.

    VLC displaying the webcam stream correctly.

Monday, January 24, 2022

How to setup rtsp-simple-server service for publishing from gstreamer using the vaapi encoder

The rtsp-simple-server README instructions on https://github.com/aler9/rtsp-simple-server is a little sparse on publishing as a systemd service using Gstreamer and the vaapi plugin. I spent some time trying to get the service to run properly. This post documents the steps I used on an Intel system board running Ubuntu 20.


Install GStreamer

  1. Optional. If Gstreamer has not been installed, then follow the instructions on https://gstreamer.freedesktop.org/documentation/installing/on-linux.html?gi-language=c.

  2. If the GStreamer VAAPI plugin has not been installed, run the following command in a Terminal:

    $ sudo apt install gstreamer1.0-vaapi

 Download and install rtsp-simple-server

  1. Using a browser, download and extract the rtsp-simple-server binary from the github repo https://github.com/aler9/rtsp-simple-server into a folder, e.g. /path/to/rtsp/

    The files rtsp-simple-server and the rtsp-simple-server.yml are extracted out into the directory /path/to/rtsp/.


  2. Open up a Terminal. At the prompt, change directory to the extracted location.

    $ cd /path/to/rtsp/

  3. Move the binary to the folder /usr/local/bin/

    $ sudo mv rtsp-simple-server /usr/local/bin/

  4. Move the configuration file to the folder /usr/local/etc/

    $ sudo mv rtsp-simple-server.yml /usr/local/etc/

Configure rtsp-simple-server to publish from gstreamer

  1. Open up a Terminal. At the prompt, change directory to the directory /usr/local/etc/.

    $ cd /usr/local/etc/

  2. Using a text editor, edit the configuration file rtsp-simple-server.yml. Create a new path name e.g. mystream under the paths key.

    paths:
        mystream:
            runOnDemand: gst-launch-1.0 v4l2src device=/dev/video0 ! 'video/x-raw,framerate=30/1,width=320,height=240' ! videoconvert ! vaapih264enc ! h264parse ! rtspclientsink location=rtsp://localhost:$RTSP_PORT/$RTSP_PATH
            runOnDemandRestart: yes
    

  3. In the runOnDemand key, type in the Gstreamer pipeline to read from a video source, perform encoding and finally to publish to the rtsp server.

    gst-launch-1.0 v4l2src device=/dev/video0 ! 'video/x-raw,framerate=30/1,width=320,height=240' ! videoconvert ! vaapih264enc bitrate=200000 ! h264parse ! rtspclientsink location=rtsp://localhost:$RTSP_PORT/$RTSP_PATH
    
    Note 1: device points to the video source.
    Note 2: video/x-raw line specifies the video format, frame rate, and resolutions to use
    Note 3: videoconvert converts the color space
    Note 4: vaapih264 performs the video encoding using the Intel GPU
    Note 5: rtspclientsink publishes the video to the rtsp server


  4. Save and close the configuration file.

Create and start the rtsp-simple-server service

  1.  Open up a Terminal. Type in the following to create the systemd service.

    sudo tee /etc/systemd/system/rtsp-simple-server.service >/dev/null << EOF
    [Unit]
    After=network.target
    [Service]
    ExecStart=/usr/local/bin/rtsp-simple-server /usr/local/etc/rtsp-simple-server.yml
    [Install]
    WantedBy=multi-user.target
    EOF


  2. To enable and start the service, run the following:

    $ sudo systemctl enable rtsp-simple-server
    $ sudo systemctl start rtsp-simple-server

Optional. Define LIBVA environment variables

On some boards, when using the vaapi encoding plugin, gstreamer may not run with the error message:

WARNING: erroneous pipeline: no element "vaapih264enc"

In this case, setting the environment variables LIBVA_DRIVERS_PATH and LIBVA_DRIVER_NAME for the service may solve the problem. An example of the command to create the rtsp-simple-server service with the environment variables is shown below:

sudo tee /etc/systemd/system/rtsp-simple-server.service >/dev/null << EOF
[Unit]
After=network.target
[Service]
EnvironmentName="LIBVA_DRIVERS_PATH=/usr/lib/x86_64-linux-gnu/dri/"
EnvironmentName="LIBVA_DRIVER_NAME=i965"
ExecStart=/usr/local/bin/rtsp-simple-server /usr/local/etc/rtsp-simple-server.yml
[Install]
WantedBy=multi-user.target
EOF

Monday, January 17, 2022

gstreamer command to encode videos using an Intel GPU on Ubuntu

An alternative to ffmpeg is the gstreamer library, which comes with optional plug-ins to perform video encoding using Intel GPUs. 

Gstreamer can be installed on Ubuntu by following instructions on  https://gstreamer.freedesktop.org/documentation/installing/on-linux.html?gi-language=c

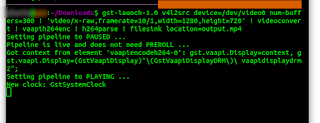
Assuming gstreamer has been installed on Ubuntu, you can run the following command to save the video into an output.mp4 video file.

$ gst-launch-1.0 \
v4l2src device=/dev/video0 num-buffers=300 ! \
'video/x-raw,framerate=10/1,width=1280,height=720' ! \
videoconvert ! \
vaapih264enc ! \
h264parse ! \
filesink location=output.mp4

Note 1: device specifies the video source /dev/video0 and num-buffers specifies the number of frames to read.

Note 2: The line video/x-raw specifies the format, frame rate and resolution to read from the video source.

Note 3: vaapih264enc specifies the Intel Video Accelerated encoder to use.

Note 4: filesink location specifies the output video file.

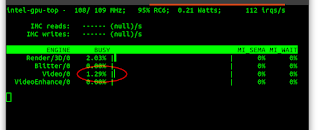
While the gstreamer command is processing the video, in another terminal, run the command to monitor the Intel GPU.

$ sudo intel_gpu_top

As shown above, the printout in red indicates the GPU is being used.

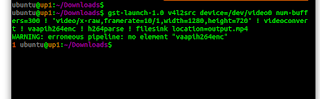
Caution: On some Intel boards I have tested, sometimes running the gstreamer vaapih264enc plugin resulted in the following error message even though the plugin has been installed:

WARNING: erroneous pipeline: no element "vaapih264enc"

In my case, I managed to resolve that error by setting the following environment variables before running the encoding command:

$ export LIBVA_DRIVERS_PATH=/usr/lib/x86_64-linux-gnu/dri/

$ export LIBVA_DRIVER_NAME=i965


Monday, December 27, 2021

ffmpeg command to encode videos using Intel GPU on Ubuntu

Using ffmpeg to encode a video stream, I found the encoding process to use my CPU excessively. I wanted to reduce the CPU usage by transferring the encoding to my built-in Intel GPU. To determine details about the on board Intel GPU driver, you can use the following command on Ubuntu:

$ vainfo


In the example screenshots below, I used the libx264 software encoding option in the ffmpeg command to encode a video stream coming from the device /dev/video0 into an output mpeg file output.mp4:

$ sudo ffmpeg -hide_banner -i /dev/video0 -c:v libx264 output.mp4

While this command is running, the top command shows a high CPU usage.

$ top

After reading through the ffmpeg manual pages and a lot of trials, I found the options to use to enable Intel GPU encoding with the ffmpeg command:

$ sudo ffmpeg -hide_banner -vaapi_device /dev/dri/renderD128 -i /dev/video0 -vf 'format=nv12,hwupload' -c:v h264_vaapi output.mp4


Running the top command shows reduce CPU usage during the encoding process:


Another example with more options is illustrated below: 

$ ffmpeg \
        -vaapi_device /dev/dri/renderD128 \
        -s 1280x720 \
        -i /dev/video0 \
        -vf 'scale=320x240,fps=fps=25,format=nv12,hwupload' \
        -c:v h264_vaapi \
        -b:v 600k \
        output.mp4

ffmpeg will request a video stream of resolution 1280x720 from the source, then scale the frames to 320x240 resolution with a fps of 25. Then it uploads the video data to the Intel GPU for encoding before writing it out with a video bitrate of 600k to the output.mp4 file.