- Click Start | All Programs | LibreOffice 4.0 | LibreOffice.
LibreOffice appears.
- Click Text Document.
A blank Writer document appears.
- Press F4.
The Data Source pane appears.
- Expand the database nodes until the desired table e.g. biblio, is visible.

- Drag and drop the table onto the blank document.
The Insert Database Columns dialog box appears.
- Toggle on Text.
- Select a Database column to export, e.g. Booktitle. Then click >. Repeat for additional columns, e.g. Author and Publisher.
- Edit the format string to include a comma or any other delimiter between the columns.

- Click OK.
The table data is placed on the document.
- Select File | Save As.
The Save As dialog box appears.
- Type in a file name e.g. mycsvfile. Choose the type as Text. Click Save.
The CSV file is created.

About Geospatial Applications, FME, Visual Studio, gvSIG, Global Mapper, Programming, LiDAR, GIS, Google Maps, SAGA GIS, Android, QGIS
Showing posts with label Microsoft Access. Show all posts
Showing posts with label Microsoft Access. Show all posts
Monday, May 13, 2013
Export a LibreOffice Base table as a CSV file
Previously I use Microsoft Access to manipulate and export out table data as comma separated values (CSV) files. I decided to use LibreOffice Base to do the same thing. It wasn't difficult to create CSV files in LibreOffice but the concept is different than Microsoft Office's. In LibreOffice, you have to create the text file document first before dragging the source table into the document. It took me a while to figure this out. The following steps illustrate how to do it.


Monday, January 24, 2011
Import GeoMedia Access Warehouse features into gvSIG
I recently installed and tried out the open source Java GIS application gvSIG OADE version 2010 from Oxford Archaeology along with a free extmdb extension to read features from a GeoMedia Access warehouse from the Google Code project site. I found the process to create a gvSIG project and import GeoMedia features to be relatively straightforward. Maybe the one thing to take note of is that the loaded GeoMedia features are temporary in nature only and must be saved permanently as gvSIG compatible formats e.g. Shape file.
In this example, I am going to import in a feature from the GeoMedia sample warehouse USSampleData.mdb file, which uses the Albers Equal Area coordinate system.
Create a new gvSIG project and assign a coordinate system
In this example, I am going to import in a feature from the GeoMedia sample warehouse USSampleData.mdb file, which uses the Albers Equal Area coordinate system.
Create a new gvSIG project and assign a coordinate system
- Select Start | All Programs | gvSIG OA Digital Edition 2010 | gvSIG OA Digital Edition 2010.
The gvSIG OADE 2010:Untitled application appears.
- In the Project manager window, click View | New.
An Untitled-0 view is created and added to the View list box.
- In the View group box, select Untitled-0. Click Properties.
The View properties dialog box appears.
- Click the Current projection button.
The Spatial Reference System (SRS) dialog box appears.
- Click the Type combo box. Choose a suitable type e.g. ESRI.
- Toggle on By name.

- In the Search criteria field, type in Albers. Click Search.
A list of matching results appear.
- Select USA_Contiguous_Albers_Equal_Area. Click OK.

- Click OK again.
- In the View group box, click Open.
The View:Untitled-0 window is opened.


Import GeoMedia features
- Select View | Add Layer.
The Add Layer dialog box appears.
- Click the MDB tab.

- Click the Search button.
The Open dialog box appears.
- Browse and select a GeoMedia MDB file e.g. C:\Warehouses\USSampleData.mdb. Click Open.
The GeoMedia feature names are displayed in the Feature Classes grid.

- Toggle on the feature(s) to add, e.g. States. Click OK.
Processing messages appear and the selected features are imported.
- Close the message box.
The imported features are displayed in the view.


Export GeoMedia feature(s)
- In the View legend, click the feature name to be exported e.g. States.
- Select Layer | Export To | Shapefile.
The Save dialog box appears.
- Type in the file name e.g. States. Click Save.
Processing messages appear.

- Click Yes.
The exported shapefile is added as a layer to the view.

Remove the GeoMedia warehouse from the view
- In the View legend, mouse right click on the warehouse name e.g. USSampleData.
A pop up menu appears.
- Choose Delete.
A prompt appears.
- Click Yes.
The GeoMedia warehouse is removed from the view.

Save the gvSIG project
- Select File | Save project.
The Save project dialog box appears.
- Type in a file name, e.g. geomedia.gvp. Click Save.
The project is saved.

Monday, July 5, 2010
Bulk update Microsoft Access database with VBA
Sometimes I want to perform a simple bulk update of records in a Microsoft Access database using plain SQL text as shown below.
UPDATE STORES SET BUILDING='EMPIRE STATE BUILDING' WHERE ID=10001;
UPDATE STORES SET BUILDING='BIG BEN' WHERE ID=100560;
UPDATE STORES SET BUILDING='EIFFEL TOWER' WHERE ID=103891;
...etc..
Previously, I wrote a Perl script that uses ODBC to do the job as described in my previous post. However, , I found myself in a situation recently without Perl and the DBI-ODBC module on my working computer. So I decided to explore bulk updating using Microsoft Access's built-in VBA engine. The following describes my method.
Create a public function in a VBA Module
First, create a function that executes the SQL statements in a series or in a loop.
Next, create a Microsoft Access macro to call the previously created public function.
UPDATE STORES SET BUILDING='EMPIRE STATE BUILDING' WHERE ID=10001;
UPDATE STORES SET BUILDING='BIG BEN' WHERE ID=100560;
UPDATE STORES SET BUILDING='EIFFEL TOWER' WHERE ID=103891;
...etc..
Previously, I wrote a Perl script that uses ODBC to do the job as described in my previous post. However, , I found myself in a situation recently without Perl and the DBI-ODBC module on my working computer. So I decided to explore bulk updating using Microsoft Access's built-in VBA engine. The following describes my method.
Create a public function in a VBA Module
First, create a function that executes the SQL statements in a series or in a loop.
- Start up Microsoft Access and open up a database to be updated.
- Press ALT+F11.
The Microsoft Visual Basic editor appears. By default, a new module - Module1 is created.
- In the editor, create a new public function e.g. BulkUpdate by typing in the following VBA code:

- Using any text editor e.g. Notepad, enclose the bulk update SQL statements with double quotes and prefix with the statements with db.Execute as shown below.
db.Execute "UPDATE STORES SET BUILDING='EMPIRE STATE BUILDING' WHERE ID=10001;"db.Execute "UPDATE STORES SET BUILDING='BIG BEN' WHERE ID=100560;"db.Execute "UPDATE STORES SET BUILDING='EIFFEL TOWER' WHERE ID=103891;"...etc.. - In the VBA Editor, copy and paste the bulk update sql text into the public BulkUpdate function.

- Select File | Save.
The Save As dialog box appears.
- Optional. In the Module Name field, type in a name e.g. Module1. Click OK.
The module is saved. - Select File | Exit to close the VBA editor.


Create a Macro
Next, create a Microsoft Access macro to call the previously created public function.
- Click New as shown in the figure below.

The Macros dialog box appears.
- Click the Action drop down list. Choose RunCode.
The Function Name field appears.
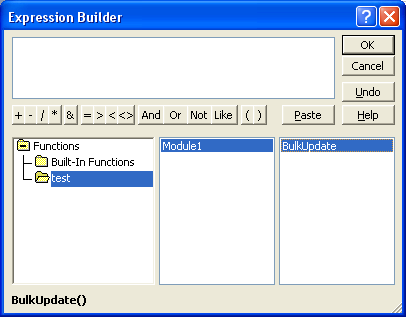
- In the Function Name field, click the Build button.
The Expression Builder dialog box appears.
- Double click Functions.
The available VBA module names appears.
- Choose the current database e.g. test. Choose the previously create module e.g. Module1. Double click the previously created public function e.g. BulkUpdate.
The selected function appears in the expression field.
- Click OK.

- Close the Macro dialog box.
The prompt appears.
- Click Yes.
The Save As dialog box appears.
- Type in a macro name e.g. Macro1. Click OK.
The macro is saved.


Run the bulk update
- In the Database dialog, choose Macros. Choose the previously created macro e.g. Macro1.

- Click Run.
The selected macro executes the BulkUpdate function, which performs the bulk updating of records.

The example VBA code above is quite simple; there is no error handling. If you have the inclination, it can be made more sophisticated to handle errors in the bulk update statements. But for my needs, it was sufficient.
Wednesday, August 27, 2008
Batch Convert Microsoft Access MDB Files
If you have a lot of Microsoft Access database files in older MDB formats, it can get tedious having to open each MDB file individually and selecting Tools > Database Utilities > Convert To Access xxxx. I found out that you can do the conversion in the Windows Command Prompt window by passing in the name and path to the old MDB file, and the new name and path to the new MDB file as arguments to the MSACCESS.EXE executable. An example is shown below:
"C:\Program Files\Microsoft Office\Office\msaccess.exe" "C:\Path\To\yourOldFile.mdb" /convert "C:\Path\To\yourNewFile.mdb"
If you prefer, you can create a DOS batch file or VBSCRIPT and loop through all the MDB files you want to convert.
"C:\Program Files\Microsoft Office\Office\msaccess.exe" "C:\Path\To\yourOldFile.mdb" /convert "C:\Path\To\yourNewFile.mdb"
If you prefer, you can create a DOS batch file or VBSCRIPT and loop through all the MDB files you want to convert.
Wednesday, June 11, 2008
Bulk Update Microsoft Access Database
Introduction
Microsoft Access is one of the easiest to use database application software with a lot of wizards and graphical utilities to guide the users along. For these reasons, I like to use it for prototyping database designs and processing small sets of data. One of the annoyances with Microsoft Access is that the Query tool does not allow me to run bulk SQL statements at one time as shown in the figure below.
This post shows a simple method to perform a bulk update of records in a Microsoft Access database from SQL statements in a text file using Perl and ODBC. I will also provide a link to download the Perl program
Software Prerequisites

Define ODBC Data Source
If you know how to use the ODBC Data Source Administrator to define a data source name, then you can skip this section.
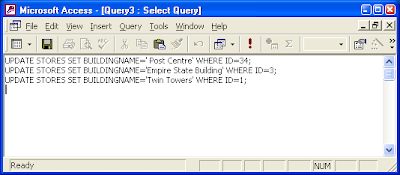
You can use any tool or text editor to create your text file containing the bulk SQL statements. An example file is shown below.
UPDATE STORES SET BUILDINGNAME='Post Centre' WHERE ID=34;
UPDATE STORES SET BUILDINGNAME='Empire State Building' WHERE ID=3;
UPDATE STORES SET BUILDINGNAME='Twin Towers' WHERE ID=1;
Using the BulkSQL Program
Microsoft Access is one of the easiest to use database application software with a lot of wizards and graphical utilities to guide the users along. For these reasons, I like to use it for prototyping database designs and processing small sets of data. One of the annoyances with Microsoft Access is that the Query tool does not allow me to run bulk SQL statements at one time as shown in the figure below.

This post shows a simple method to perform a bulk update of records in a Microsoft Access database from SQL statements in a text file using Perl and ODBC. I will also provide a link to download the Perl program
Software Prerequisites
- Download and install ActiveState Perl.
- Download and install the ODBC Driver for Perl DBI.

Define ODBC Data Source
If you know how to use the ODBC Data Source Administrator to define a data source name, then you can skip this section.
- Select Start > Control Panel.
The Control Panel dialog appears. - Click the following: Performance and Maintenance > Administrative Tools > Data Sources (ODBC).
The ODBC Data Source Administrator appears.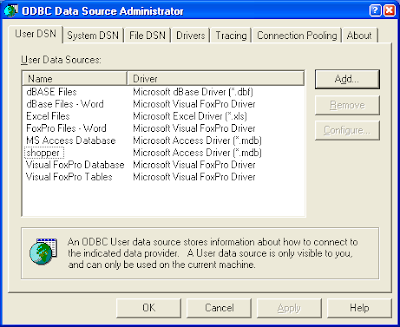
- Click Add.
The Create New Data Source dialog appears.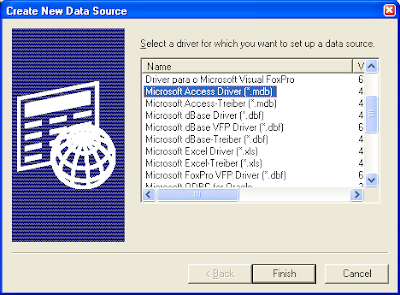
- Choose Microsoft Access Driver (*.mdb) and click Finish.
The ODBC Microsoft Access Setup dialog appears.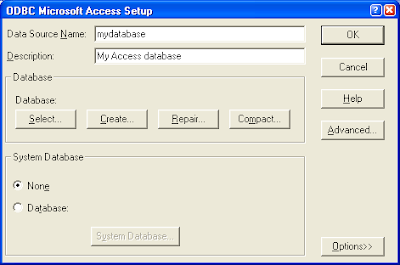
- Type in your Data Source Name and click Select and choose your Microsoft Access database file.
- Click OK to close all the dialog boxes.


You can use any tool or text editor to create your text file containing the bulk SQL statements. An example file is shown below.
UPDATE STORES SET BUILDINGNAME='Post Centre' WHERE ID=34;
UPDATE STORES SET BUILDINGNAME='Empire State Building' WHERE ID=3;
UPDATE STORES SET BUILDINGNAME='Twin Towers' WHERE ID=1;
Using the BulkSQL Program
- Download and the BulkSQL.pl program from this link and uncompress the file into a folder of your choice.
- Open a Command Prompt window.
- At the prompt, type in the following commands to run the program.
Note: Replace mydatabase with the actual name of your ODBC data source name to your Access database file. Replace mybulksql.txt with the actual name of your bulk SQL text file.
C:\> perl bulksql.pl mydatabase mybulksql.txt
A sample run is shown in the figure below.

- The program will print out the number of records affected by a single SQL statement.
- The program will print out the SQL statement if it did not affect any records.
Subscribe to:
Posts (Atom)
