Showing posts with label Oracle VirtualBox. Show all posts

Monday, January 30, 2023

Fixing a kernel panic error when installing Ubuntu 20.04 in VirtualBox

I was trying to create an Ubuntu 20.04 virtual machine using Oracle VirtualBox but I kept encountering this error with the message "...end kernel panic - not syncing: Attempted to kill the idle task!..." The screenshot below shows the error in VirtualBox.

Eventually, I found out the error was caused by inadequate alllocated CPU resources in VirtualBox. By default, the number of CPU allocated for the VM is 1, as shown in the screen shot below.

Simply increasing the number of CPU to at least 2 helped to solve the kernel panic error in this case.

Monday, June 1, 2020

Configure an Ubuntu VirtualBox guest instance for ssh access from the host OS

I use VirtualBox to run guest OS such as Ubuntu 18.04 virtual machines for trying out stuff and experiments to prevent messing up my host operating system, e.g. Ubuntu. For convenience, the guest Ubuntu OS running in the VirtualBox can be accessed remotely from the host OS by creating a network adapter that bridges between the host and the guest. This post describes the configuration needed to allow the host OS to connect to the guest OS remotely through a secured shell (ssh).

The following steps assume an Ubuntu virtual machine has been created in VirtualBox and shutdown.

Create a bridge network adapter
  1. Run VirtualBox.

    The VirtualBox Manager is displayed.

  2. Select the Ubuntu virtual machine e.g. vm1. Click Settings.

    The Settings appear.

  3. Select Network.


  4. Select the Adapter 2 tab. Toggle on the Enable Network Adapter field.


  5. Choose Bridged Adapter in the Attached to field.
  6. In the Name field, choose the network you want the virtual machine to join, e.g. wlp3s0. Click OK.

    The bridged network adapter is created in the virtual machine.
 Identify the virtual machine's IP address on the bridged network
  1. In VirtualBox, run the guest virtual machine, e.g. vm1.
  2. Log in to the guest OS. Open up a Terminal.
  3. Type in the ifconfig command at the prompt:

    A list of network adapters and related information is displayed.


  4. Note down the virtual machine's ip address, e.g. 192.168.0.189.

Install SSH server
If the SSH server is not installed in the guest Ubuntu OS, then do the following steps.
  1. Open a Terminal.
  2. At the prompt, type in the command:

    $ sudo apt-get install openssh-server
  3. At the prompt, type in the command to enable the ssh service.

    $ sudo systemctl enable ssh
  4. Start the ssh service by entering the following command.

    $ sudo systemctl start ssh
Remote access to the guest virtual machine
Now the virtual machine can be accessed from the host operating system. With the virtual machine running, the following commands can be used to access the guest OS.
  1. Open up a Terminal. Type in the following command:

    $ ssh remote_user@192.168.0.189

    Note: where remote_user is the login name for the guest OS and 192.168.0.189 is the IP address of the virtual machine on the host's network.

Monday, July 15, 2019

Setup an Ubuntu VM instance on a Windows host for remote ssh access

An Ubuntu VM VirtualBox instance running as a guest OS on a Windows host can be remotely accessed via the secured ssh shell but the VirtualBox and the host OS must be configured to allow the networking traffic to pass through the ssh ports. The basic steps are: (a) to configure the Windows firewall, (b) to configure the port forwarding in Oracle VirtualBox, and (c) to install and setup the ssh server on the Ubuntu instance.

Open up the Windows firewall for Oracle VirtualBox
  1. In Windows, search for the Windows Defender Firewall with Advanced Security App and open it.


  2. Select Inbound rules. Check the VirtualBox Manager rules and if they are not enabled, double click and enable the rules.
Forward the TCP ssh ports to the Ubuntu VM
  1. Start Oracle VirtualBox.


  2. Select the Ubuntu VM, e.g. Ubuntu19. Click Settings. Then click Network.


  3. Click Port Forwarding.


  4. Click the Plus icon. Add in a new rule for Ssh with the Host Port set to 3022 and the Guest Port set to 22.

    Note: 3022 would be the port number to use to remotely access the Ubuntu VM.
  5. Click OK to all the dialog boxes.
Install openssh-server on the Ubuntu VM
  1. In Oracle VirtualBox, start the Ubuntu VM, e.g. Ubuntu19.
  2. Optional. If the openssh-server is not installed, then open up a Terminal and run the following command.

    $ sudo apt install openssh-server


  3. After the installation is completed, either reboot or restart the ssh service with the following command.

    $ service ssh restart

Remote access via ssh
  1. On a remote PC, open up a Terminal.
  2. Type in the following command to connect to the remote Ubuntu VM instance.

    $ ssh 192.168.8.157 -p 3022

    Note: where 3022 is the port number and 192.168.8.157 is the example IP address of the Windows PC hosting the Ubuntu VM instance.
    The ssh prompt appears.

Monday, July 8, 2019

Setup an Ubuntu VirtualBox instance on Windows 10 to connect to a Velodyne VLP-16 sensor

An Ubuntu 18.04 guest OS virtual machine running on a Windows 10 host can connect to a Velodyne VLP-16 LiDAR sensor and process the sensor's data and positioning packets. However, the VirtualBox Ubuntu guest OS must be configured properly to transfer the LiDAR data packets from the host OS to the guest OS. The following steps show how to perform the settings.
  1. On Windows, open the Internet and Network Settings.

     
  2.  Click the Change adapter options.

    The Network Connections window opens.
  3. Right click on the Local Area Connection icon. Choose Properties.

    The Local Area Connection Properties dialog box appears.
  4. Select Internet Protocol Version 4. Click Properties.

    The Internet Protocol Version 4 (TCP/IPV4) Properties appear.
  5. Toggle on Use the following IP address. In the IP address field, type in the following address:

    192.168.1.77
  6. Click OK to all the dialog boxes.

    The local Windows machine IP address is changed to 192.168.1.77


  7. Optional. If necessary, use the Windows Defender Firewall with Advanced Security App to open up the host Windows OS UDP ports for Oracle VirtualBox. In the Inbound Rules, make sure the VirtualBox Manager entries are enabled, as shown below.


  8. Now start Oracle VirtualBox.

    The Oracle VM VirtualBox Manager appears.
  9. Select the Ubuntu instance, e.g. Ubuntu18. Then click Settings.

    The Ubuntu18 Settings dialog box appears.
  10. Click Network. Then click the Port forwarding button.

    The Port forwarding rules dialog box appears.
  11. Click the Plus icon and add in two UDP protocol rules as shown below.


    Note: The rules will forward UDP packets from ports 2368 and 8308 on the Windows host to the same ports on the Ubuntu guest.
  12. Click OK.
  13. Now start the Ubuntu18 host.
  14. Login to Ubuntu and run Veloview. In Veloview, connect to the Velodyne VLP-16 sensor stream as per normal.

    The LiDAR point cloud is displayed.

Monday, July 1, 2019

How to setup a Ubuntu VirtualBox for remote telnet access

An Ubuntu 19.05 VirtualBox instance running on a Windows machine can be configured to be accessible remotely via telnet.

This can be simply by configuring the Ubuntu VirtualBox instance's network port forwarding in the VirtualBox graphical user interface. The following points illustrate the procedure.

Configure Oracle VirtualBox
  1. Start Oracle VirtualBox.

  2. Select the Ubuntu instance e.g. Ubuntu19. Click the Settings icon.
  3. In the Settings dialog box, select Network.

  4. Click the buton Port forwarding.

    The Port Forwarding Rules dialog box appears.
  5. Click the Add icon.

  6. Change the Host Port to an unused port e.g. 3023. Change the Guest Port to 23.

    Note: in this example, when accessing remotely, the port called should be 3023.
  7. Click OK to all the boxes.
Now run up the Ubuntu instance. If the telnet server is not installed, the open up a Terminal and run the following command.

$ sudo apt install telnetd

Then either restart the service or simply reboot.

On a remote computer, type in the following command to access the Ubuntu instance.

$ telnet 192.???.???.??? 3023

Note: replace 192.???.???.??? with the IP address of the Windows host

Note: If all the parameters are correct, the telnet response should be displayed as shown below.


Monday, June 24, 2019

How to setup a VirtualBox Ubuntu virtual machine on a Windows 10 computer for remote desktop access

An Oracle VirtualBox virtual machine (VM) can be accessed from a remote Windows 10 computer through the remote desktop protocol (RDP) as if it were running locally on the local desktop. But this is not enabled by default; to allow remote desktop connections, the VM's remote display parameters must be set and enabled. The following steps show how this can be done.

Setting up a VM on the remote PC for remote access
  1. On the remote Windows 10 PC, start Oracle VirtualBox.

  2. In the list of virtual machines, select a VM, e.g. Ubuntu19. Click Settings.

    The Settings dialog box appears.
  3. Click Display and then the Remote Display tab.
  4. Toggle on the Enable Server field. In the Server Port field, type in an unused port e.g. 5000. Click OK.
  5. Click the black drop down arrow on the Start icon and choose Start Headless Start.


    The Virtual machine is started without displaying any windows.

Connecting to the remote VM from a local PC
  1. Now on a local PC e.g. an Ubuntu 18.04, start up a RDP client e.g. Remmina Remote Desktop Client.
  2. Create a new Remote Desktop Profile.

  3. In the Name field, type in a suitable name, e.g. demo_vbox.
  4. In the Protocol field, choose RDP - Remote Desktop Protocol.
  5. In the Server field, type in the IP address and port number of the remote Windows 10 computer, e.g. 192.168.123.123:5000.
  6. Choose an appropriate Resolution and Color depth.
  7. Save and connect to the VM.

    The remote desktop is displayed.

If the remote VM cannot be connected successfully, then it is possible the remote Windows 10 PC's firewall is blocking the network port. To open the port, the following steps can be done.

  1. On Windows 10, click the Start button and then the Settings icon.

    The Settings dialog box appears.
  2.  Click Windows Security. Click Firewall and network protection.

  3. Scroll down and click Advanced settings.

    The Windows Defender Firewall with Advanced Security on Local Computer dialog box appears.
  4. Click Inbound Rules.

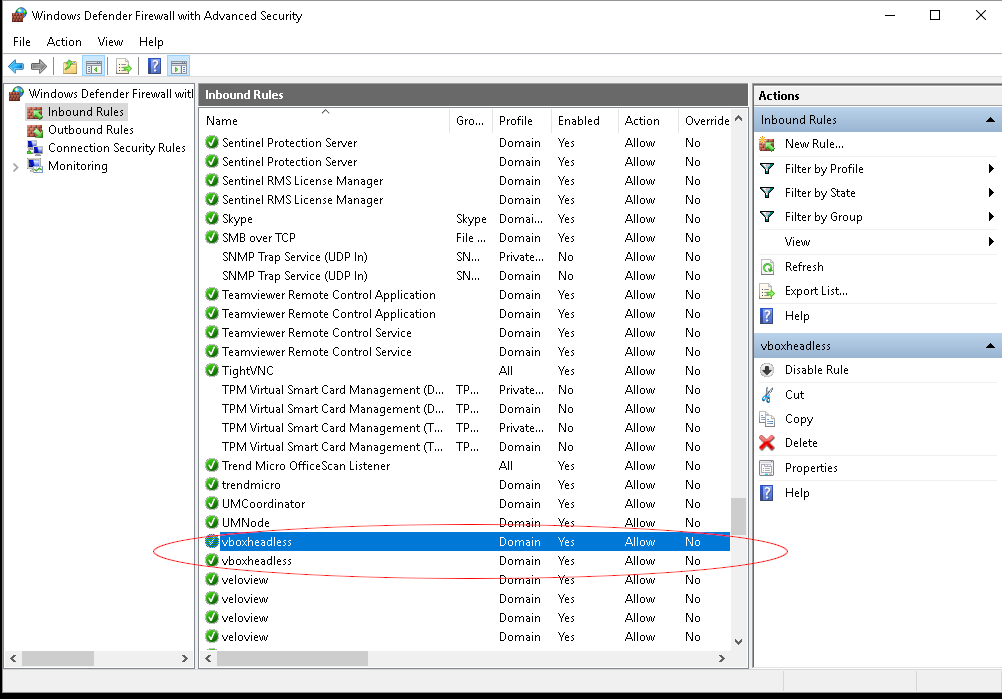
  5. Scroll down and ensure the vboxheadless rule exists and enabled. If not create a new rule and enable the selected port e.g. 5000.

Wednesday, September 9, 2015

Cannot start the Windows Phone emulator with the message "The emulator is unable to create the internal network switch"

On a Windows 10 Pro notebook, I encountered this error while trying to run the Windows phone emulator from Visual Studio 2015.

A few quick Internet search results came up with the following suggestions:

  1. Use the Hyper-V Manager to manually create the "Windows Phone Emulator Internal Switch" but I found this did not fully resolve the problem, as running the emulator will create additional network switches.

  2. Uninstall Oracle Virtual Box. However, I required Virtual Box for other purposes. 
The solution that work for me was to do the following:
  1. In Windows, search for "View network connections" to bring up the Network Connections panel.


  2. Look for all VirtualBox Host-Only Ethernet Adapter connections e.g. Ethernet 3. Mouse right click on each connection.
  3. In the pop up menu, choose Disable
It may be necessary to restart Windows. Now the Windows Phone emulator should be able to start up.