Showing posts with label Image processing. Show all posts

Monday, December 16, 2024

Use Generative AI to expand an image in Krita

I was playing around with the Generative AI Diffusion plugin for Krita (https://github.com/Acly/krita-ai-diffusion) but I could not figure out how to expand an image for a while. Eventually, I learnt how to get the job done by doing the following steps, illustrated below.

  1. Load in an image you want to expand, e.g. a Halloween pumpkin, in Krita.
    The image to be expanded loaded in Krita


  2. Next, select the crop command in the tool palette, or press C on the keyboard. Then click on the image itself.
    Handles appear around the image


  3. Use the mouse to drag the handles in the direction to be expanded, e.g. to the left.

    Drag the handle to the left in the expansion direction


  4. Now, double click in the empty expanded area.

    The image is resized but empty of content in the expanded area


  5. Click the Rectangular Selection tool or press CTRL-R. Drag out the empty expanded area to define a rectangle.

    Select the area for AI image generation


  6. In the AI Image Generation docker, choose an appropriate style, e.g. Digital Artwork. Type in a suitable prompt, e.g. Halloween pumpkin still life, pastel style. Then press the Expand button.

    Choose a style and enter a prompt


  7. A preview of the AI generated image appears as shown below. You can see the AI has taken the image context and prompt to fill in the empty expanded area.


Monday, March 27, 2023

Convert a sequence of JPG images into a MP4 video using FFMPEG

If you have a sequence of images like the screen shot below, it is quite straightforward to use ffmpeg to concatenate them into a single video file. 


Obviously, you need to specify the image file name and sequence pattern, the frame rate to show each image as shown in the example ffmpeg command below.

$ ffmpeg -hide_banner \
-f image2 \
-framerate 1 \
-start_number 1 \
-i %02d.jpeg \
-vcodec mpeg4  \
output.mp4

where -f specifies the input format as image,

-framerate specifies the rate in Hz at which to display each image frame,

-start_number specifies the starting number of the image frame sequence,

-i specifies the file name and sequence pattern, e.g. %02d means a pattern of 2 digits with a prefix character '0' for single digit numbers,

-vcodec tells ffmpeg to output mpeg4 format.

 Running the command will display the following output and generate the output video file output.mp4.


Monday, December 5, 2022

Using GIMP to copy an image layer into a channel

In GIMP, it is possible to copy a colored image layer into a single grayscale channel. Here's how to do the job.

Create an empty channel

  1. In GIMP, open up the image file.


  2. Click the Channels tab on the bottom right.


  3. Then click the Create a new channel icon.

    The New Channel dialog box appears.


  4. Optional. In the Channel name field, type in a name, e.g. flats. In the Fill opacity field, slide to 50.0.
     
  5. Click OK.

    A new channel is created.

Copy and paste the colored image into the channel

  1. Click the Layers tab. Click the image layer, e.g. bored-tiger.jpg to make sure it is active.


  2. In the menu, choose Select | All. Then choose Edit | Copy.

    The layer is copied to the clipboard.

  3. Click the Channels tab. Click the previously created channel, e.g. flats.


  4. In the menu, select Edit | Paste in Place


  5. Then click the Layers tab.

    A Floating Selection (Pasted Layer) is visible in the Layers list.


  6. Click the green Anchor the floating layer icon.

    The pasted layer is added to the active channel.

  7. Optional. Click the Channels tab.

    Note the channel thumbnail has been updated with a grayscale image of the pasted layer.

Monday, November 28, 2022

Using GIMP's color channels to remove blue guide lines from inked line art

Penciled comic book art typically have blue guide lines (and text) as shown in the screen shot below. 

The sketch can be downloaded from this site https://www.deviantart.com/edtadeo/art/Elektra-2-Pencil-174307445 if you want to practice with it. There are a number of ways to remove the blue lines from the image. I will be using the Color channels panel to remove the guide lines.

The steps:

Remove pixels from the Red and Green channels

  1. In GIMP, open up the image. Click the Channels tab on the bottom right.


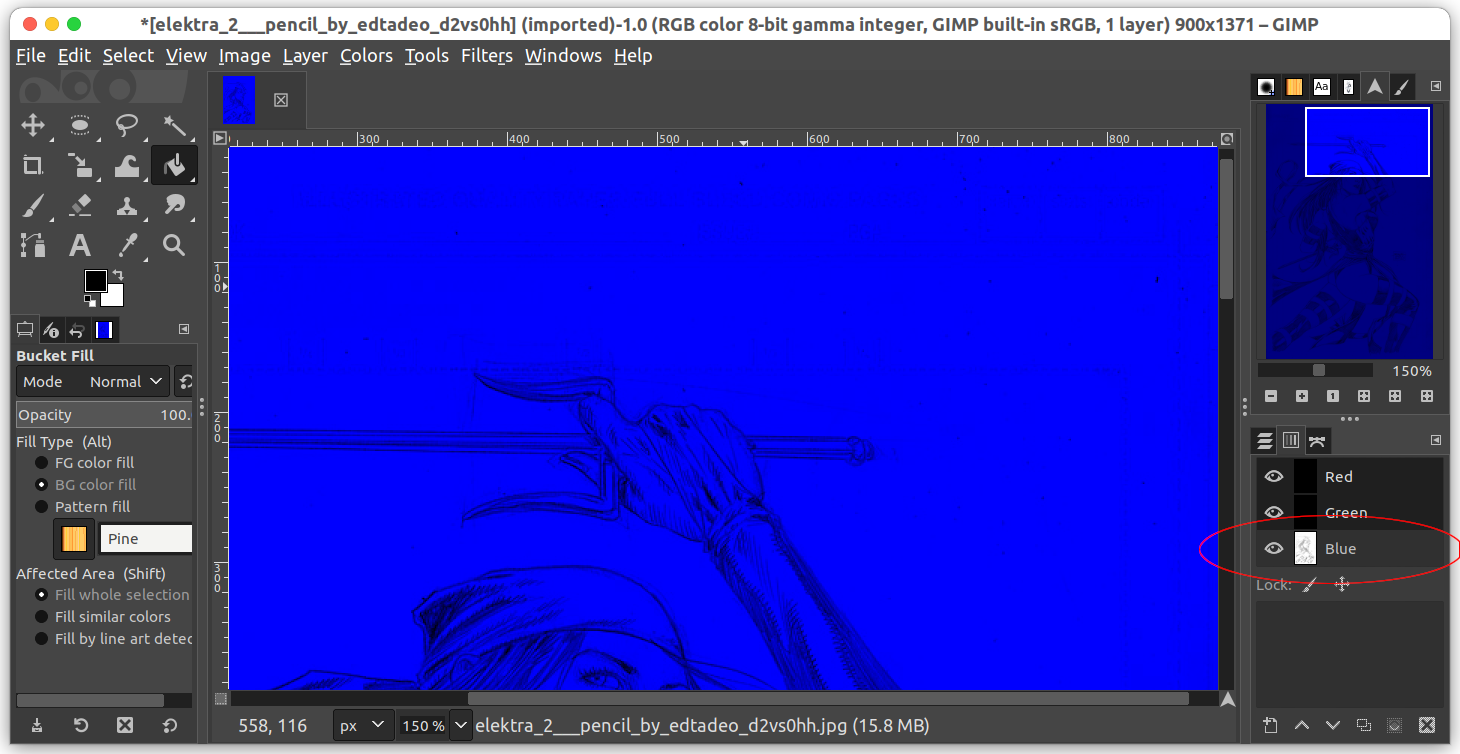
  2. Click the Blue channel to deselect it.


  3. In the Tool palette, click the Fill icon.


  4. Toggle on the FG color fill. Make sure the foreground color is black since we want to remove the Red and Green channels data.


  5. Then, click anywhere on the canvas.

    The background becomes blue.


Create the line art in the Red and Green channels

  1.  In the Channels tab, press the mouse right click button on the Blue channel.

    A popup menu appears.


  2. Choose Channel to Selection.

    The blue channel's non-zero pixels are selected.


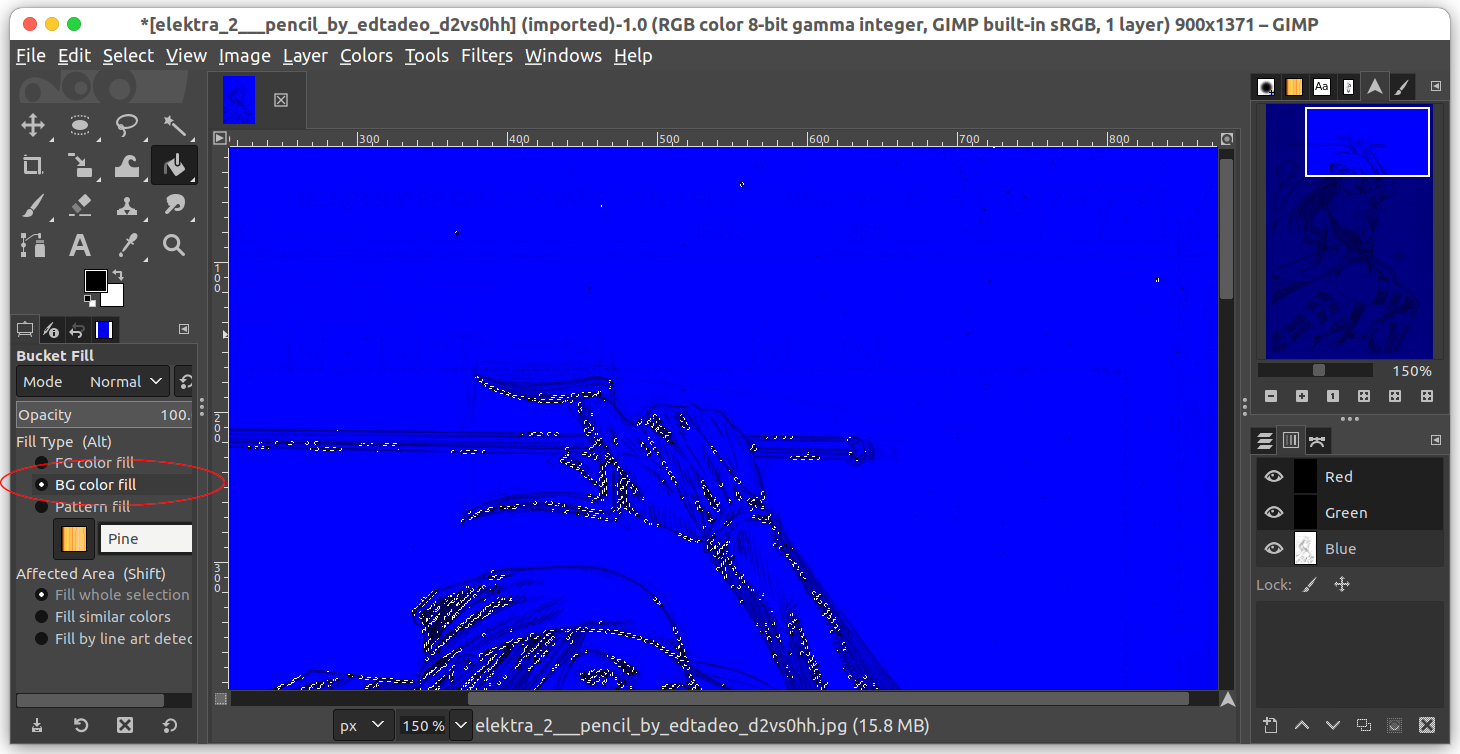
  3. In the Tool box, click the Fill icon. Toggle on the BG color fill option. (Note: the background color should be white). Then click anywhere in the selection on the canvas.

    The background becomes white.


  4. In the Channels tab, click the Blue channel to select it again.  Then in the menu, choose Select | None to clear the selection.


Use Threshold to clean up the line work

  1. In the menu, select Colors | Threshold.

    The Threshold dialog box appears.

     
  2.  Drag the black triangle until you are satisfied with the contrast between the line work and the background.


  3. Save your work.

Monday, January 11, 2021

QGIS - Change the background color of multiple raster images to transparent

QGIS can easily display geo-referenced raster images; by default the background pixels or no data value pixels are colored as black, as shown in the screenshot below. 


The black no data colored pixels can obscure other vector or raster data underneath it. You can use QGIS to define a color to be rendered as transparent in the raster layer's properties. This can be easily done for a single raster layer. If you want to do it for multiple raster layers at once, then you have to copy the style of the raster layer with a transparent color set and apply that style to the rest of the raster layers.

This post illustrates the steps.

Define the transparent color for a single raster layer

  1. Start up QGIS. Load and display the raster images.

    The raster layers are displayed with black as the background color.


  2. In the Layers pane, mouse right click on a raster layer. Choose Properties. Select Transparency.

    The Properties dialog box is displayed.


  3. In the Transparency pixel list, click the + icon.

    An RGB entry is added to the list.

  4. In the Red, Green, and Blue fields, enter 0.


  5. Click OK.

    The selected raster layer's background pixels are rendered transparent.


  6. In the Layers pane, mouse right click on the raster layer with transparent background and choose Styles | Copy Style.


  7. In the Layers pane again, press CTRL or SHIFT and select one or more raster layers.

    Multiple raster layers are selected.

  8. In the Layers pane, mouse right click on a selected raster layer and choose Paste Style.

    The selected raster layers' background is rendered transparent.

Monday, July 22, 2019

Convert multiple images to WebP format using Android Studio

WebP (https://en.wikipedia.org/wiki/WebP) is a lossy and lossless compressed image format with a resultant file size smaller than JPEG. Using Android Studio, you can easily convert one or more images intoWebP format.
  1. Run Android Studio and open a project.
  2. In the Project pane on the left, select one or more images.


  3. Press the mouse right button. In the pop up menu, choose Convert to WebP....

    The Converting Images to WebP dialog box appears.

  4. Optional. If necessary, change the parameters e.g. encoding. Click OK.

    The Preview and Adjust Converted Images dialog box appears.

  5. Optional. If necessary, adjust the quality parameter. Click Next to preview the next conversion, or click Accept All to convert all images.

    The images are converted to WebP.

Monday, July 31, 2017

PDAL: Colorize a LAS file with multiple GeoTiff images

A LiDAR LAS file may not necessarily share the same bounds as a single raster image file. More often the case, to cover the LAS file more than one raster image file is needed. One way to resolve this is to merge all the raster images into a single mosaic file. Another way may be to keep the raster images as they are and load them in one by one (just-in-time fashion) to colorize the LAS file. This workflow is a little more complicated but it can be done using PDAL's pipeline processing mechanism.

In this post, PDAL will be used to colorize a LAS file using multiple tiles of GeoTIFF image files - four to be exact. You just need to create a pipeline that loads in the LAS file, apply the RGB values from each image file individually and write the colored points into an output LAS file. The following sections illustrate this workflow.

Here's how the source LAS and GeoTIFF files look like.
The source LiDAR LAS file displayed by elevation
The source GeoTIFF raster image files
Create a PDAL pipeline JSON file
  1. Using a text editor, type in the JSON syntax to colorize a LAS file using PDAL's colorization filter, as shown below.


    where
    uncompahgre.laz is the source LAS file,
    tile0.tif, tile1.tif, tile2.tif and tile3.tif are the source image files,
    and color.laz is the output LAS file name

  2. Save the text into a file e.g. colorLas.json.
A sample pipeline JSON is show in the listing below.

{
    "pipeline": [
        "uncompahgre.laz",
        {
            "type": "filters.colorization",
            "raster": "tile0.tif"
        },
        {
            "type": "filters.colorization",
            "raster": "tile1.tif"
        },
        {
            "type": "filters.colorization",
            "raster": "tile2.tif"
        },
        {
            "type": "filters.colorization",
            "raster": "tile3.tif"
        },
        {
            "type": "writers.las",
            "compression": "true",
            "minor_version": "2",
            "dataformat_id": "3",
            "filename":"color.laz"
        }
    ]
}

Run the colorization process

  1. Open up a OSGeo4W Command Prompt.
  2. At the prompt, type in the pdal pipeline command:

    c:\> pdal pipeline colorLas.json
    where colorLas.json is the pipeline JSON file created in the previous section.
  3. Run the command.

    Processing messages appear.


    The output colorized LAS file color.laz is generated.
  4. Optional. Display the resultant colored LAS file in a LAS Viewer.


Tuesday, July 25, 2017

Using Orfeo ToolBox to combine grayscale TIFF images into RGB and CIR composites

For working with geo-referenced TIFF images, Orfeo ToolBox (OTB) provides a useful convenience function otbcli_concatenateImages to combine separate grayscale images into a composite file. Examples of separate bands of grayscale images are shown below.

For instance, the separate grayscale bands representing the red, green and blue channels can be combined into a single RGB composite image. To do this using OTB, the following steps can be done.

  1. Open up a OSGeo4W Command Prompt.
  2. At the prompt, type in the otbcli_concatenateImages command with options:

    C:\> otbcli_concatenateImages -il band_red.tif band_green.tif band_blue.tif -out rgb.tif uint16

    where
    band_red.tif, band_green.tif, and band_blue.tif are the input files in the correct order,
    rgb.tif is the output RGB composite file
    uint16 is the output file datatype. By default it is float32 but that is too much. 
  3. Run the command.

    Processing messages appear. The bands are merged into the output file rgb.tif.
  4. Optional. Display the resultant file in a suitable viewer.

Similarly, to combine the separate grayscale bands into a composite Colored Infra-Red CIR file, the following steps can be done.

  1. Open up a OSGeo4W Command Prompt.
  2. Type in the otbcli_concatenateImages command.

    C:\> otbcli_concatenateImages -il band_nir.tif band_red.tif band_green.tif -out cir.tif uint16
    Where
    band_nir.tif, band_red.tif, and band_green.tif are the ordered input bands
    cir.tif is the output file name
    uint16 is the output file data type
  3. Run the command.

    Processing messages appear. The bands are merged into the output file cir.tif.
  4. Optional. Display the resultant file in a suitable viewer.


Wednesday, July 12, 2017

Applying a simple X,Y shift or translation to a raster GeoTIFF file using GDAL

Sometimes when comparing a raster ortho-mosaic GeoTIFF file to ground control points (GCPs), the raster file may appear to be slightly shifted relative to the ground control points. To resolve this problem correctly, it may be necessary to regenerate the ortho-mosaic after adjusting the tie points. But sometimes, if the shift is linear or you want to do a fast correction, then the open source software GDAL may be able to solve the problem for you.

To shift a raster GeoTIFF file e.g. input.tif with GDAL, do the following:

  1. Open up a Windows Command Prompt.
  2. Type in the gdal_translate command with the a_ullr option:

    C:\> gdal_translate -a_ullr 760726.437 4557390.415 772996.466 4540826.364 input.tif translate.tif

    Note: 
    translate.tif is the output filename
    -a_ullr specifies the new upper left X, upper left Y, lower right X, lower right Y coordinates  

  3. Run the command.

    Processing messages appear. The file is shifted to the new coordinates.


    The file is shifted to the new coordinates.

Wednesday, June 21, 2017

Combine separate gray scale TIFF images into a single RGB TIFF image

Some multi spectral cameras capture images as individual gray scale TIFF images - each file containing data for a single light wavelength e.g. red, green, blue, or infra-red. Example files are the gray scale TIFF files shown below, each file representing a single color band.

Combining these individual color bands into a single RGB color composite can be done using the free and open source ImageMagick software, as shown in the steps below.

  1. Open up a Command Prompt.
  2. At the prompt, type in the ImageMagick convert command:

    C:\> magick convert -verbose band_red.tif -channel R band_green.tif -channel G band_blue.tif -channel B -combine -channel RGB -alpha off -colorspace sRGB out_rgb.tif

    Note:
    band_*.tif are the input TIFF files. Each input file must be followed with the correct channel option.
    out_rgb.tif is the output RGB TIFF file.
    -verbose is used to print out processing messages.
    -combine -channel RGB are for combining the bands.
    -alpha off is used to disable the creation of the alpha channel in the output RGB file.
    -colorspace sRGB is used to set the output color space.
  3. Run the command.

    Processing messages appear. The output file out_rgb.tif is created.
  4. Open up the resultant file in an image editor, e.g. GIMP.

    The file is displayed in color and the the bands are combined into the image's red, green and blue channels.