Showing posts with label XML. Show all posts

Monday, December 12, 2022

How to read an array from a ROS1 launch file into a C++ vector variable

I was having problems reading an array of doubles in a ROS launch file into a vector variable in a C++ ROS1 program node. After some digging around, I found I was doing it the wrong way; instead of using the <param> tag in the ROS launch file, I should be using the <rosparam> tag. 

The example ROS launch file listing shows the correct way to enter an array, e.g. [0.01, 0.1, 0.2] with the <rosparam> tag:

?xml version="1.0" encoding="UTF-8"?>
<launch>
  <node pkg="learning_tutorial" type="my_node" name="my_node">
        <param name="my_string_param" value="hello" />
        <rosparam param="my_array_param">[0.01, 0.1, 0.2]</rosparam>
  </node>
</launch>

Then in the ROS C++ code, I could do the following to read the array:

// ...etc...

using namespace ros;
using namespace std;

vector<double> myArrayParam;
NodeHandle nh;

// Read the my_array_param from the launch file into the myArrayParam variable
nh.param<vector<double>> ( "my_array_param", myArrayParam, { 1, 2, 3});

// Just print out the array parameter
ROS_INFO ( "My array: %f, %f, %f", myArrayParam[0], myArrayParam[1], myArrayParam[2]);
 
// ...etc...

Hope this helps somebody.


Monday, March 16, 2020

How to run a shell script from a ROS launch file

I wanted to execute a bash shell script from the ROS launch file but the ROS Wiki were not very clear. After some trial and error, I figured out how to do it. The following steps illustrate the procedure I used:

Create a shell script
  1. In the ROS workspace package, e.g. /path/to/workspace/package/script/ folder, create a shell script e.g. run_script.sh.
  2. Type in the script commands, e.g. see the code listing below.

    Note 1: ensure the shebang statement is at the top i.e. #!/bin/bash and a exit status code (0 for success or other values) is returned from the script.

    Note 2: Use the chmod command to make the script executable, e.g. $ chmod a+x run_script.sh

#!/bin/bash

# just print this out
echo "Hello ROS world"

# exit gracefully by returning a status 
exit 0


Create a launch file
  1. In the ROS workspace package launch folder, create a launch file e.g. /path/to/workspace/package/launch/hello_script.launch.
  2. Using a text editor, type in the following:

    Note: fill in the package name, e.g. beginner_tutorials, and the type, which should be the shell script name; name is any label you want to associate with the script node.


<launch>
        <node pkg="beginner_tutorials"
                type="run_script.sh" name="run_script"
                output="screen"
        />
</launch>

Run the launch file
  1. In a terminal, type in the ros launch command:

    $ roslaunch beginner_tutorials hello_script.launch

    Note: change beginner_tutorials to your package name and hello_script.launch to the launch file created previously.

    The script is executed as shown in the print out of "Hello ROS world" below.

Monday, August 19, 2019

Set Android system bar to be transparent when Navigation drawer is opened

While developing Android apps, a lot of times I broke the code and made the Android system bar opaque when the Navigation drawer is opened, as shown in the screenshot below.

Then I had to waste precious time hunting down the cause. So I am putting down the requirements to enable the Android system bar to be transparent over the Navigation drawer.
  1. In Android Studio, open up the XML layout file e.g. activity_main.xml for the activity with the Navigation Drawer. In the AndroidX DrawerLayout widget, make sure the property fitsSystemWindows is set to true.


  2. Next, create a "no action bar" style e.g. AppThem.NoActionBar in styles.xml to be used by the activity with the Navigation Drawer. In the example below, the style inherits the theme Theme.AppCompat.DayNight.DarkActionBar style for day and night mode styling.


  3. Set the properties windowActionBar to false and windowNoTitle to true.
  4. Then create the same "no action bar" style for Android API 21 and above e.g. /path/to/res/values-v21/styles.xml. Set the properties windowDrawsSystemBarBackgrounds to true and statusBarColor to "@android:color/transparent" as shown below.


  5. Compile and run the application. The system bar should be transparent over the Navigation Drawer now.

Wednesday, March 7, 2018

Fixing "Cannot resolve symbol Theme" error in Android Studio

If you have ever encountered unusual "cannot resolve symbol" messages with regards to Android resource XML files (an example is the screenshot below), which cannot be resolved by running Android Studio's Build | Clean Project or Build | Rebuild Project menu commands, then fixing the issue is very simple.


To resolve the problem, click on the Sync Project with Gradle Files icon in Android Studio, as shown in the screenshot below, or select Tools | Android | Sync Project with Gradle Files

Processing files will appear and at the end of it, the error messages no longer appear, as shown below.

Monday, May 30, 2016

Using Android XML layout tabs without ViewPager and Fragments

In Android, the TabLayout widget is typically used together with a ViewPager and fragments; when a user touch a tab, a fragment associated with the tab is displayed in the activity. But sometimes, I do not want or need fragments for each tab; I just want to execute some code. This post illustrates an example of using the TabLayout without a ViewPager and Fragments and setting a tab selected listener to the TabLayout.


First, create an XML layout and add in the TabLayout code. Add in the TabItem widgets underneath the parent TabLayout node. You can simple use text or icons (in this example) for the TabItem labels.

<?xml version="1.0" encoding="utf-8"?>
<LinearLayout xmlns:android="http://schemas.android.com/apk/res/android"
    xmlns:app="http://schemas.android.com/apk/res-auto"
    xmlns:tools="http://schemas.android.com/tools"
    android:layout_width="match_parent"
    android:layout_height="match_parent"
    android:orientation="vertical"
    tools:context="com.skyglob.insight.view.MainActivity">

    <android.support.design.widget.CoordinatorLayout
        android:id="@+id/coordinatorLayout"
        android:layout_width="match_parent"
        android:layout_height="match_parent"
        android:fitsSystemWindows="true">

        <android.support.design.widget.AppBarLayout
            android:layout_width="match_parent"
            android:layout_height="wrap_content"
            android:theme="@style/AppTheme.AppBarOverlay">

            <android.support.v7.widget.Toolbar
                android:id="@+id/toolbar"
                android:layout_width="match_parent"
                android:layout_height="?attr/actionBarSize"
                android:background="?attr/colorPrimary"
                app:popupTheme="@style/AppTheme.PopupOverlay" />

            <android.support.design.widget.TabLayout
                android:id="@+id/tabs"
                android:layout_width="match_parent"
                android:layout_height="wrap_content"
                app:tabGravity="fill"
                app:tabMode="fixed">

                <android.support.design.widget.TabItem
                    android:layout_width="wrap_content"
                    android:layout_height="wrap_content"
                    android:icon="@drawable/ic_action_call" />

                <android.support.design.widget.TabItem
                    android:layout_width="wrap_content"
                    android:layout_height="wrap_content"
                    android:icon="@drawable/ic_action_checkin" />

                <android.support.design.widget.TabItem
                    android:layout_width="wrap_content"
                    android:layout_height="wrap_content"
                    android:icon="@drawable/ic_action_contacts" />

                <android.support.design.widget.TabItem
                    android:layout_width="wrap_content"
                    android:layout_height="wrap_content"
                    android:icon="@drawable/ic_action_schedule" />

                <android.support.design.widget.TabItem
                    android:layout_width="wrap_content"
                    android:layout_height="wrap_content"
                    android:icon="@drawable/ic_action_logout" />

            </android.support.design.widget.TabLayout>

        </android.support.design.widget.AppBarLayout>

        <include layout="@layout/content_main" />

    </android.support.design.widget.CoordinatorLayout>

</LinearLayout>

In the activity Java code, add in the tab selected listener. The following is an example showing how to assign a tab selected listener to the TabLayout widget.


private void setupTabLayout() {
    TabLayout mTabLayout = (TabLayout) findViewById(R.id.tabs);
    mTabLayout.setOnTabSelectedListener(new TabLayout.OnTabSelectedListener() {
        @Override
        public void onTabSelected(TabLayout.Tab tab) {
            onTabTapped(tab.getPosition());
        }
        @Override
        public void onTabUnselected(TabLayout.Tab tab) {

        }
        @Override
        public void onTabReselected(TabLayout.Tab tab) {
            onTabTapped(tab.getPosition());
        }
    });
}

private void onTabTapped(int position) {
    switch (position) {
        case 0:
            // Do something when first tab is tapped here
            break;
        default:
            Toast.makeText(this, "Tapped " + position, Toast.LENGTH_SHORT);
    }
}

Monday, April 25, 2016

Android Studio: easier text string extraction from a layout file into a string resource XML file

All the while in Android Studio, I individually create and populate a strings resource XML file, then link the named strings to the layout XML file using the @string/string_name construct. Then I found that Android Studio has a convenient helper function to extract the text string from the layout XML file and placed it into the strings resource XML file. That function is the Extract String Resource command, and the following steps show how to use it.

  1. In Android Studio, open up a layout XML file. Place the cursor on the line with the text you want to extract e.g. android:title="My title", as shown in the screenshot below.


  2. Wait for the light bulb to appear, then either click on it or press ALT+ENTER.

    A context menu appears.

  3. Chose Extract String Resource.

    The Extract Resource dialog appears.

  4. In the Resource name field, type in a label e.g. my_title.

    Optional. Change the file name, resource directories, or create new resource directories.
  5. Press OK.

    The text in the layout is extracted into the selected string resource XML file.

Monday, March 30, 2015

How to change the Android ActionBar background from the default dark color

By default, the background color of the ActionBar in any Android App is black as shown in the example below.

I wanted to style the background to a different non-black color. After some investigation, I had to do the following:
  • Choose a color
  • Define a custom theme
  • Assign the custom theme to the application
Choose a color
  1. Decide on a color to use for the background e.g. red or #303f9f in hex.
  2. Decide on a color for the text e.g. white of #ffffff in hex.
  3. Add these colors to the Android app's XML file e.g. [app]/res/values/color.xml.
<?xml version="1.0" encoding="utf-8"?>
<resources>
<color name="actionbar_background">#303f9f</color>
<color name="actionbar_text">#ffffff</color>
</resources>


Define a Custom theme

  1. Open up the Android app's styles XML file e.g. [app]/res/valuess/styles.xml, in a text editor.
  2. Append in a new style e.g. CustomActionBarTheme that inherits a parent theme e.g. Theme.AppCompat.Light.DarkActionBar.
  3. Append in new styles for the action bar, title text, and tabs text, e.g. MyActionBar, MyActionBarTitleText and MyActionBarTabText.
  4. The following code shows the complete styles.xml file.

<resources>
 
<!-- Base application theme. -->
<style name="AppTheme" parent="Theme.AppCompat.Light.DarkActionBar">
<!-- Customize your theme here. -->
</style>
 
<style name="CustomActionBarTheme"
parent="@style/Theme.AppCompat.Light.DarkActionBar">
<item name="android:actionBarStyle">@style/MyActionBar</item>
<item name="android:actionBarTabTextStyle">@style/MyActionBarTabText</item>
<item name="android:actionMenuTextColor">@color/actionbar_text</item>
 
<!-- Support library compatibility -->
<item name="actionBarStyle">@style/MyActionBar</item>
<item name="actionBarTabTextStyle">@style/MyActionBarTabText</item>
<item name="actionMenuTextColor">@color/actionbar_text</item>
</style>
 
<!-- ActionBar styles -->
<style name="MyActionBar"
parent="@style/Widget.AppCompat.Light.ActionBar.Solid.Inverse" >
<item name="android:background">@color/actionbar_background</item>
<item name="android:titleTextStyle">@style/MyActionBarTitleText</item>
 
<!-- Support library compatibility -->
<item name="background">@color/actionbar_background</item>
<item name="titleTextStyle">@style/MyActionBarTitleText</item>
</style>
 
<!-- ActionBar title text -->
<style name="MyActionBarTitleText"
parent="@style/TextAppearance.AppCompat.Widget.ActionBar.Title">
<item name="android:textColor">@color/actionbar_text</item>
</style>
 
<!-- ActionBar tabs text -->
<style name="MyActionBarTabText"
parent="@style/Widget.AppCompat.ActionBar.TabText">
<item name="android:textColor">@color/actionbar_text</item>
</style>
 
</resources>


Assign the new custom theme to the Android Application

  1. Open up the AndroidManifest.xml file in a text editor.
  2. In the application tag, change the theme to the new theme e.g. @style/CustomActionBarTheme.
  3. The following code snippet shows the relevant portion of the edited AndroidManifest.xml file.

<?xml version="1.0" encoding="utf-8"?>
<manifest xmlns:android="http://schemas.android.com/apk/res/android"
android:installLocation="auto"
package="com.dom925.demo" >
 
<application
android:name=".App"
android:allowBackup="true"
android:icon="@drawable/ic_launcher"
android:label="@string/app_name"
android:theme="@style/CustomActionBarTheme">
 
<!-- etc -->
 
</manifest>

Now the application's ActionBar should be using the custom theme with a non-black background.

Monday, May 5, 2014

How to enable MultiWindow support for Android Apps on Samsung devices

Some Samsung devices such as the Note range of handsets can display two apps at the same time in two windows. Samsung calls this two window feature as MultiWindow and supported apps are activated from Samsung's Traybar, a vertical or horizontal strip launcher on the sides of the screen. Tweaking your Android app so that it can run in MultiWindow mode is very easy - just add some meta data tags in the AndroidManifest.xml file as shown in the example below. Then recompile the app.

<?xml version="1.0" encoding="utf-8"?>
<manifest xmlns:android="http://schemas.android.com/apk/res/android"
package="com.dom925.trainsity.kualalumpur"
android:installLocation="auto"
android:versionCode="3"
android:versionName="1.0.2" >
<uses-permission android:name="android.permission.INTERNET" />"
<uses-permission android:name="android.permission.ACCESS_NETWORK_STATE" />

<uses-sdk
android:minSdkVersion="11"
android:targetSdkVersion="19" />
 
<application
android:name="com.dom925.trainsity.kualalumpur.App"
android:allowBackup="true"
android:icon="@drawable/ic_launcher"
android:label="@string/app_name"
android:theme="@style/AppTheme" >
<activity
android:name="com.dom925.trainsity.kualalumpur.MapListActivity"
android:label="@string/app_name" >
<intent-filter>
<action android:name="android.intent.action.MAIN" />
<category android:name="android.intent.category.LAUNCHER" />
<!-- add this category tag here -->
<category android:name="android.intent.category.MULTIWINDOW_LAUNCHER" />
</intent-filter>
</activity>
<!-- some stuff deleted here for clarity -->
<!-- add the following meta-data tags here -->
<meta-data 
android:name="com.samsung.android.sdk.multiwindow.enable" 
android:value="true" />
<meta-data 
android:name="android.intent.category.MULTIWINDOW_LAUNCHER" 
android:value="true" />
<meta-data 
android:name="com.sec.android.intent.category.MULTIWINDOW_LAUNCHER" 
android:value="true" />"
</application>
 
</manifest>
An app that supports MultiWindow will be visible in the Traybar launcher. Simply drag out the app from the Traybar launcher. The screenshot below shows a Note device running a Chrome browser and a metro app in MultiWindow mode.

Monday, June 3, 2013

Set the ImageButton background to transparent in Android

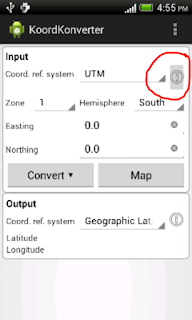
If a transparent icon source only is used in the ImageButton widget in Android, then the transparent portion of the icon is displayed on top of a default grey looking button as shown in the screen shot below.

It is possible to render the default grey button as transparent by changing the android:background property of the ImageButton to Android's selectableItemBackground drawable. An example of this is the following XML layout code below.


<ImageButton
android:id="@+id/inputInfoButton"
android:layout_width="0dp"
android:layout_weight="0.1"
android:layout_height="wrap_content"
android:contentDescription="Input coordinate reference system info"
android:background="@android/drawable/selectableItemBackground"
android:src="@android:drawable/ic_menu_info_details"
/>   

The resultant ImageButton should look like the screenshot below - no more default  grey button color for the ImageButton.

Note that this property will only work on Android versions 11 (Honeycomb) and above.

Monday, February 18, 2013

Example KML for displaying extended data in balloons

In Google Earth, it is possible to display a nicely formatted Placemark balloon showing some relevant information about that Placemark. The simplest way to create the Placemark KML is to write and format everything (including the HTML mark ups) in the Placemark's Description tag, as shown in the example code below.
<Placemark>
<name>Microsoft</name>
<description>
<![CDATA[
<b>Example 1</b>
<table border="1" >
<tr><td>Company Name</td></tr>
<tr><td><i>Microsoft</i></td></tr>
</table>
]]>
</description>
<Point> <coordinates>-122.034924,37.331586,0</coordinates>
</Point>
</Placemark>

The screenshot shows how it is displayed in Google Earth.

However, if there are a lot of Placemarks, it would be a pain to have write the mark up and data values for everyone. It would be better to define a custom balloon style containing a template HTML mark up and placeholders for the variable data values once; the data values would then be stored under the Placemark's ExtendedData tag. When Google Earth renders the Placemark balloons, it would use the referenced balloon style and replace the placeholders with the actual data values from the Placemark's ExtendedData tags.

The example code below defines a balloon style with a placeholder $[Company_Name] in the HTML mark up text.
<Style id="MyBalloonStyle">
<BalloonStyle>
<text> <![CDATA[
<b>Example extended data template</b>
<table border="1" >
<tr><td>Company Name</td></tr>
<tr><td><i>$[Company_Name]</i></td></tr>
</table>
]]></text>
<bgColor>ffffffbb</bgColor>
</BalloonStyle>

Then in the Placemark tag, it is only necessary to place the data (name and value) under the ExtendedData tag as shown below. The balloon style is referenced with the StyleUrl tag.
<Placemark>
<name>Apple</name>
<styleUrl>#MyBalloonStyle</styleUrl>
<ExtendedData>
<Data name="Company_Name"><value>Apple Incorporated</value></Data>
</ExtendedData>
<Point> <coordinates>-122.034924,37.331586,0</coordinates>
</Point>
</Placemark>

The full KML code is shown below.


<?xml version="1.0" encoding="UTF-8"?>
<kml xmlns="http://www.opengis.net/kml/2.2">
<Document>
 
<Style id="MyBalloonStyle">
<BalloonStyle>
<text> <![CDATA[
<b>Example extended data template</b>
<table border="1" >
<tr><td>Company Name</td></tr>
<tr><td><i>$[Company_Name]</i></td></tr>
</table>
]]></text>
<bgColor>ffffffbb</bgColor>
</BalloonStyle>
<IconStyle> <color>ffffffff</color> <scale>1</scale>
<Icon><href>http://maps.google.com/mapfiles/kml/pushpin/grn-pushpin.png</href>
</Icon>
</IconStyle>
<LabelStyle> <scale>0</scale> </LabelStyle>
</Style>
<Folder> <name>Tech Companies</name>
<Placemark>
<name>Apple</name>
<styleUrl>#MyBalloonStyle</styleUrl>
<ExtendedData>
<Data name="Company_Name"><value>Apple Incorporated</value></Data>
</ExtendedData>
<Point> <coordinates>-122.034924,37.331586,0</coordinates>
</Point>
</Placemark>
<Placemark>
<name>Google</name>
<styleUrl>#MyBalloonStyle</styleUrl>
<ExtendedData>
<Data name="Company_Name"><value>Google Incorporated</value></Data>
</ExtendedData>
<Point> <coordinates>-122.084676,37.421742,0</coordinates>
</Point>
</Placemark>
</Folder>
</Document>
</kml>

The screenshot shows how it is rendered in Google Earth.

Monday, February 11, 2013

Example KML for displaying a photo image from the local disk

Recently I had to generate some Google Earth KML files for displaying photos from a local hard drive in a Placemark balloon. In order to display local images not from a web server, the file keyword must be used with 3 forward slashes in the HTML img tag followed by the full path of the photo file, as shown in the example KML code below.

 <?xml version="1.0" encoding="utf-8"?>  
 <kml>  
  <Document>  
   <name>Example of displaying a local image file</name>  
   <Placemark>  
    <name>Monaco</name>  
    <Snippet>Photo 1</Snippet>  
    <description><![CDATA[  
 <img src='file:///c:\temp\monaco\IMG_5523.jpg' width='400' /><br/&gt;  
 Photo taken from near the palace in Monaco<br/>  
 ]]>  
 </description>  
    <Point>  
     <coordinates>7.421630,43.731459</coordinates>  
    </Point>  
   </Placemark>  
  </Document>  
 </kml>  
The following screenshots show how this KML file is rendered in Google Earth.
 When the Placemark is clicked, the balloon pops up showing the local photo image file.

Monday, January 14, 2013

Stop the ListView from turning black while scrolling in Android

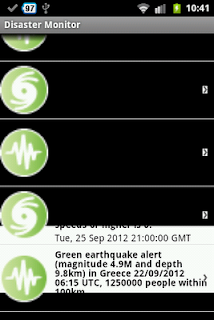
While developing an Android app, I noticed that my nice white color ListView will turn black whenever I scroll the list. See the screenshot below.


I found out that I set the cacheColorHint property to black in the Android layout xml file.
    <ListView
        android:layout_width="match_parent"
        android:layout_height="match_parent"
        android:id="@+id/listView1"
        android:background="#ffffff"
        android:cacheColorHint="#000000" >
    </ListView>

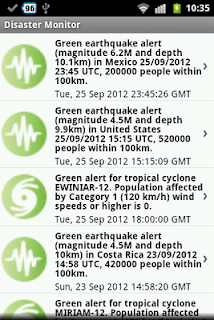
To rectify the problem, simply set the cacheColorHint property to white to match the background color as shown below.
    <ListView
        android:layout_width="match_parent"
        android:layout_height="match_parent"
        android:id="@+id/listView1"
        android:background="#ffffff"
        android:cacheColorHint="#FFFFFF" >
    </ListView>
Alternatively instead of white, it is okay to set the CacheColorHint property to transparent.

    <ListView
        android:layout_width="match_parent"
        android:layout_height="match_parent"
        android:id="@+id/listView1"
        android:background="#ffffff"
        android:cacheColorHint="@android:color/transparent" >
    </ListView>


And the resultant scrolling of the list will work correctly, as shown below.