Showing posts with label Vector. Show all posts

Monday, August 26, 2019

Creating faux square Android Navigation Drawer icons

The Navigation drawer widget in Android can display vector SVG icons, but if the vector icons are non-rectangular, Android will distort the dimensions to force them into squares. This can be seen in the screenshot of the Hawaii flag icon below.


It is possible to extend the drawer by code to display non-rectangular icons but I prefer to adjust the SVG icon instead. The way I did it was to change the page size to a square and then placing a transparent square box around the page. The following steps illustrate:

Change the page to a square
  1. Open up the SVG icon in Inkscape.


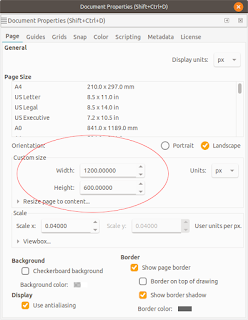
  2. Select File | Document Properties.


    1. Under the Page tab, change the Width and Height to be equal e.g. 1200 x 1200 px. Close the dialog box.

      The page display changes to a square.

  3. Using the Align and Distribute tools, align the graphics to the middle of the page.


Create a transparent square
  1.  Next, click the Create rectangles and squares (F4) icon. Place a stroke only, no-fill rectangle on the page.


  2. Change the width and height of the rectangle to match the page dimensions e.g. 1200 by 1200 px.


  3. Change the origin to the upper left corner of the page, e.g. X=0, Y=0.

  4. Open the Fill and stroke pane. Change the stroke opacity to low or zero opacity, e.g. 0.


  5. Save the file.
Import the SVG vector icon into an Android drawable icon
  1.  In Android Studio, right click on the /path/to/app/res/drawables folder and choose New | Vector Asset.


  2. Toggle on Local File (PNG, SVG). Choose the new SVG icon file from the previous section.
  3. Click Next. Click OK.

    The drawable is created.
Using this new icon, the Navigation drawer can now display the icon seemingly with the correct proportions, as shown below.

Monday, February 12, 2018

Displaying WKT geometry string in QGIS with getWKT plugin

If you want to display the Well Known Text (WKT) string of a selected geometry in QGIS, there is a plug-in getWKT that can be used for this purpose. The screen shot below shows the Plug-in Manager's description of the getWKT plug-in.
 
 To use the getWKT plug-in, do the following:
  1. In QGIS, click the Select Features by area of single click button. Using the mouse, click on a feature.

    A feature is selected and highlighted in yellow.
  2. Then click the getWKT icon in the tool bar.


    The GetWKT dialog box appears with the WKT string of the selected geometry.

Monday, January 29, 2018

Display CSV (with WKT geometry field) files on Google Maps with this Mapplet

If you want to display a Comma Separated Values (CSV) file with an embedded geometry field in Well Known Text (WKT) format with just an Internet browser, then this Mapplet may be useful to you. Just go to this url https://dominoc925-pages.appspot.com/mapplets/vcsvfile.html with any modern browser such as Chrome, or FireFox. All the processing is done within your browser, that is the CSV file is never uploaded to a server for processing.


  1. To load a CSV file, click on the Import CSV button (in blue color) as shown in the screenshot below. 


    The Import Comma Separated Values (CSV) file dialog box appears.

  2. To load in a CSV file from a local drive, click the Choose File button. Then browse and select a CSV file as shown below.


    Note: You can also copy and paste WKT text into the CSV file field's text area. Or click the Use Sample Data drop up button to load demo WKT data into the text area.

  3. Click Open.

    The file is read and displayed in the text area below the Choose File button. The WKT Geometry column button is populated with the header fields from the CSV file.


    Note: If necessary, choose an appropriate Coordinate System and projection.
  4. Click Start Import.

    The CSV file is loaded and rendered as overlays on the Google Maps backdrop. The name of the file is added to a CSV files combo box.

  5. Optional. Click on the CSV Command drop up button and choose a command to apply to the current CSV layer.


    Fit - Display the current CSV layer within the map
    Fit All - Display all loaded CSV layers within the map
    Toggle display - Toggle the CSV layer display on or off
    Display off - Don't display the current CSV layer
    Display on - Display the current CSV layer
    Remove layer - Unload the current CSV layer

Monday, January 22, 2018

Using QGIS to export CSV files with Well Known Text geometry

QGIS can export feature layers as comma separated values (*.CSV) files with a geometry column in  Well Known Text (WKT) format. This can be very convenient if you want to exchange a small amount of data from one GIS system to another GIS system.

To save a vector feature layer to a WKT CSV file, do the following:

  1. In the legend pane of QGIS, select a layer to export, e.g. forest. Then press the right click of the mouse.

    A pop up menu appears.

  2. In the pop up menu, choose Save As.
  3. The Save vector layer as dialog box appears.


  4. In the Format combo box, choose Comma Separated Values (CSV). In the File name field, click the  Browse button and type in the output file name, e.g. forest.csv.


  5. In the Layer Options group box's GEOMETRY combo box, choose AS_WKT. Click OK.

    The selected vector layer is exported out as a CSV file with a geometry field as WKT format as shown below in a spread sheet.

Monday, February 22, 2016

How to prevent vector graphics from becoming a raster image while doing a Copy and Paste operation in Inkscape

While using Inkscape on a Macbook, I found that copying and pasting a group of vector graphic elements within Inkscape will convert the vector group into a bitmap image after the paste operation. This may be a problem if I wanted to manipulate the vector elements individually. The problem is shown in the screenshot below - see the circled part of the status bar indicating that the selected graphic is an image with a certain resolution.

To get Inkscape to paste as vector elements, the following steps should be done:

  1. In MacOSX, activate the XQuartz application. Then select XQuartz | Preferences.


    The XQuartz Preferences dialog box appears.


  2. Click Pasteboard tab. Toggle off Update Pasteboard when CLIPBOARD changes.


  3. Close the dialog box.
From then on, copying and pasting group of vector elements will no longer result in a conversion of the elements to a bitmap image, as shown in the screenshot below.