Showing posts with label Windows 10. Show all posts

Monday, March 2, 2020

git authentication failed after changing password or installing a new version of git for Windows

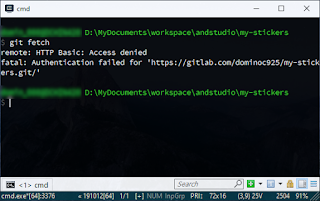
After installing a new version of git for Windows or changing the git repository password, the following git error messages may appear when trying to access the git repository: "...access denied...fatal authentication failed for ..."
 
This problem can be resolved by resetting the git password in the Windows Credential Manager.

  1. Click the Windows Start button.
  2. Start typing in "Credential Manager". When the Credential Manager icon is displayed, click the icon.

    The Credential Manager dialog box appears.

  3. Click the Windows Credentials icon.
  4. Scroll down the credential list and look for a git generic credential, e.g. git:https://gitlab.com. Click on the credential.

    The git credential properties appear.

  5. Click Remove.


    The git credential is removed.
  6. Close the Credential Manager.

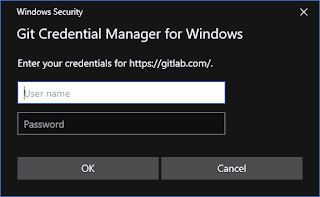
Now, running any git command to access the repository will cause Windows to pop up a dialog box to enter the login and pasword, as shown below.
Entering the correct login and password will allow the git command to be executed successfully.


Monday, September 9, 2019

How to emulate a Raspbian OS in QEMU on Windows 10

I wanted to test out developing for a Raspberry Pi on a Windows 10 PC platform running an emulated Raspbian OS. After trying out a few methods to get  the emulator running, I settled on the following procedure.

Install QEMU for 64-bit Windows 10
  1. Go to the following web site https://www.qemu.org/download/ and download the latest QEMU installer for Windows 64bit.
  2. Run the installer.

    The QEMU executable files are installed, e.g. C:\Program Files\qemu\
Download a Linux kernel
  1. Go to the following web site https://github.com/dhruvvyas90/qemu-rpi-kernel and download a suitable kernel, e.g. kernel-qemu-4.4.34-jessie.
  2. Place the kernel file in a folder e.g. D:/Temp/raspbian/kernel-qemu-4.4.34-jessie
Download an Raspbian OS image
  1. Go to the following web site http://downloads.raspberrypi.org/raspbian/images/ and download the latest image e.g. 2019-06-20-raspbian-buster.zip
  2. Unzip the image file into a folder, e.g. D:/Temp/raspbian/2019-06-20-raspbian-buster.img

Create a Windows bat file
  1. Run a text editor.
  2. Type in the following lines.

    "c:\Program Files\qemu\qemu-system-arm.exe" ^
    -kernel kernel-qemu-4.4.34-jessie ^
    -cpu arm1176 ^
    -m 256 ^
    -M versatilepb ^
    -serial stdio ^
    -append "root=/dev/sda2 rootfstype=ext4 rw" ^
    -hda 2019-06-20-raspbian-buster.img ^
    -net nic ^
    -net user,hostfwd=tcp::5022-:22 ^
    -no-reboot


    Note: rename the kernel and image file names (in bold) to match the downloaded file names accordingly.

  3. Save as a bat file e.g. run_raspbian.bat and close the editor.
Run QEMU
  1. Open up a Command Prompt.
     
  2. Change directory to the folder containing the kernel and image files e.g. D:/Temp/raspbian.
  3. Type in the command:

    D:\> run_raspbian.bat


    The QEMU window appears running Raspbian OS

Monday, July 15, 2019

Setup an Ubuntu VM instance on a Windows host for remote ssh access

An Ubuntu VM VirtualBox instance running as a guest OS on a Windows host can be remotely accessed via the secured ssh shell but the VirtualBox and the host OS must be configured to allow the networking traffic to pass through the ssh ports. The basic steps are: (a) to configure the Windows firewall, (b) to configure the port forwarding in Oracle VirtualBox, and (c) to install and setup the ssh server on the Ubuntu instance.

Open up the Windows firewall for Oracle VirtualBox
  1. In Windows, search for the Windows Defender Firewall with Advanced Security App and open it.


  2. Select Inbound rules. Check the VirtualBox Manager rules and if they are not enabled, double click and enable the rules.
Forward the TCP ssh ports to the Ubuntu VM
  1. Start Oracle VirtualBox.


  2. Select the Ubuntu VM, e.g. Ubuntu19. Click Settings. Then click Network.


  3. Click Port Forwarding.


  4. Click the Plus icon. Add in a new rule for Ssh with the Host Port set to 3022 and the Guest Port set to 22.

    Note: 3022 would be the port number to use to remotely access the Ubuntu VM.
  5. Click OK to all the dialog boxes.
Install openssh-server on the Ubuntu VM
  1. In Oracle VirtualBox, start the Ubuntu VM, e.g. Ubuntu19.
  2. Optional. If the openssh-server is not installed, then open up a Terminal and run the following command.

    $ sudo apt install openssh-server


  3. After the installation is completed, either reboot or restart the ssh service with the following command.

    $ service ssh restart

Remote access via ssh
  1. On a remote PC, open up a Terminal.
  2. Type in the following command to connect to the remote Ubuntu VM instance.

    $ ssh 192.168.8.157 -p 3022

    Note: where 3022 is the port number and 192.168.8.157 is the example IP address of the Windows PC hosting the Ubuntu VM instance.
    The ssh prompt appears.

Monday, June 24, 2019

How to setup a VirtualBox Ubuntu virtual machine on a Windows 10 computer for remote desktop access

An Oracle VirtualBox virtual machine (VM) can be accessed from a remote Windows 10 computer through the remote desktop protocol (RDP) as if it were running locally on the local desktop. But this is not enabled by default; to allow remote desktop connections, the VM's remote display parameters must be set and enabled. The following steps show how this can be done.

Setting up a VM on the remote PC for remote access
  1. On the remote Windows 10 PC, start Oracle VirtualBox.

  2. In the list of virtual machines, select a VM, e.g. Ubuntu19. Click Settings.

    The Settings dialog box appears.
  3. Click Display and then the Remote Display tab.
  4. Toggle on the Enable Server field. In the Server Port field, type in an unused port e.g. 5000. Click OK.
  5. Click the black drop down arrow on the Start icon and choose Start Headless Start.


    The Virtual machine is started without displaying any windows.

Connecting to the remote VM from a local PC
  1. Now on a local PC e.g. an Ubuntu 18.04, start up a RDP client e.g. Remmina Remote Desktop Client.
  2. Create a new Remote Desktop Profile.

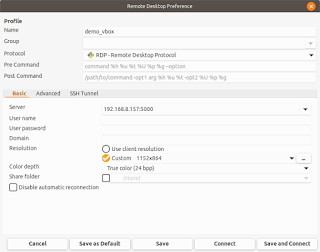
  3. In the Name field, type in a suitable name, e.g. demo_vbox.
  4. In the Protocol field, choose RDP - Remote Desktop Protocol.
  5. In the Server field, type in the IP address and port number of the remote Windows 10 computer, e.g. 192.168.123.123:5000.
  6. Choose an appropriate Resolution and Color depth.
  7. Save and connect to the VM.

    The remote desktop is displayed.

If the remote VM cannot be connected successfully, then it is possible the remote Windows 10 PC's firewall is blocking the network port. To open the port, the following steps can be done.

  1. On Windows 10, click the Start button and then the Settings icon.

    The Settings dialog box appears.
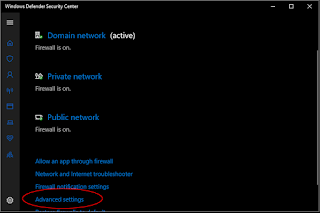
  2.  Click Windows Security. Click Firewall and network protection.

  3. Scroll down and click Advanced settings.

    The Windows Defender Firewall with Advanced Security on Local Computer dialog box appears.
  4. Click Inbound Rules.

  5. Scroll down and ensure the vboxheadless rule exists and enabled. If not create a new rule and enable the selected port e.g. 5000.

Monday, November 23, 2015

Display sample data in Visual Studio's Designer using simple data binding

In Visual Studio, when designing the graphical user interface using XAML, it would be nice to see the screen filled with sample data rather than a blank spot as shown in the example screenshot below.

In order to get the Designer to show some sample data, you have to create a few view model item and collection classes, as well as a sample data XAML. Then link up the sample data with the graphical page XAML using bindings. In this example, only a simple one way binding will be shown to illustrate the steps in getting the Designer to display some sample data.

Create a view model item class
In Visual Studio, create a new class that represents an object with properties that you want to display in the Designer, e.g. a PersonItemViewModel class with ID and FirstName properties in the project's ViewModels folder.

namespace Solarizr.ViewModels
{
    public class PersonItemViewModel
    {
        public string Id { get; set; }
        public string FirstName { get; set; }
    }
}


Create a view model collection class
To contain one or more Person items in a list, create a collection class e.g. PeopleViewModel in the project's ViewModels folder. Note that the name PeopleCollection used here will be used later in the Page XAML binding source definition.

using Solarizr.Models;
using System;
using System.Collections.Generic;
using System.Collections.ObjectModel;
using System.ComponentModel;
using System.Linq;
using System.Text;
using System.Threading.Tasks;

namespace Solarizr.ViewModels
{
    public class PeopleViewModel
    {
        public PeopleViewModel()
        {
            this.PeopleCollection 
                = new ObservableCollection<PersonItemViewModel>();
        }

        public ObservableCollection<PersonItemViewModel> PeopleCollection { get; set; }
    }
}

Create a XAML with sample data
With the PersonItemViewModel and PeopleViewModel collection class definitions created, the next thing to do is to create a XAML file populated with some sample data you want to display in the Visual Studio Designer. In the XAML file, it is important to add in a namespace xmlns declaration to the PersonItemViewModel and PeopleViewModel view model classes. In the code listing below, it is vm pointing to "using:Solarizr.ViewModels". The sample data XAML can be created in the project's SampleData folder. In this sample, 3 records are defined - David, John and Mary.


<vm:PeopleViewModel
    xmlns="http://schemas.microsoft.com/winfx/2006/xaml/presentation"
    xmlns:x="http://schemas.microsoft.com/winfx/2006/xaml"
    xmlns:vm="using:Solarizr.ViewModels"
    >

    <vm:PeopleViewModel.PeopleCollection>
        <vm:PersonItemViewModel Id="1" FirstName="David" />
        <vm:PersonItemViewModel Id="2" FirstName="John" />
        <vm:PersonItemViewModel Id="3" FirstName="Mary" />       
    </vm:PeopleViewModel.PeopleCollection>
    
</vm:PeopleViewModel>

Add in the view models to the Page XAML
Now with the sample data XAML created, the next step is to edit the Page XAML using the Visual Studio Designer and editor and add in the namespaces and bindings.

  1. In the Page XAML file, add in the view models namespace.

    xmlns:vm="using:Solarizr.ViewModels"
  2. Add in the sample data namespace.

    xmlns:sampleData="using:Solarizr.SampleData"
  3. Add in a design time data context and point it to the sample data.

    d:DataContext="{d:DesignData ../SampleData/PeopleViewModelSampleData.xaml }"
  4. Add in the data source to a list control's items e.g. ListView.

    ItemsSource="{Binding Path=PeopleCollection, Mode=OneTime}"
>

  • Add in the individual item control's binding field.

    Text="{Binding Path=FirstName}"
  • Width="80" Margin="10" />

    The Designer should now display the sample data from the binding as shown in the screenshot below.

    Monday, November 2, 2015

    Resolving a Visual Studio uninstallation that takes forever

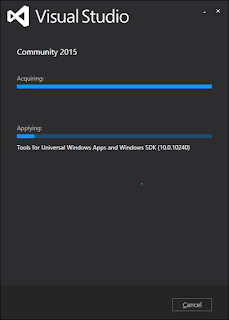
    In some cases, uninstalling Visual Studio may seem to take a long time (as in days) with some cryptic messages about "Applying something" and a looping ball animation as shown in the screenshot below.
    If you are in this situation, open up the Windows Task Manager and examine the Disk activity. If the disk activity is minimal, it means the uninstaller is not doing anything and waiting for something.

    I found out that the uninstaller will not be able to proceed if the anti-virus software AVG is enabled and running on the system. It seems that AVG will hold onto some files needed by the uninstaller and the installer will wait endlessly for the files to be released. There is no timeout and there is no error messages displayed in the uninstaller.

    1. So to resolve the situation, simply disable AVG temporarily.


    2. Run the Visual Studio uninstaller again.
    3. Optional. Run Task Manager and show the Disk activity.

      The disk activity should be high.

    4. Visual Studio should be successfully removed within a reasonable amount of time now.