Showing posts with label Inkscape. Show all posts

Monday, August 26, 2019

Creating faux square Android Navigation Drawer icons

The Navigation drawer widget in Android can display vector SVG icons, but if the vector icons are non-rectangular, Android will distort the dimensions to force them into squares. This can be seen in the screenshot of the Hawaii flag icon below.


It is possible to extend the drawer by code to display non-rectangular icons but I prefer to adjust the SVG icon instead. The way I did it was to change the page size to a square and then placing a transparent square box around the page. The following steps illustrate:

Change the page to a square
  1. Open up the SVG icon in Inkscape.


  2. Select File | Document Properties.


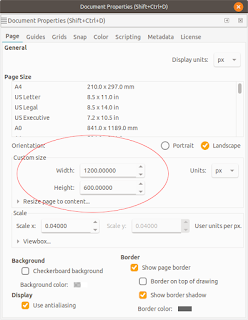
    1. Under the Page tab, change the Width and Height to be equal e.g. 1200 x 1200 px. Close the dialog box.

      The page display changes to a square.

  3. Using the Align and Distribute tools, align the graphics to the middle of the page.


Create a transparent square
  1.  Next, click the Create rectangles and squares (F4) icon. Place a stroke only, no-fill rectangle on the page.


  2. Change the width and height of the rectangle to match the page dimensions e.g. 1200 by 1200 px.


  3. Change the origin to the upper left corner of the page, e.g. X=0, Y=0.

  4. Open the Fill and stroke pane. Change the stroke opacity to low or zero opacity, e.g. 0.


  5. Save the file.
Import the SVG vector icon into an Android drawable icon
  1.  In Android Studio, right click on the /path/to/app/res/drawables folder and choose New | Vector Asset.


  2. Toggle on Local File (PNG, SVG). Choose the new SVG icon file from the previous section.
  3. Click Next. Click OK.

    The drawable is created.
Using this new icon, the Navigation drawer can now display the icon seemingly with the correct proportions, as shown below.

Monday, February 22, 2016

How to prevent vector graphics from becoming a raster image while doing a Copy and Paste operation in Inkscape

While using Inkscape on a Macbook, I found that copying and pasting a group of vector graphic elements within Inkscape will convert the vector group into a bitmap image after the paste operation. This may be a problem if I wanted to manipulate the vector elements individually. The problem is shown in the screenshot below - see the circled part of the status bar indicating that the selected graphic is an image with a certain resolution.

To get Inkscape to paste as vector elements, the following steps should be done:

  1. In MacOSX, activate the XQuartz application. Then select XQuartz | Preferences.


    The XQuartz Preferences dialog box appears.


  2. Click Pasteboard tab. Toggle off Update Pasteboard when CLIPBOARD changes.


  3. Close the dialog box.
From then on, copying and pasting group of vector elements will no longer result in a conversion of the elements to a bitmap image, as shown in the screenshot below. 


Monday, November 10, 2014

SVG template for creating Android Material Design product icons

Android Material Design has some guidelines for developers and designers to create product icons that reflect brand identity, as described in detail on this site http://www.google.com/design/spec/style/icons.html#icons-product-icons. As part of these guidelines, product icons can be based on certain keyline shapes in order to "maintain a consistent visual proportion across related product icons."

These keyline shapes include:

  • square
  • circle
  • vertical rectangle
  • horizontal rectangle. 

I did not find any downloadable resources of the keyline shapes to base the creation of new Android icons, so I created my own template in SVG format, at 4 times 48 pixels size, i.e. 192 pixels. The template looks as shown in the screenshot of Inkscape below.


Each keyline shape is placed on a separate layer.

Simply toggle on the desired keyline shape e.g. Horizontal rectangle in order to use it as a guide in creating new icons.


The SVG template can be downloaded from this site https://www.dropbox.com/s/3fhijfrf3zipnjm/mat_dgn_icon_template.svg?dl=0 if you want to use it.

Monday, August 25, 2014

Using Android L Material Design color palette swatches in Inkscape

In the previous post, I showed how to import the upcoming Android "L" Material Design color palettes for styling Android apps into Gimp. The palette swatches can be downloaded from http://www.google.com/design/spec/style/color.html and used in Adobe Illustrator and Adobe Photoshop. If you want to import and use the swatches in the free and open source vector drawing software Inkscape, the following must be done:

  • Import the swatches into Gimp palette files, as described in the previous post. 
  • Then copy the imported Gimp palette files into Inkscape's palettes folder. 
 More details are below on how to copy the palette files into Inkscape, assuming they have been imported into Gimp.

  1. Using the Windows Explorer, browse and locate the imported Gimp palette files, e.g. C:\users\xxx\.gimp-2.8\palettes\.

    Note: xxx is the log in user name.
  2. In Windows Explorer, select the two *.gpl files. Press CTRL-C.
  3. In Windows Explore, browse to the Inkscape palette folder, e.g. C:\Program Files (x86)\Inkscape\share\palettes\.

  4. Press CTRL-V.

    The two files are copied into the palette folder.
  5. Start Inkscape.

  6. In the bottom right, next to the horizontal color palette boxes, click the black arrow icon.

    A pop up menu appears.
  7. Choose one of the Material Design palette, e.g. Material Expanded Palette.aco.

    The selected color palette preview is updated.
  8. Now you can use any of the Material Design colors. Click on one of the colors to use for styling vector drawing elements.

Monday, May 26, 2014

QGIS Export layers to SVG for cartographic editing in desktop publishing software

If there is a need to manipulate QGIS map layers for cartographic publishing purposes in vector editing software like Adobe Illustrator or the free and open source software Inkscape, there is a plugin - Simple SVG for that. The plugin is not perfect but it gives you probably enough to work on.

If the plugin is not installed in QGIS, simply run select Plugins | Manage and install Plugins... Then search for SimpleSvg, as shown below. Once located, just install it. There will be a Web pull down menu and an SVG icon in the tool bar.


  1. Using SimpleSvg is simple. Just display the layers you want to export to SVG. Resize the map view until you are happy with the extent.


  2. Then select Web | Save as SVG | Save as SVG.

    The SimpleSvg dialog box appears.

  3. Type in the output SVG file path and name.

    Note: On Windows, clicking the browse button will cause a Python error. So just key in the output file path and name.

  4. Click OK.

    The SVG file is created.

  5. Open the resultant SVG file in a vector editing software such as Inkscape. Further cartographic editing can now be done on the resultant vector graphics.


    Note: There is a bounding box feature in the resultant layer named qgisviewbox.
    Each map feature is placed in its own layer, e.g. waterbody.
    Each map feature is grouped together
    .


Monday, June 4, 2012

Create a camera calibration chess board pattern PDF file

For calibrating a camera to calculate its intrinsic parameters e.g. focal length, principal point and distortion, some camera calibration toolboxes make use of images of chessboard patterns taken with the camera. One such toolbox is this open-source software from this site http://graphics.cs.msu.ru/en. To create this calibration chess board pattern, there are a variety of methods that can be employed to generate it.


In this post, I shall use the free and open-source vector illustration software Inkscape to create an A4 sized 8x3cm by 6x3cm tiles calibration pattern. Inkscape can be downloaded from this site http://inkscape.org.

  1. Start Inkscape.

  2. Select File | Document Properties.

    The Document Properties dialog box appears.
  3. In the Page Size list box, select A4. In the Default Units field, choose cm. Close the Document Properties dialog box.
  4. In the toolbox, click the Create rectangles and squares icon.
  5. Click and drag out a rectangle on the page.

  6. In the Change W and H fields, type in 3.
  7. In the toolbox, click the Select and transform objects icon.

  8. Select Edit | Copy.
  9. Select Edit | Paste. Repeat to paste the square two more times.

  10. Change the fill color of two squares to black. Change the fill color of two squares to white.

  11. Click the Select and transform objects icon and select all squares.
  12. Select Object | Rows and Columns.

    The Rows and Columns pane appears.
  13. Ensure the Rows and Columns are set to 2. Ensure the Set spacing is 0. Click Arrange.

    The squares are rearranged.
  14. Ensure all the squares are selected. Select Object | Group.

    All the squares are grouped as a single object.
  15. Select Edit | Copy.
  16. Select Edit | Paste. Repeat 10 more times to place a total of 48 (3x4x4) tiles.
  17. Press CTRL-A.

    All the tiles are selected.
  18. Select Object | Rows and Columns if the Rows and Columns pane is not displayed.

    The Rows and Columns pane is displayed.
  19. In the Rows field, type in 4. In the Columns field, type in 3. Click Arrange.

    The calibration chess board pattern is complete.
  20. Select File | Save As.

    The Select file to save to dialog box appears.
  21. In the Save as type field, choose Portable Document Format (*.pdf). Browse and type in a file name e.g. calib.pdf. Click Save.

    The file is saved.